Here I am again, but at least it proves I’m working hard to get Murial finished.
Today I present to you a problem with the SU fuel pump from a 57 948 engine.
After inspection it appeared that the part that shuttles up and down inside the main barrel was seized. I’ve managed to free it off, but have a problem where I cannot undo the part at the bottom in the photo. I’ve removed the leather cover to try and gain more access, but the big washer looking thing spins freely, but the smaller part in the middle (which looks like a nut, but isn’t, won’t move and my grips just won’t grip it.
Any help or advice to get this apart please?
https://photos.app.goo.gl/dkcH9FMoVFrArsph9
SU Fuel pump - part stuck
Forum rules
By using this site, you agree to our rules. Please see: Terms of Use
By using this site, you agree to our rules. Please see: Terms of Use
-
MsRose

- Minor Fan
- Posts: 159
- Joined: Wed Feb 12, 2014 1:21 pm
- Location: Worcestershire
- MMOC Member: Yes
SU Fuel pump - part stuck
https://www.facebook.com/groups/1309792820116561 Muriel's Facebook Page 
-
svenedin

- Minor Legend
- Posts: 3129
- Joined: Fri Aug 29, 2014 9:27 am
- Location: Surrey
- MMOC Member: Yes
Re: SU Fuel pump - part stuck
What you are describing is the diaphragm. It is made of a rubber type material and it has a central metal disc to which a rod is attached. That rod goes all the way through the body of the pump and threads into the contact breaker assembly at the top of the pump.
Take off the top cover of the pump and you will see that the end of the rod is threaded into the brass contact breaker assembly. Spray release agent over the end of the rod where it is threaded in. Now try to undo the central disc of the diaphragm by unscrewing it anticlockwise.
Stephen
Take off the top cover of the pump and you will see that the end of the rod is threaded into the brass contact breaker assembly. Spray release agent over the end of the rod where it is threaded in. Now try to undo the central disc of the diaphragm by unscrewing it anticlockwise.
Stephen
1969 1098cc Convertible “Xavier” which I have owned since 1989.
Stephen
Stephen
-
svenedin
- Minor Legend
- Posts: 3129
- Joined: Fri Aug 29, 2014 9:27 am
- Location: Surrey
- MMOC Member: Yes
Re: SU Fuel pump - part stuck
Here is the end of the diaphragm operating rod threaded in to the contact breaker rocker assembly. The alternative method is to strip down the top of the pump and unscrew the rocker assembly from the diaphragm rod BUT you need to be sure you will know how to put it all back together again. I did recommend the SU Workshop Manual......
- IMG_1874.jpeg (2.14 MiB) Viewed 4726 times
1969 1098cc Convertible “Xavier” which I have owned since 1989.
Stephen
Stephen
-
MsRose
- Minor Fan
- Posts: 159
- Joined: Wed Feb 12, 2014 1:21 pm
- Location: Worcestershire
- MMOC Member: Yes
Re: SU Fuel pump - part stuck
Thank you, it’s so helpful. I’ve left the top soaking in release oil. I tend to take lots of photos so that i know where it all goes on re assembly.svenedin wrote: ↑Sat Apr 26, 2025 5:34 pm Here is the end of the diaphragm operating rod threaded in to the contact breaker rocker assembly. The alternative method is to strip down the top of the pump and unscrew the rocker assembly from the diaphragm rod BUT you need to be sure you will know how to put it all back together again. I did recommend the SU Workshop Manual......
IMG_1874.jpeg
I’m going to order the rebuild kit for it as soon as I can get that rod undone. I didn’t think that id be able to free it all off.
https://www.facebook.com/groups/1309792820116561 Muriel's Facebook Page
-
geoberni

- Minor Legend
- Posts: 4428
- Joined: Fri Aug 04, 2017 11:19 am
- Location: North Leicestershire
- MMOC Member: Yes
Re: SU Fuel pump - part stuck
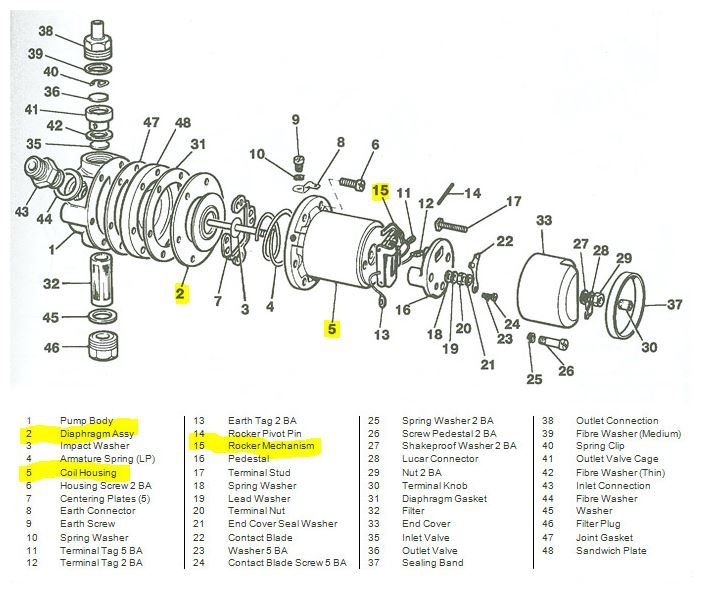
I did post you an exploded view diagram, this one, on the Windtone Horn topic, where you first mentioned the fuel pump...
.
Where I explained that (2) has to be unscrewed from (15).
It's worth watching this Tony Hillyard Video about rebuilding the Pump:
https://youtu.be/oU5uLjuOQdM
It's better than many offerings with the exception that about 12:30 point, he reuses the old plastic clip rather than using the new brass discs, because basically the plastic clip is easier to fit and he "has no idea why they changed it".
Well I can tell everyone that.
SU Pumps originally used the set of brass discs.
They tried replacing them with a nylon clip item, no doubt to save money over brass discs.
But after some years, they've gone back to the original brass discs, because thy do the job better than the nylon clip.
I got that information a few years ago, from an engineer at SU, when I phoned them about some Pump issues.
Make sure you order the correct rebuild kit, as per the SU website, check the Earth connection Screw size.
You want a kit for an LP Pump, not an HP (The HP Kit looks the same, but basically has a stronger Spring).
A pre-1985 LP pump has a 2BA earth screw, the same size head as the other screws holding the pump together.
A post '85 LP pump has a 4BA earth screw.
Basil the 1955 series II

-
MsRose
- Minor Fan
- Posts: 159
- Joined: Wed Feb 12, 2014 1:21 pm
- Location: Worcestershire
- MMOC Member: Yes
Re: SU Fuel pump - part stuck
geoberni wrote: ↑Sat Apr 26, 2025 6:16 pm I did post you an exploded view diagram, this one, on the Windtone Horn topic, where you first mentioned the fuel pump...
.
Where I explained that (2) has to be unscrewed from (15).
It's worth watching this Tony Hillyard Video about rebuilding the Pump:
https://youtu.be/oU5uLjuOQdM
It's better than many offerings with the exception that about 12:30 point, he reuses the old plastic clip rather than using the new brass discs, because basically the plastic clip is easier to fit and he "has no idea why they changed it".
Well I can tell everyone that.
SU Pumps originally used the set of brass discs.
They tried replacing them with a nylon clip item, no doubt to save money over brass discs.
But after some years, they've gone back to the original brass discs, because thy do the job better than the nylon clip.
I got that information a few years ago, from an engineer at SU, when I phoned them about some Pump issues.
Make sure you order the correct rebuild kit, as per the SU website, check the Earth connection Screw size.
You want a kit for an LP Pump, not an HP (The HP Kit looks the same, but basically has a stronger Spring).
A pre-1985 LP pump has a 2BA earth screw, the same size head as the other screws holding the pump together.
A post '85 LP pump has a 4BA earth screw.
Amazing stuff, thank you. I’m
Sorry I didn’t notice the fuel pump diagram on the horn post.
I happened to come across the you tube video you mentioned and it helped me no end. I’ve kept all the brass discs ready for the rebuild. Thank you the clarity on the rebuild kit too.
Honestly, you guys are amazing on here!
https://www.facebook.com/groups/1309792820116561 Muriel's Facebook Page
-
svenedin
- Minor Legend
- Posts: 3129
- Joined: Fri Aug 29, 2014 9:27 am
- Location: Surrey
- MMOC Member: Yes
Re: SU Fuel pump - part stuck
Great. When you come to rebuild the pump have a nice clean area to work at. It is best done sitting at a table with a white tea towel to work on or workbench with good lighting. The tea towel is to reduce the risk of losing small parts and to make them easier to spot. It is important to note very carefully where everything goes for instance the nut with a concave surface which goes with the tiny lead washer. This is a precision piece of equipment that is very fussy about having the right set-up. The rebuild kit will come with an electronic component that is designed to reduce arcing at the points. It is arcing that destroys the points over time. That component will not fit properly with an old flat-top cap. It needs either a hump top or stepped top cap. It is strongly advised that you do fit the arc-suppressor component to avoid problems later on. You will need a set of feeler gauges, ideally Imperial and a 2BA spanner is useful but a small adjustable will do (a set of BA spanners is useful for the car generally, there are quite a few BA fixings). A good ordinary flat blade screwdriver that actually fits the screw properly is also important. Nothing looks more amateurish than marred screws and the screws to the pump body need to be very tight! (my grandfather was a clockmaker/watchmaker). Take care with the pedestal screws as the Bakelite pedestal will crack if they are overtightened ( it is brittle).
Don't panic if something goes a bit wrong. Every single part is available from Burlen.
The stepped top caps are bakelite whereas the hump top caps are some other type of plastic. The stepped top caps look more original.
https://sucarb.co.uk/su-fuel-pumps-spar ... -caps.html
Stephen
Don't panic if something goes a bit wrong. Every single part is available from Burlen.
The stepped top caps are bakelite whereas the hump top caps are some other type of plastic. The stepped top caps look more original.
https://sucarb.co.uk/su-fuel-pumps-spar ... -caps.html
Stephen
1969 1098cc Convertible “Xavier” which I have owned since 1989.
Stephen
Stephen
-
MsRose
- Minor Fan
- Posts: 159
- Joined: Wed Feb 12, 2014 1:21 pm
- Location: Worcestershire
- MMOC Member: Yes
Re: SU Fuel pump - part stuck
Thank you.
After leaving the rod to soak I managed to get it undone from the top.
I’ve given everything a clean and it’s all placed safely in a tub. I shall loosely put it back together in the morning, just in case the kit takes longer to arrive than my memory can serve me
After leaving the rod to soak I managed to get it undone from the top.
I’ve given everything a clean and it’s all placed safely in a tub. I shall loosely put it back together in the morning, just in case the kit takes longer to arrive than my memory can serve me
https://www.facebook.com/groups/1309792820116561 Muriel's Facebook Page
-
geoberni
- Minor Legend
- Posts: 4428
- Joined: Fri Aug 04, 2017 11:19 am
- Location: North Leicestershire
- MMOC Member: Yes
Re: SU Fuel pump - part stuck
No problem, it's easy to miss things on here unless you've been quoted like thisMsRose wrote: ↑Sat Apr 26, 2025 7:14 pm
Amazing stuff, thank you. I’m
Sorry I didn’t notice the fuel pump diagram on the horn post.
I happened to come across the you tube video you mentioned and it helped me no end. I’ve kept all the brass discs ready for the rebuild. Thank you the clarity on the rebuild kit too.
Honestly, you guys are amazing on here!
I'd just support Stephen's comment about the pedestal screws, I have a small collection of pumps I've brought from ebay for overhaul and a couple of them have cracked pedestals.
Also about having a Spark Suppressor fitted. They really 'do the job'.
Reassembly of the pump is something to be quite fastidious about, and it should then work first time without leaks.
Basil the 1955 series II