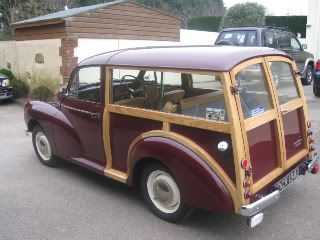
Resto of 1968 Traveller 'Hilda'

Let us all know what you are up to with your current restoration project. Get that Minor on the road!
Forum rules
By using this site, you agree to our rules. Please see: Terms of Use
Post Reply
southerly95
Minor Fan
Posts: 376
Joined: Sun Oct 29, 2006 10:52 pm
Location: North Norfolk
MMOC Member: No

Resto of 1968 Traveller 'Hilda'

Post by southerly95 »

Having struggled to get my daughter's Traveller through the MOT last year felt I should sort it properly while she is away at Uni at UCL. I have asked members several q's about starting this project and this is progress so far. I have not been able to find pics of a complete inner wing replacement and will be including some of those pics as a record.
Examining the woodwork I found lots of rot - see 2 pics below, one where a previous owner had cut some wood in as a patch.

[frame]Image[/frame]

[frame]Image[/frame]

I thought I would start where I had found a hole in the o/s inner rear wing - as I raked out the rust the hole got bigger until eventually I had to remove the whole of the inner wing - the flange which joins to the woodwork had rusted through and had separated so there must have been very little structural strength to the car. Next 2 pics show the state of the wing.

[frame]Image[/frame]

[frame]Image[/frame]

The pic below shows the chassis mid section with evidence of brazing and several layers of metal. The floor the other side of the chassis was also holed by rust in a strip all the way down to the strengthening box section at the rear of the floors.

[frame]Image[/frame]

More to follow ....
[sig]4918[/sig]
southerly95
Minor Fan
Posts: 376
Joined: Sun Oct 29, 2006 10:52 pm
Location: North Norfolk
MMOC Member: No

Resto of 1968 Traveller 'Hilda' - number 2

Post by southerly95 »

The next pic shows the rear of the chassis rail where I had cut the rust away. I made a mistake here probably by removing all of the lower section – the rest was strong but had several layers of metal and there was separation between the floor and chassis rail and felt it would be better to start afresh – see 2nd pic showing the separation. 3rd pic below shows the floor re-welded to the chassis.

[frame]Image[/frame]

[frame]Image[/frame]

[frame]Image[/frame]

The forward section of the chassis looks like this in the pic below – fragile at best!

[frame]Image[/frame]

The next 5 pics show the restoration of the chassis rail. My first attempts at fabricating – the internal strengthening section for the bump stop and my first attempt at welding. Note the probably over-zealous addition of strengthening patches inside the chassis - just in case!

[frame]Image[/frame]

[frame]Image[/frame]

[frame]Image[/frame]

[frame]Image[/frame]

You can just see the new bump stop in place with a small patch welded to it to keep the water out. I have to say fitting these bits were the most difficult thing because the new area of floor I had put in above it was convex to match to the curves of the chassis and floor. You can just see the head of a bolt I used to hold it in position on the 1st pic of this group. Much bad language during this phase! No pics of the floor patching or of the underside will do those later. Anyway at this stage the inner wing is ready to be glued on – it has taken me 2 months from mid Jan to mid March and approx 100 hours, unbelievables ….
[sig]4918[/sig]
chickenjohn
Minor Legend
Posts: 4064
Joined: Tue Dec 07, 2004 8:50 am
Location: Margate, East Kent
MMOC Member: No

Re: Resto of 1968 Traveller 'Hilda'

Post by chickenjohn »

Hello Southerly, I would recommend you go on a restoration, or at least a welding course. With all due respect, from the welding inside the chassis member I feel the restoration of this car would benefit greatly from you seeking some instruction.

I hope the car is supported front and rear and is level and that the boot floor is supported in several places. Travellers can get very weak here when the inner wing and rear chassis legs are cut out.
Cheers John - all comments IMHO
- Come to this years Kent branches Hop rally! http://www.kenthop.co.uk
(check out the East Kent branch website http://www.ekmm.co.uk )
ImageImage
MarkyB
Minor Maniac
Posts: 7845
Joined: Thu Jan 25, 2007 3:18 pm
Location: South East London
MMOC Member: No

Re: Resto of 1968 Traveller 'Hilda'

Post by MarkyB »

That's some ugly bodging on the woodwork too, the waist rail repair would need to be a lapped joint to maximise the surface area for the glue.
Woodwork isn't welding, if done right it would have been fine.

"Once you break something you will see how it was put together"
southerly95
Minor Fan
Posts: 376
Joined: Sun Oct 29, 2006 10:52 pm
Location: North Norfolk
MMOC Member: No

Re: Resto of 1968 Traveller 'Hilda'

Post by southerly95 »

Thanks for replies, it was difficult to decide whether to scrap this vehicle or not but I didn't like the idea of losing another Traveller to parts and scrap plus my daughter would have been mortified! I've got the hang of welding now and improving rapidly - I will be the first to admit my first attempts were pretty awful. Sadly no courses are available this side of the world but would have done this if they were. All advice is welcome so don't hold back :)

Chickenjohn - the car was/is level when measured side to side at the rear seat box section and the rear rail. The car was supported behind and in front of the tank and under both front spring hangers although you can't see much of that in the pics. I had to let the floor drop an inch or so to clean out between the under side of the chassis rail and the floor so as to get a good weld - which is where you might be thinking it may have been unsupported. You are right the floor is fragile and has to be treated with care - I left the tank in for that reason but that will come out when I replace the rear bootwell panel.

Regards, John
[sig]4918[/sig]
Ratbag

Re: Resto of 1968 Traveller 'Hilda'

Post by Ratbag »

That welding is truly awful, dangerous even.
I'd cut it out & start again - I believe that these chassis sections are available (?) so no need to bodge.

Phil.
chickenjohn
Minor Legend
Posts: 4064
Joined: Tue Dec 07, 2004 8:50 am
Location: Margate, East Kent
MMOC Member: No

Re: Resto of 1968 Traveller 'Hilda'

Post by chickenjohn »

Ratbag wrote:That welding is truly awful, dangerous even.
I'd cut it out & start again - I believe that these chassis sections are available (?) so no need to bodge.

Phil.
I agree with Ratbag, now you've said we are not to hold back! Cut it all off, learn to weld and fabricate properly and repair it again properly with butt welded repair sections of the right gauge. The work inside that chassis member looks neither strong nor long-lasting. I expect some of the patches would come off with a quick blow from a hammer and chisel :(

I would advise not to fit the inner wing until the chassis leg has been properly repaired.
Cheers John - all comments IMHO
- Come to this years Kent branches Hop rally! http://www.kenthop.co.uk
(check out the East Kent branch website http://www.ekmm.co.uk )
ImageImage
User avatar
ptitterington
Minor Fan
Posts: 391
Joined: Thu May 12, 2005 9:59 pm
Location: Jersey Channel Islands
MMOC Member: No

Re: Resto of 1968 Traveller 'Hilda'

Post by ptitterington »

Do your daughter a favour and tell her someone stole the car. Then take it to the dump and find a less dangerous hobby!

If you are serious about restoring the Traveller read this thread from start to finish. http://www.mmoc.org.uk/viewtopic.php?f=28&t=25298
Ok the man is a genius but is showing how this work should be done properly. If you can honestly say that you posess less than 25% of this mans skills, then dont attempt the work.
Traveller rebuilt in 2007 by Charles Ware's Morris Minor Centre
Pickup Fully restored 2011 by Rich Legg

ImageImage

http://WWW.minor1000.com
http://www.morrisowners.co.uk/
Image
chickenjohn
Minor Legend
Posts: 4064
Joined: Tue Dec 07, 2004 8:50 am
Location: Margate, East Kent
MMOC Member: No

Re: Resto of 1968 Traveller 'Hilda'

Post by chickenjohn »

Yes, Taupe is very good- he also went on a restoration course and his skill level clearly shows!
Cheers John - all comments IMHO
- Come to this years Kent branches Hop rally! http://www.kenthop.co.uk
(check out the East Kent branch website http://www.ekmm.co.uk )
ImageImage
DAVIDMCCULLOUGH
Minor Legend
Posts: 3010
Joined: Sun Sep 09, 2007 10:42 pm
Location: Whiteabbey, Co Antrim
MMOC Member: Yes

Re: Resto of 1968 Traveller 'Hilda'

Post by DAVIDMCCULLOUGH »

I do think you are being rather harsh with southerly95, we all have to start somewhere. Welding and fabrication improves with practice and welding 2 peices of shiney new tin together on a bench is completely different from lying on you back under neath a car trying to weld above your head. Just my opinion as there has obviously been a considerable time and effort put into this work and not just a couple of cover patches quickly slapped on.

If every home restorer is put off from starting work then more cars will go off the road.

I patched up my first minor because I didnt know any better, i thought I was doing it properly but it did teach me to weld and then a couple of years later I removed the patches and repaired it all properly.


Too many Minors so little time.....
chickenjohn
Minor Legend
Posts: 4064
Joined: Tue Dec 07, 2004 8:50 am
Location: Margate, East Kent
MMOC Member: No

Re: Resto of 1968 Traveller 'Hilda'

Post by chickenjohn »

Good point David, However, I'm not trying to dissuade southerly, just point him in the right direction. And that direction is getting some proper skills, then re-doing the work he has already done, this time to proper, strong, safe, long lasting restoration standard.

As it stands at the moment, there will be vital suspension mounting points held on by very poor welding and patching, which could be potentially very dangerous. Imagine of his daughter went round a corner a little too fast and the rear hanger welds gave way, the rear axle fell off- could cause a nasty accident.
taupe
Minor Legend
Posts: 1189
Joined: Sun Oct 26, 2008 3:20 pm
Location: Bucks
MMOC Member: No

Re: Resto of 1968 Traveller 'Hilda'

Post by taupe »

Well on the positive side I think its a lot stronger than it was :D And as David says we all have to start somewhere.

I also think it looks worse than it is because of the 'strengthening' patches added with some rather poor plug welds. These patches are actually more likely to cause corrosion problems later and would be better removed. Repairs to let in new parts of the chassis should all be seam welded which you seem to have done. At the original spot welded seams plug welds are ok as they replicate the original construction.

I would recommend some more off car practice at plug welding... theres a great description of doing this on the MIG welding forum and you should after a little more practice be able to produce good strong plug welds nearly every time :D

The seam welding looks better than your plug welds but again with some more practice you will become adept.... try experimenting with the wire feed rate and power settings on some scrap steel of the same thickness.

From what I can see your approach of doing an area at a time seems sound also :D

Take note of peoples comments even though they may seem a bit harsh and you will soon develop the skills that you need.

Taupe
chickenjohn
Minor Legend
Posts: 4064
Joined: Tue Dec 07, 2004 8:50 am
Location: Margate, East Kent
MMOC Member: No

Re: Resto of 1968 Traveller 'Hilda'

Post by chickenjohn »

Good points, Taupe. I just don't understand the need for the plug welded in patches in this case. If that member is thinner by rust in sections, then cut out those areas and butt weld metal of the same (or slightly thicker) gauge.

As for the Mig- welding.co.uk site, it is the best resource on the internet for the amateur mig welder.

http://www.mig-welding.co.uk/mig-techniques.htm
ASL642
Minor Maniac
Posts: 5200
Joined: Sat Oct 20, 2007 3:14 pm
Location: Warwickshire
MMOC Member: No

Re: Resto of 1968 Traveller 'Hilda'

Post by ASL642 »

If you can't find a welding course near to where you live (we couldn't find any near us) see if there are any messageboard members near where you live who weld and ask if you could "sit in and watch" them - take the tea/biscuits/cans with you. Get hold of a few spare old doors and practice welding.

Lou Rocke
MMOC 43512
1mustard
Minor Fan
Posts: 125
Joined: Wed May 26, 2010 6:45 pm
MMOC Member: No

Re: Resto of 1968 Traveller 'Hilda'

Post by 1mustard »

southerly keep trying and practicing mate,like the others suggest perhaps practice on the bench with scrap also may i suggest you adjust your settings, it looks like you may need more gas and possibly less wire, completely fill the holes when you weld also listen for the crackle, you clearly need more penetration on your welds, it should'nt spit you should get a nice buzzing
noise.
'truly awful' what a thing to say to a complete stranger, and some of the other comments are below the belt, encourage don't destroy someones confidence, advice is helpful.
User avatar
ptitterington
Minor Fan
Posts: 391
Joined: Thu May 12, 2005 9:59 pm
Location: Jersey Channel Islands
MMOC Member: No

Re: Resto of 1968 Traveller 'Hilda'

Post by ptitterington »

I would have to disagree 1mustard, call a spade a spade, if the bloke has done substandard work, tell him. Being all nice and fluffy and hoping for the best wont make a dangerous car safe. I am shocked that the MOT system is so flawed that this car passed last time.
People have offered good advice. Hopefully he will be big enough to go back to the drawing board and write off the 100 hrs as a lesson learned.
I work in construction and am shocked at the dangerous work that some DIYers have done because they saw stuff on the tv and thought they would have a go!
Traveller rebuilt in 2007 by Charles Ware's Morris Minor Centre
Pickup Fully restored 2011 by Rich Legg

ImageImage

http://WWW.minor1000.com
http://www.morrisowners.co.uk/
Image
1mustard
Minor Fan
Posts: 125
Joined: Wed May 26, 2010 6:45 pm
MMOC Member: No

Re: Resto of 1968 Traveller 'Hilda'

Post by 1mustard »

I hear what you are saying mate,i work professionally in the motor trade and i have seen far,far worse that people have paid for!I just thought some of the comments where over the top, i am a tester aswell and if those repairs where seam welded they would be fine for the test, and lets be honest a lot stronger than a load of rot!, clearly its not pretty and wouldn't last as long or be as strong as replacing a whole chassis rail properly, as far as the test goes if the tester can't see it (covered in underseal etc) he can't fail it.
Post Reply