Page 1 of 2
any good before and after restoration pics?
Posted: Tue Aug 04, 2009 10:17 pm
by singleton
Hello all, just wondering if any one has any good before and after pics of there projects? Looking for bit of inspiration!
Posted: Tue Aug 04, 2009 11:27 pm
by Dryad
I've only got 'before' pics so far.....

resto pics
Posted: Tue Aug 04, 2009 11:28 pm
by jonathon
Here are a few of a traveller we built some years ago<br>

<br><br>

<br><br>

<br><br>

<br><br>

<br><br>

<br><br>

<br><br>

<br><br>

<br><br>

<br><br>

<br><br>

<br><br>

<br><br>

<br>
Posted: Tue Aug 04, 2009 11:40 pm
by Dryad
Very useful pics there, Jonathon. How did you support the body of the Traveller when you removed the wood because I need to remove mine to replace the boxing panels, but the restoration book I have says you shouldn't do that until the sills are repaired.
Posted: Tue Aug 04, 2009 11:49 pm
by jonathon
Basically this car required full jigging so we were not to bothered about bracing up the car. It was supported during the strip down, but we essentially started at one corner (front ) and worked our wayacross and back, getting the floor sills A and B posts correct before touching the rear. In the case above the new wood was taped up and bolted to the B post then the doors cross beams and roof added. only then did we build the steelwork to fit the wood. This eliminates any stress on the joints and gave a perfect shell.
We are working on a full body jig at the moment using original patterns for the jigs. Hopefully then we can offer a full chassis check for critical dimensions and maybe retail in knock down form the internal jigs for home restorers.
Posted: Tue Aug 04, 2009 11:58 pm
by Dryad
maybe retail in knock down form the internal jigs for home restorers.
An excellent idea. I think most of us would feel more confident about undertaking structural work if there was such a thing available.
Posted: Wed Aug 05, 2009 9:03 am
by David53
Hopefully this will help with the inspiration. Firstly, stripping down in 2001....
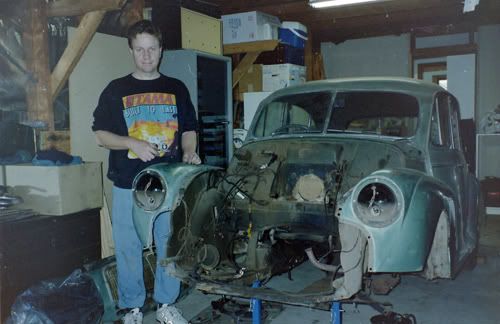
And recently on one of her first runs after completing the resto....

All the best with your project!
Posted: Wed Aug 05, 2009 10:57 am
by pfgiz
Mine were all done 6 years ago in my Dads front garden between March and July. The paint work is now showing signs that it was applied in a garden but I always knew that would happen and I’d need to re-do it again. The Car has not failed an MOT since.
<img src="
http://farm3.static.flickr.com/2482/379 ... 9aee72.jpg" width="500" height="375" alt="Photo00262" />
<img src="
http://farm4.static.flickr.com/3540/379 ... 3d8461.jpg" width="500" height="375" alt="Photo00440" />
<img src="
http://farm3.static.flickr.com/2615/379 ... 19c19e.jpg" width="500" height="375" alt="Photo00275" />
<img src="
http://farm4.static.flickr.com/3524/379 ... 6bba6c.jpg" width="500" height="375" alt="Photo00436" />
<img src="
http://farm4.static.flickr.com/3084/379 ... 3ca1a8.jpg" width="500" height="375" alt="Photo00310" />
<img src="
http://farm4.static.flickr.com/3541/379 ... 42a68d.jpg" width="500" height="375" alt="Photo00429" />
<img src="
http://farm3.static.flickr.com/2588/379 ... 522143.jpg" width="500" height="375" alt="Photo00311" />
<img src="
http://farm4.static.flickr.com/3555/379 ... acacc9.jpg" width="500" height="375" alt="Photo00430" />
<img src="
http://farm4.static.flickr.com/3564/379 ... 03792f.jpg" width="500" height="375" alt="Photo00366" />
<img src="
http://farm3.static.flickr.com/2675/379 ... 40ba1b.jpg" width="500" height="375" alt="Photo00367" />
<img src="
http://farm3.static.flickr.com/2511/379 ... 1566c8.jpg" width="500" height="375" alt="Photo00374" />
<img src="
http://farm4.static.flickr.com/3480/379 ... 1cd0a4.jpg" width="500" height="375" alt="Photo00376" />
<img src="
http://farm4.static.flickr.com/3588/379 ... 635fc8.jpg" width="500" height="375" alt="Photo00382" />
<img src="
http://farm4.static.flickr.com/3582/379 ... d3ee8f.jpg" width="500" height="375" alt="Photo00383" />
<img src="
http://farm4.static.flickr.com/3441/379 ... 97c149.jpg" width="500" height="375" alt="Photo00385" />
<img src="
http://farm3.static.flickr.com/2453/379 ... c214f8.jpg" width="500" height="375" alt="Photo00407" />
<img src="
http://farm4.static.flickr.com/3526/379 ... df6932.jpg" width="500" height="375" alt="Photo00408" />
<img src="
http://farm3.static.flickr.com/2657/379 ... d468f5.jpg" width="500" height="375" alt="Photo00420" />
<img src="
http://farm4.static.flickr.com/3498/379 ... a7bb8a.jpg" width="500" height="375" alt="Photo00458" />
Of all the things to loose in the shed, the top chrome strip.
This was all done on an extremely tight budget as I’d just been made redundant and was between jobs. This also helped with the amount of focus and time available.
Posted: Wed Aug 05, 2009 12:03 pm
by alainmoran
Hehe ... I'm loving the placement of the indicators ... almost like ears

Posted: Wed Aug 05, 2009 2:44 pm
by iandromiskin
Really really good photos there pfgiz. Some excellent ones showing the position of the sills, inner step and floor panels. Thanks.
Posted: Wed Aug 05, 2009 4:21 pm
by pfgiz
alainmoran wrote:Hehe ... I'm loving the placement of the indicators ... almost like ears
They are called 'Pigs Ears' and are Lucas L559. More common on commercials but very eye catching on the saloon.
iandromiskin wrote:Really really good photos there pfgiz. Some excellent ones showing the position of the sills, inner step and floor panels. Thanks.
Thank you, I do have bigger pictures if you’d like to see them..
Posted: Wed Aug 05, 2009 4:50 pm
by iandromiskin
pfgiz wrote:Thank you, I do have bigger pictures if you’d like to see them..
Would I !!!!

Yes please. Perhaps you could PM me a few. Trying to learn to weld so that in time I can do the same to my car and your pics are the best I've seen showing how to do it.
Posted: Wed Aug 05, 2009 6:53 pm
by Dryad
They are called 'Pigs Ears' and are Lucas L559. More common on commercials but very eye catching on the saloon.
I remember seeing them on black Austin taxis up until the early 1980's. Haven't seen any for ages.
Posted: Wed Aug 05, 2009 8:52 pm
by Mogwai
I don't have many digital pictures so here's a couple before & after ones, hope they inspire.
slow progress, already had it about 8-9 years when this was taken

<br>

<br>
then 6years later<br>

<br>
Posted: Sat Sep 26, 2009 11:13 pm
by Dryad
Hey pfgiz, I think I saw your Minor today! I was heading back from Wales via the M54/M6 near Birmingham and saw a Minor just like yours with the 'ears' heading west on the opposite carriageway. Was it you?!!!
Posted: Sat Sep 26, 2009 11:18 pm
by pfgiz
Hi, Yes indeed it was. I popped off the Leyton Buzzard to pick up some glass for my other half. Must have been on my way back.
Posted: Sun Sep 27, 2009 1:44 pm
by Dryad
You have a very distinctive Minor there! Did you see the smoke grey (I think) Minor which had probably overheated in the traffic tailback where the roadworks were? A breakdown truck had just pulled up as I drove past.
Posted: Sun Sep 27, 2009 5:42 pm
by Judge
Well pfgiz, you have certainly shown what can be achieved by the owner/enthusiast when funds are an important consideration. Well done.
Posted: Sun Sep 27, 2009 8:38 pm
by pfgiz
Hi Dryad, Thanks, I think it’s the ears that make her stand out, haven’t seen another saloon with them. Sometimes I wonder about converting her to a soft-top but then remember that the ears are what made me want her in the first place, and the reason my Sister kept her for me, so loosing them won’t happen. Maybe a Webasto, saw one today on a Smoked Grey saloon at a local boot-fair……mmmmmm
I missed the broken down Minor, but did see a nice Trafalgar Blue saloon in Leyton Buzzard, parked up in a yard next to some small steam engines.
Thanks Judge, I would not have been able to do it justice had I not been ferreting things away for years. Got my trafficators and spare ears at Detling Auto jumble in the early 90’s, the break cylinders at Gaydon during the 50’s anniversary show, small bits all mount up and in the end it went together really nicely.
Posted: Sun Sep 27, 2009 9:20 pm
by webbnuts
I've only just started work on my Traveller, but this is my first ever bit of MIG welding! Most of it is quite sounds, just surface rust and general grot removal.<br>

<br>