Page 1 of 2
Floors, under or over the sill section?
Posted: Tue Sep 16, 2008 10:29 pm
by Velocemitch
I'm sure its an old question, but do the floor repair sections tuck under the main inner sill piece or sit above it?.
It looks like everything is design with the floor upstand sitting outside the vertical section of the sill, but something in the back of my mind is telling me otherwise.
Posted: Tue Sep 16, 2008 10:57 pm
by rayofleamington
Saloon:
the original floor sat under the inner step and continues out to the middle of the sill. The outer sill joins here with the boxing plate (vertical piece with holes in it) above the join.
Generally if you fit a replacement floor pan, it sits under the inner step and a new 'inner sill' underneath it sandwiching the floor in between. (The inner sill would have been part of the floor pressing) If/when doing that, make sure it is welded right through, so that the under sill is connected through to the inner step panel. (I've seen many where the parts are joined wherever the panel ends, and therefore nowhere near each other - giving no rigidity at all!!)
Posted: Wed Sep 17, 2008 7:06 am
by chickenjohn
I used to sandwich the new floor panel between inner sill step and "floor edge undersill panels" but now I prefer to plug weld the floor to the lip of the inner sill step (or preferably spot weld) and then cut the "floor edge" sill panel so the edge butts up to the floor pan/ sill step flange join. Then butt weld this piece in.
This more closely replicates the original structure and minimises any water traps etc, whilst still being very strong. Try and do butt welds rather than lap as they are stronger and dont trap moisture (can cause future rust).
Posted: Wed Sep 17, 2008 12:46 pm
by Velocemitch
I'm a bit confused now as there is obviously two differant approaches here.
It's a 2 door saloon, if that makes a differance?.
It does seem easier to me to make sure the inner sill section is properly plug welded to the under sill panel, before getting the floor section mixed up into the equation.
The upstands on the floor section seem to be what's confusing the fit, it's almost as if they are there if you want to botch it and use them to replace a rotten inner sill section. If i understand ChickenJohn's post you are cutting those off and welding the edge of the floor section to the upper surface of the horizontal lip on the inner sill section. I'm leaning towards this as it's seems a better way. I would need to grind off the plug welds holding it to the under floor first though.
I would rather get all the sill and boxing plates in place and welded before I cut the remains of the floor panels out as they are still providing some stiffness at the moment. (Don't worry I have also braced the door aperture

).
On the subject of the floor, three quarters of the width of the panels is fine, is it normal to cut and butt these or take the whole thing out back to the tunnel and replace it?.
Posted: Wed Sep 17, 2008 8:30 pm
by rayofleamington
I'm a bit confused now as there is obviously two different approaches here.
There's dozens of different approaches, but the 2 mentioned are 'normal'.
If I read correctly myself and John were talking about joining floor, inner step and the inner undersill. Your floor repair panel has part of the inner step included, which is a different variation. The inner step was originally joined by a spot welded seam, and wasn't part of the floor.
The MOT man will want to see the edge of the undersill to be seam welded to meet the rules - whether you overlap it with the floor or not. I plug weld through all 3 (you'd only have 2 if you left the repair panel as it is) then seam the overlapping edge of the undersill, however John's method gives less overlapping (more original and less water traps).
My prefference is not to use the floor repair panels that include part of the inner step, as this makes fitting (aligning) more difficult. However if you need to replace the vertical bit of the inner step then it can be a sensible option. I'd repair the inner step on it's own but only because that's how it was made and I don't like using too much artistic license now I'm getting old ;-)
Posted: Wed Sep 17, 2008 8:33 pm
by Redmoggy
Hope this kinda helps.<br>

<br><br>

<br>
With the apperture braced! I left the origional outer sill in place and trimmed the new floor pan so that it could be butt welded to the outer section of new floor so it replicates factory design. You can then replace the box section and keep the factory seems. Also i always figured the more overlapping seems you add the more chance of trapping moisture and causing new rot,hence i butt welded it.<br>

<br>
Posted: Wed Sep 17, 2008 8:55 pm
by rayofleamington
Hi Redmogy - i had to do a re-look at your 2nd picture as I initially thought the floor included the inner step vertical piece - before realising (from your description and 3rd pic) that yopu've done very similar to John's method.
The only thing I'd say is that seam welding the edge of a seam is less effective than plug welding as it allows the seam to buckle easier in a crash. This difference will not be very much at all, and please don't take it as a criticism - just a comment as I've seen a lot of people weld the edge of a seam that would originally be spot welded.
Posted: Wed Sep 17, 2008 9:02 pm
by Redmoggy
No i do agree with you reference spot welded seams. To be honest i was being lazy!
Posted: Wed Sep 17, 2008 9:16 pm
by rayofleamington
No i do agree with you reference spot welded seams. To be honest i was being lazy!
Fair enough ;-) My plug welds are far neater than my runs and I don't mind buying new drill bits once in a while - these 2 things help me get a nice result quickly. I'd probably do less plug welding if it didn't give me an inner smile in the process.
Posted: Wed Sep 17, 2008 9:30 pm
by Redmoggy
Buy a hole punch must quicker than a drill

Posted: Thu Sep 18, 2008 1:06 am
by stag36587
Redmoggy - did u buttweld to the transmission tunnel or leave a small overlap?
Posted: Thu Sep 18, 2008 7:12 am
by Redmoggy
I butt welded to the trans tunnel.
Rod
Posted: Thu Sep 18, 2008 6:21 pm
by rayofleamington
If anyone is thinking of making an overlap join at the trans tunnel - if you do the joint 'as far up the trans tunnel as possible' then it can't be seen when someone kneels down to look under the car.
It's not a big deal, but nice if the repairs are made less obvious.
Posted: Thu Sep 18, 2008 9:31 pm
by bmcecosse
Great welding there Redmoggy!
Posted: Thu Sep 18, 2008 10:58 pm
by Redmoggy
Thank you very much.
Rod
Posted: Fri Sep 19, 2008 7:42 am
by chickenjohn
Yes, I agree! Thats great work you're doing there RedMoggy.
Posted: Mon Sep 22, 2008 9:56 pm
by Velocemitch
Can somebody advise how these panels finish off;

I'm interested in the panel which comes down outside of the sill but inside the outer skin. On mine it's been cut back clear of the undersill member and I think I need to carry it down on to it. You can see it in both photo's, but it's clearer on the first, don't be confused by the shadow.
PS I'm still learning with the Mig set too
Posted: Mon Sep 22, 2008 10:39 pm
by Redmoggy
There is an extension to boxing plate that finishes this section. I will post some pics when i can.
Welding is looking good so i hope you dont mind me offering a little advise? In your top picture it looks as though you have moved the welder to fast leaving lots of weld on the surface. When you first strike an arc hold in one spot and draw a small circle,let the trigger go and do the same again overlapping the first. Try and do this while each spot is good and hot. You should end up with a tidy looking weld thats fairly smooth and has lots of penetration.
Please dont think im knocking your work just offering some advice.
Rod
Posted: Mon Sep 22, 2008 10:47 pm
by Velocemitch
That's OK Rod, I know the theory it's putting it into practice which I struggle with

Just bought one of those Automatically darkening helmets for £40.00 off Ebay and it's Soooo much easier now

. With the my old dark hand held visor my welds were missing the join before I even arced up!, now I can use both hands to steady myself and even see what I'm going to do before I do it!.
The plan is to do the bits of welding that are hidden myself and let someone who know how to do it properly do the visible bits. Mine look a bit rough but should hold OK... I hope!
Posted: Mon Sep 22, 2008 10:55 pm
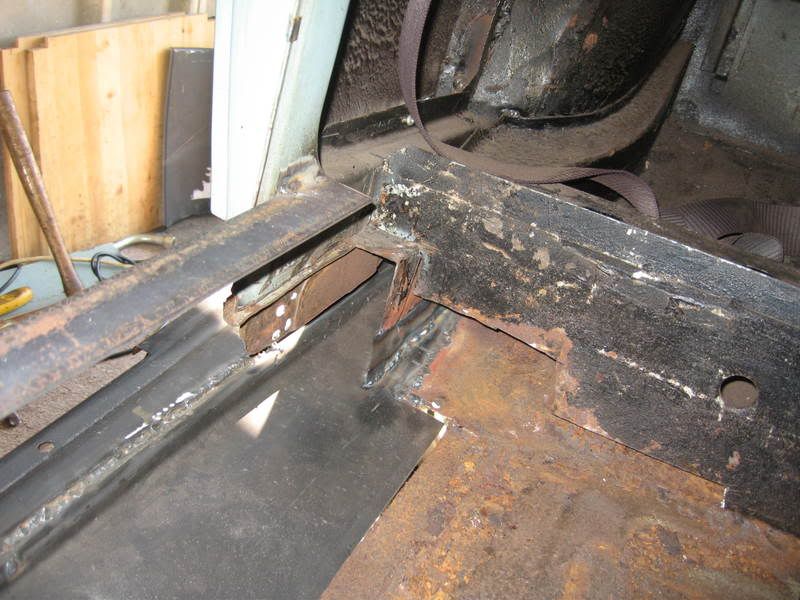
by Velocemitch
Just thought of another question, in the bottom photo you can see the cut end of the inner sill section projecting out from beyond the cross member. The new repair section for the inner sill stops and is supposed to be welded with tabs too face of the cross member.
The easy way would be to just weld the new repair section over the old one and against the cross member. But the engineer in me is saying I really ought to cut the new one and butt it to the old one to maintain the continuity of the inner sill beyond the cross member. Or perhaps I do both and plug weld the new one to the remains of the old one?
Any thoughts??