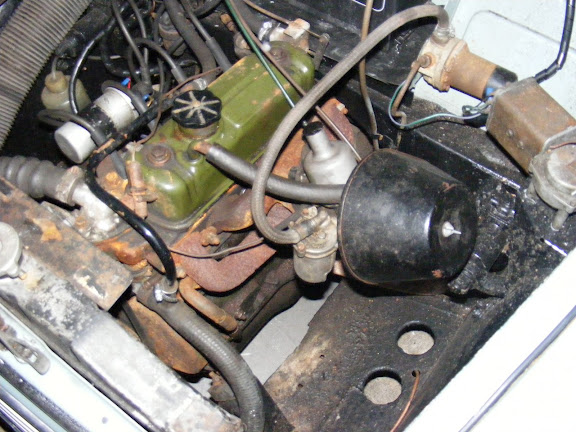
I have prettified the outside if my 67 trav and i am tentativley looking under the bonnet. It looks pretty,,,pretty dire that is..... A mechanically minded colleague tell me the carb is adjusted to the max and i know i will have to refurbish that. The car runs well so i would be easliy persuaded to leave well enough alone but thats no fun.
As you can see it looks rough. Would the collective of the MMOC care to suggest what jobs/tasks you would undertake in what order to reduce the embarrassment when lifting the bonnet
http://lh5.google.com/rob.hardy99/R6ddA ... imgmax=576
http://lh4.google.com/rob.hardy99/R6dc- ... imgmax=576
You will also see that there couple of trademark circular holes missing from the front of the engine compartment. I have looked for replacement holes on fleabay but no luck. Has anyone found a decent supplier of holes? I am fully prepared to adjust to fit any hole that anyone has spare.
Where do i start??
Forum rules
By using this site, you agree to our rules. Please see: Terms of Use
By using this site, you agree to our rules. Please see: Terms of Use
-
rob.hardy1
- Minor Fan
- Posts: 374
- Joined: Mon Oct 08, 2007 6:19 pm
- Location: swindon Wilts
- MMOC Member: No
-
alex_holden
- Minor Legend
- Posts: 3798
- Joined: Tue Jul 25, 2006 9:46 am
- Location: Burnley
- MMOC Member: No
Re: Where do i start??
It doesn't look too bad to me. You might want to add rubber grommets where the brake pipes pass through the holes in the floor.
http://morrisminorspares.co.uk/shop/pro ... cts_id=576
Fitting them is a big job though...
http://morrisminorspares.co.uk/shop/pro ... cts_id=577rob.hardy1 wrote:You will also see that there couple of trademark circular holes missing from the front of the engine compartment. I have looked for replacement holes on fleabay but no luck. Has anyone found a decent supplier of holes?
http://morrisminorspares.co.uk/shop/pro ... cts_id=576
Fitting them is a big job though...


Alex Holden - http://www.alexholden.net/
If it doesn't work, you're not hitting it with a big enough hammer.
Looks fine - don't worry about it -it's a car, not a museum piece. The brake pipes should indeed be through rubber grommets - otherwise risk of the pipe wearing into a hole where it rubs on the tie-plate. Just slit the grommet and slide it into place. MOT should have pulled you up for the missing grommets!


-
rob.hardy1
- Minor Fan
- Posts: 374
- Joined: Mon Oct 08, 2007 6:19 pm
- Location: swindon Wilts
- MMOC Member: No

-
bloodyank
- Minor Fan
- Posts: 133
- Joined: Thu Dec 27, 2007 5:58 pm
- Location: Steamboat Springs, Colorado, USA
- MMOC Member: No
Good Topic, though...
If it makes you feel any better, mine's worse.. but I know the answer. The problem is that you get aslongasi'mitis. (As long as I'm this, I might as well that, ad infinitum)
http://www.davidwinterswoodworker.com/
-
chickenjohn
- Minor Legend
- Posts: 4064
- Joined: Tue Dec 07, 2004 8:50 am
- Location: Margate, East Kent
- MMOC Member: No
I've seen a lot worse! That engine bay is not too bad, at least it looks fairly clean- not too much oil and gunge about. To tidy the bay up would require removing the engine and all ancillaries for rubbing down and painting and painting the metal work itself. quite a lot of work.
Just ensure it all works under there!
Just ensure it all works under there!
Cheers John - all comments IMHO
- Come to this years Kent branches Hop rally! http://www.kenthop.co.uk
(check out the East Kent branch website http://www.ekmm.co.uk )


- Come to this years Kent branches Hop rally! http://www.kenthop.co.uk
(check out the East Kent branch website http://www.ekmm.co.uk )
-
MoggyTech
- Minor Legend
- Posts: 1466
- Joined: Sat Aug 11, 2007 12:06 pm
- Location: Livingston Scotland
- MMOC Member: No
I've seen a lot worse. Still, it can be fun restoring the engine bay and the components. It can be done with the engine in place by brush painting using JAPLAC. You would need Sky Blue and White to mix to a close colour for your car (Teal Blue?)
With a good quality brush, Japlac dries without leaving bruch marks.
You can use Japlac Black on the starter motor, windscreen wiper motor, air filter housing, and radiator casing.
Hammerite High Temp matt black for the manifold and rad core.
engine can be painted in situ, if your into Yoga
With a good quality brush, Japlac dries without leaving bruch marks.
You can use Japlac Black on the starter motor, windscreen wiper motor, air filter housing, and radiator casing.
Hammerite High Temp matt black for the manifold and rad core.
engine can be painted in situ, if your into Yoga
[img]http://i49.photobucket.com/albums/f264/Ghostrider117/sig.jpg[/img]
http://www.freewebs.com/moggytech
http://www.freewebs.com/moggytech
-
wibble_puppy
- Minor Legend
- Posts: 2031
- Joined: Tue Sep 07, 2004 6:09 pm
- Location: Room 7609
- MMOC Member: No
Have you tried printing a large picture of a tidy..... no, no, I won't
agree about the grommets, and also that goodness me it is a car and that engine bay looks absolutely fine, and loads better than loads I've seen.
The main thing is keeping it reasonably clean so that if something does need attention it isn't too grim diving in there and sorting it out - also cleanliness does help you spot any weird new patches of oil or corrosion which are pointers to leaks or other problems.
Refurbishing a carb is excellent fun and really not difficult at all. You'll need a carb servicing kit, some carb cleaner, some rags, and Onne. The proper thing to use in the dashpot is dashpot oil, also available from parts suppliers. About half a day should do it, for a first-timer, including getting it off the car and back on again - unless you want to do any heavy-duty polishing (I suggest a Dremel for that, if you are feeble like me), which is completely unnecessary. Check out the Useful Tips section for one of my threads with a recommendation for a very good book about refurbishing components.
If you want to take longer over it you can pick up second-hand carbs at rallies, they are cheap and you can refurbish one, swap it with the one in your car, and refurbish that one to keep in reserve....
There are some things in the engine bay which are easier to remove and replace than others, for instance the air filter housing for the easy one, the wiper motor for a hard one. You could have a poke around and get out the easy bits and scrub them up, give them a lick of paint maybe.
I'm guessing that you will be getting into servicing the car yourself, you can learn how to do this pretty easily and as you service bits you can clean them up (for instance, when changing the spark plugs you can clean the leads).
If you are feeling energetic you might want to check out what is causing the wet-looking stain on the front of your inlet manifold. Someone more experienced than me (*cough* everyone, then *cough* ) will probably be able to tell you what it is typical of.
One handy tip from a first-time restorer (me): if you have a digital camera then think through as you take something apart and take loads of photos showing the process in such a way as to make it possible to follow the reverse sequence when reassembling. If you have no camera then take notes, and try doing some little sketches if possible. You think you will remember.... but you don't!
Enjoy!
wibble
ps I have faxed over some holes, hope they are roughly the right size
agree about the grommets, and also that goodness me it is a car and that engine bay looks absolutely fine, and loads better than loads I've seen.
The main thing is keeping it reasonably clean so that if something does need attention it isn't too grim diving in there and sorting it out - also cleanliness does help you spot any weird new patches of oil or corrosion which are pointers to leaks or other problems.
Refurbishing a carb is excellent fun and really not difficult at all. You'll need a carb servicing kit, some carb cleaner, some rags, and Onne. The proper thing to use in the dashpot is dashpot oil, also available from parts suppliers. About half a day should do it, for a first-timer, including getting it off the car and back on again - unless you want to do any heavy-duty polishing (I suggest a Dremel for that, if you are feeble like me), which is completely unnecessary.
If you want to take longer over it you can pick up second-hand carbs at rallies, they are cheap and you can refurbish one, swap it with the one in your car, and refurbish that one to keep in reserve....
There are some things in the engine bay which are easier to remove and replace than others, for instance the air filter housing for the easy one, the wiper motor for a hard one. You could have a poke around and get out the easy bits and scrub them up, give them a lick of paint maybe.
I'm guessing that you will be getting into servicing the car yourself, you can learn how to do this pretty easily and as you service bits you can clean them up (for instance, when changing the spark plugs you can clean the leads).
If you are feeling energetic you might want to check out what is causing the wet-looking stain on the front of your inlet manifold. Someone more experienced than me (*cough* everyone, then *cough*
One handy tip from a first-time restorer (me): if you have a digital camera then think through as you take something apart and take loads of photos showing the process in such a way as to make it possible to follow the reverse sequence when reassembling. If you have no camera then take notes, and try doing some little sketches if possible. You think you will remember.... but you don't!
Enjoy!
wibble
ps I have faxed over some holes, hope they are roughly the right size
