Page 1 of 2
Repair panels
Posted: Tue Nov 07, 2006 11:52 am
by alex_holden
Where's the best place to get repair panels from? I took off my right front wing and found this underneath:
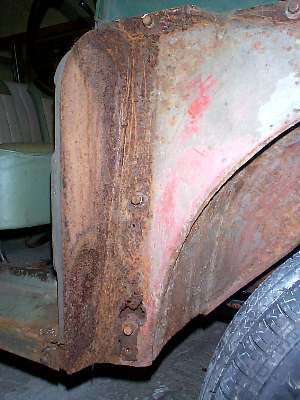
I'd like to replace the rusted area with a repair panel rather than letting in a few smaller hand-made patches.
This one looks appropriate, albeit probably a bit bigger than I need - do you think that's the best one to get? PM me if you want to let me know about repair panel suppliers I should stay away from.
Posted: Tue Nov 07, 2006 12:21 pm
by bigginger
That really isn't too bad at all

I've found ESM/Bull Motif to be good. Do be sure the area is still sound behind the post, and if it isn't, get one of these
http://morrisminorspares.co.uk/shop/pop ... p?pID=2397 not one where there's an angle which is meant to cover the outside of the post. They don't seem to be on the ESM site any more, but that's what I ended up with

PM sent too, btw
Posted: Tue Nov 07, 2006 12:32 pm
by alex_holden
Ah, I see.. I think. I guess I'll have to cut the hinge pillar cover plate off and have a look what's underneath it. Thanks for the advice.
Posted: Tue Nov 07, 2006 1:03 pm
by bigginger
I hope you don't need it, it's a bit of a pig of a job, but I find that one often does. If the door's not slumpng you may be fine - can you get in at the bottom of the post with a screwdriver to poke about?
*Or/and, with the glove box liner out, from the top
Posted: Wed Nov 08, 2006 8:40 am
by chickenjohn
The inner wing area there looks good. Looks like its not been repaired there before which makes things easier. When I did the same area on my traveller it had been bodged before- metal welded over rust.
Set to it with a grider with wire brush attachment and see what you are left with.
Look at Flying`s sill layout thread for pictures of the inside of this area- eg inside of hinge pillar and "kidney panel" behind the inner wing.
Posted: Sun Nov 19, 2006 12:49 pm
by alex_holden
I've finally got around to cutting off the cover plate and wire-brushing the area:
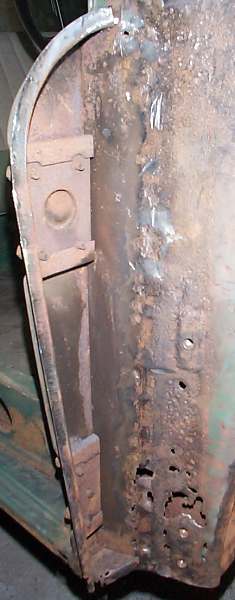
The inner wing is slightly rotten in a few places where the cover plate was tacked to it (mostly between the tacks) but I could probably patch those up without a repair panel.
I'm still not entirely sure about the difference between
this panel and
this panel. Any idea which one is more appropriate for this repair?
The passenger side is similar but not as bad BTW - I probably don't need to replace the cover plate on that side, just the upright part of the inner wing with the captive nuts in it.
Posted: Sun Nov 19, 2006 1:16 pm
by nebogipfel
That all looks pretty good Alex. It ought to be OK to make a new lower section with captive nut and let it in, as it is a simple shape
A new cloaking panel would complete the job and make it look peachy
As John says it's nice that somebody hasn't already had a go at it.
Posted: Wed Nov 22, 2006 9:52 am
by alex_holden
alex_holden wrote:I'm still not entirely sure about the difference between
this panel and
this panel. Any idea which one is more appropriate for this repair?
ESM's response to this question:
The RP124R is for a 'proper' repair the RP124AR is for a 'cover up' type repair. We suggest that you use the RP124R.
Posted: Wed Nov 22, 2006 11:33 am
by chickenjohn
I think they've got that the wrong way round! 124R is the rear inner wing section with captive nuts for wing mounting which is fine, but it also has a seemingly useless bit of metal in the rough shape of the hinge cover panel bent off at the side of it.
I cut that off and used the properly shaped curved cover panel.
The ESM made panel looks nice but is a different shape. I guess as its all hidden by the wing, that actual shape is not as important as strenght of the A pillar and durabillity.
Posted: Wed Nov 22, 2006 11:53 am
by alex_holden
They didn't really answer the question (what is the difference between the two), but I think I'm going to simply buy a RP124R and then once I've got it in my sweaty mitts I'll be able to work out how to fit it and whether I also need to buy a separate RP123AR cover plate (they claim you don't because that part's included with the RP124R).
I've just re-read what you wrote. You have actually seen one of these panels (RP124R) in the flesh, and you think the bit of bent metal on the side isn't a suitable replacement for a separate cover plate? OK, maybe I'll order a cover plate at the same time then...
Posted: Wed Nov 22, 2006 1:30 pm
by chickenjohn
RP123AR is the curved cover panel. Its very thick

and fits nicely.
Posted: Wed Nov 22, 2006 2:50 pm
by chickenjohn
alex_holden wrote:-snip-
I've just re-read what you wrote. You have actually seen one of these panels (RP124R) in the flesh, and you think the bit of bent metal on the side isn't a suitable replacement for a separate cover plate? OK, maybe I'll order a cover plate at the same time then...
Yes I fitted one to my Traveller.

This bent bit is flat, wheas the back of the hinge pillar is a nice curve. I ended up buying the seperate cover panel too. Unless ESM mean they actually supply the cover panel with the inner wing section as a set?
For the current project I'm going to make up the inner wing panel rear half as its completely flat. Drill holes and weld in the captive 5/16 BSF nuts. Will still buy the curved cover panel as its only £4.50 plus vat.
Posted: Wed Nov 22, 2006 2:59 pm
by alex_holden
I think that is what they sell with the bent cover-plate shaped bit attached - it doesn't look like they bundle it with the separate pressed cover plate. I wonder how you're supposed to weld the back edge of the flat part to the inner wing if the bent bit is in the way. [shrug]
Posted: Wed Nov 22, 2006 3:10 pm
by chickenjohn
exactly what I thought! So I cut it off.
The steel came in useful elsewhere on the car though.
Posted: Mon Nov 27, 2006 9:44 pm
by alex_holden
Here's the finished job (apart from painting):
I did wind up using both the inner wing repair panel and a separate cover plate. Because the rot extended a bit further back than the fold in the repair panel (it was rotten between the spot welds that held the original cover plate on), I flattened it out and cut it off a bit further back than the fold, which gave me enough extra metal to replace all of the rotted metal with the one panel. Then the cover plate just welded over the top, after a bit of "persuasion" to make it come somewhere close to fitting correctly.
Posted: Sun Dec 03, 2006 5:53 pm
by alex_holden
And here's the passenger side before I ground the welds flat:
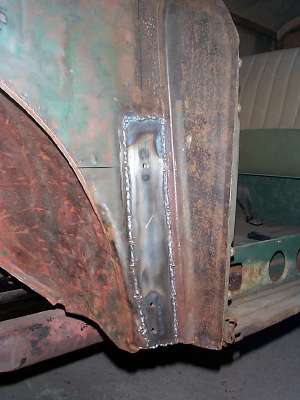
The new steel came from the cover-plate shaped bit I cut off the commercial repair panel I fitted on the driver's side. I reused the old captive nuts as they were fine after I cut them off and ran a tap through them.
I accidentally cut through the kidney-shaped box underneath when I was cutting the rotten section out, so I had to weld up the cuts from the inside of the car too. It was after grinding those welds flat in the confined space inside the car that a piece of sharp grit fell out of my hair into my eye when I took my goggles off, resulting in
the trip to casualty I blogged about yesterday.
Posted: Tue Dec 05, 2006 9:37 am
by chickenjohn
Nice work Alex! Hope your eye is better now.
Don't feel too bad about cutting the Kidney panel as its spot welded to the inner wing in that area and almost impossible to avoid damage when you cut out the rot in the inner wing (unless you manage to find the spot welds and drill, them out).
In a way its good, as by welding up the kidney panel you will be re-attaching it to the inner wing, as its supposed to be.
After cleaning up and painting the area, I would inject waxoyl/dinitrol through the bolt holes for the wing, door mount and through the interior light switch (screw it out first). That will protect the inside of the box sections, which are now sealed.
Posted: Tue Dec 05, 2006 9:52 am
by alex_holden
On the driver's side I managed to grind off all the spot welds without damaging the kidney panel, then I used about a dozen plug welds to attach the replacement.
The eye is fine but the antibiotic gunge I have to squirt into it four times a day is rather annoying.
The repairs look surprisingly good after grinding and priming. My welding skills have certainly improved since I bought Fenchurch!
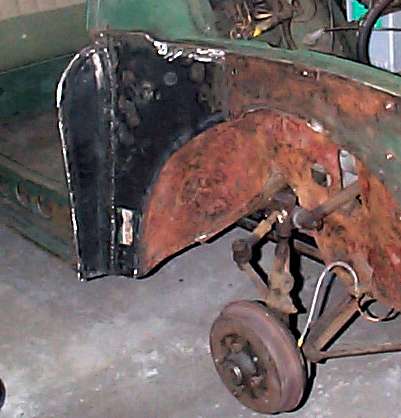
Question on that vgood picture fully exposed wheel& inn
Posted: Sat Dec 15, 2007 1:47 am
by kautilya
If there are holes in what seems to be the full inner wing (where your picture shows the oblong hole with steering rod coming thru red metal area to the wheel, as opposed to what u have so nicely welded, would you have to remove the whole engine to repair that? or is there a repair kit (like a two-part inner wing which is fitted either side of the holes and then welded together?
sorry if this is an obvious question from a starter. but worried if such holes would cause an MOT failure after all the other work and engine removal frightening.....
tks
alex_holden wrote:Here's the finished job (apart from painting):
I did wind up using both the inner wing repair panel and a separate cover plate. Because the rot extended a bit further back than the fold in the repair panel (it was rotten between the spot welds that held the original cover plate on), I flattened it out and cut it off a bit further back than the fold, which gave me enough extra metal to replace all of the rotted metal with the one panel. Then the cover plate just welded over the top, after a bit of "persuasion" to make it come somewhere close to fitting correctly.
Posted: Sat Dec 15, 2007 10:01 am
by kennatt
what you are looking at is the upper shock absorber arm,you just take the shock absorber off to replace the whole panel.