Page 4 of 5
Posted: Tue Oct 14, 2008 4:18 pm
by Luxobarge
More progress today!
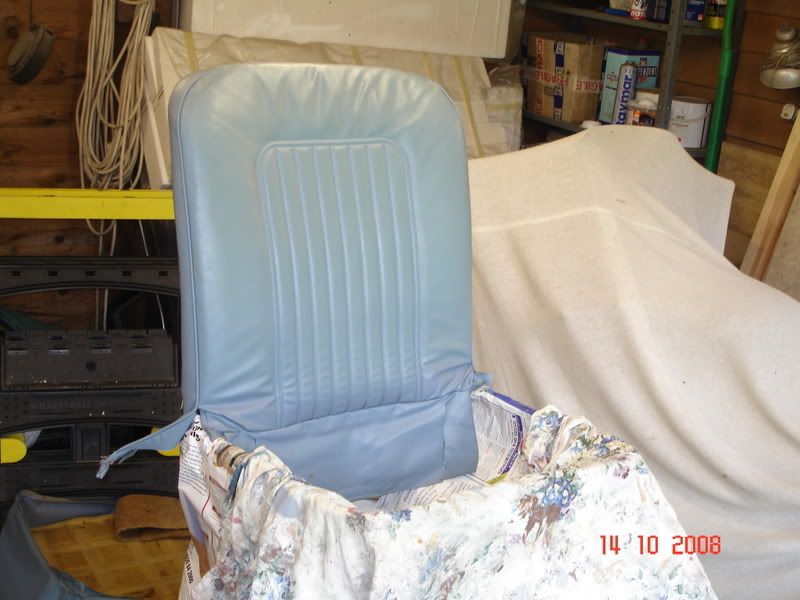
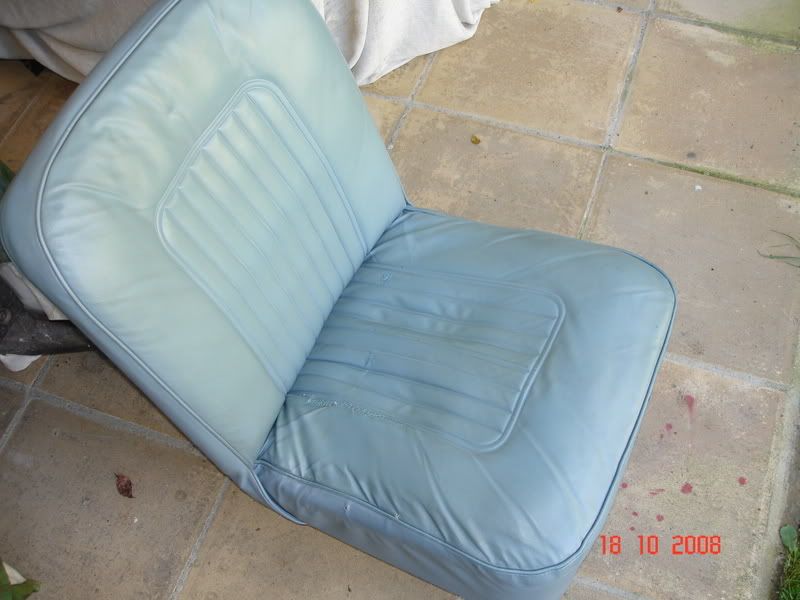
With the paint now dry on the passenger seat frame, I could turn my attention to colouring the vinyl seat back. Here it is "before":

I'm glad I left the seats till last, as there is quite a lot of vinyl, you need to spray them in a vertical position (with a greater risk of runs) and there are numerous folds and flaps of vinyl at the bottom that can be tricky to effectively clean and paint evenly.
Next a gruelling session of the normal routine - clean thoroughly, wipe with prep thoroughly, and spray.
Here is is after about an hour and a half's cleaning, ready for spraying:
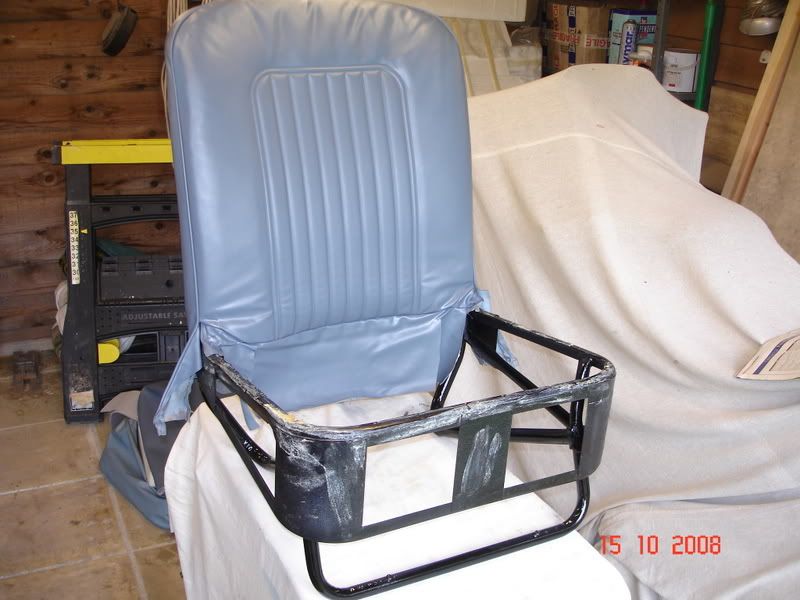
Then 2 or 3 coats of colour dye applied evenly, dry with the trusty hairdryer and here's the finished result!

I'll wait for the vinyl to dry properly overnight, then the next job will be to re-cover the seat base with the new Newton Commercial foam and cover kit. This will be the real test of this colouring lark, as it will be a new seat base right next to a re-coloured seat back - we'll see!


Posted: Tue Oct 14, 2008 6:21 pm
by MarkyB
They look great but if you want some comfort you need to arrange some lumber support.
Even a bit of shaped foam pushed up under the back cover would make it more spine shaped

Posted: Tue Oct 14, 2008 6:41 pm
by markattard
Hi Luxobarge, this great stuff you are posting should be printed and kept handy for all future interior restorers!!
Very helpful, now I hope more of us take the example and do the same in other areas.
...keep it up
Posted: Tue Oct 14, 2008 10:47 pm
by MGFmad
Nice work there, your interior will look as good as that shiny paintwork.
Posted: Wed Oct 15, 2008 1:04 pm
by Luxobarge
Posted: Wed Oct 15, 2008 1:05 pm
by Luxobarge
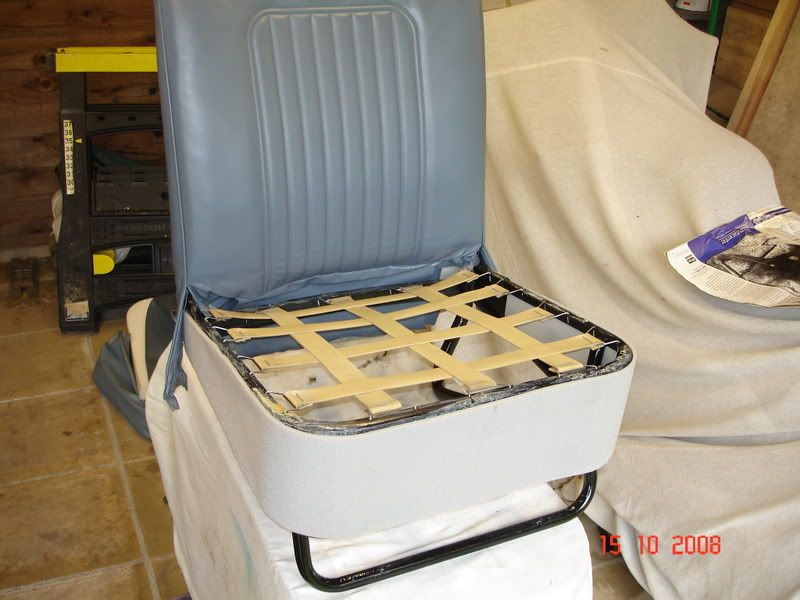
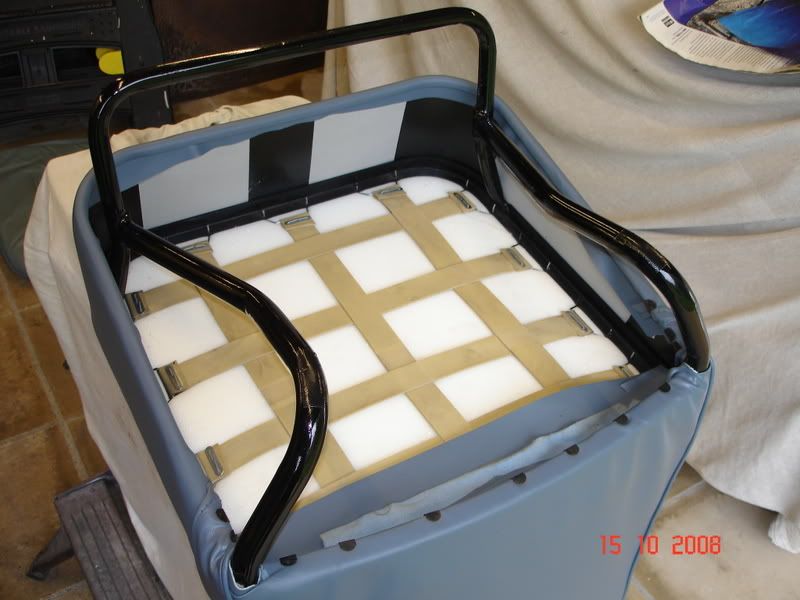
Now the vinyl dye and frame paint are dry on the passenger seat, today it's time to fit the new cover and foam to the seat base cushion - supplied by Newton Commercial, via Charles Ware Morris Minor centre.
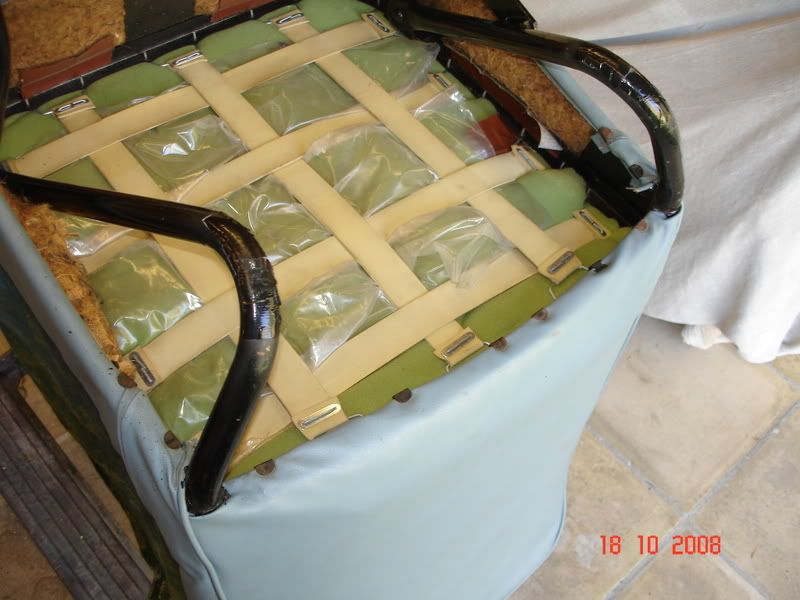
So, this is what we start with:
First job is to give the front of the frame and the surround foam a quick squirt of spray adhesive, and fit the foam. Here it is, with the seat base straps re-fitted too:
Then fit the foam to the new cover, and place it on the seat base. Here it is roughly placed, but not clipped in yet:
First I fitted the long rubber tube which goes around the groove on the inside of the front and sides of the frame, which traps the vinyl under it to hold it in place. You need to be careful to stretch the vinyl strongly but evenly when doing this - strong fingers are an advantage!
Then similarly stretch the two side bits that come down from the back-rest cover, and the back of the back-rest cover and hammer the clips home.
Here is the underneath of the seat with this work done:
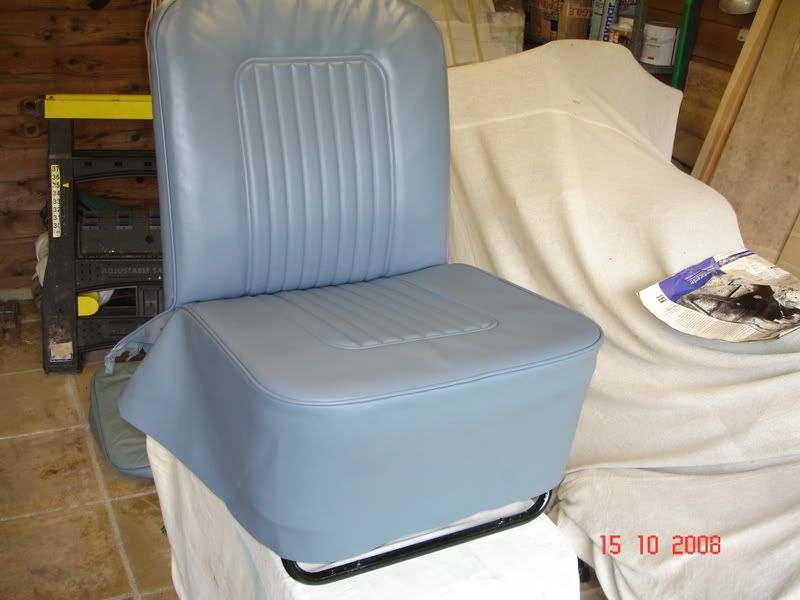
When fitted, the new cover was a good colour match to the "dyed" back rest, but the new cover had more of a "matt" finish, so I polished the whole seat with "Armor-All" vinyl cleaner/protector, which gave it a more uniform finish.
Here is the end result!
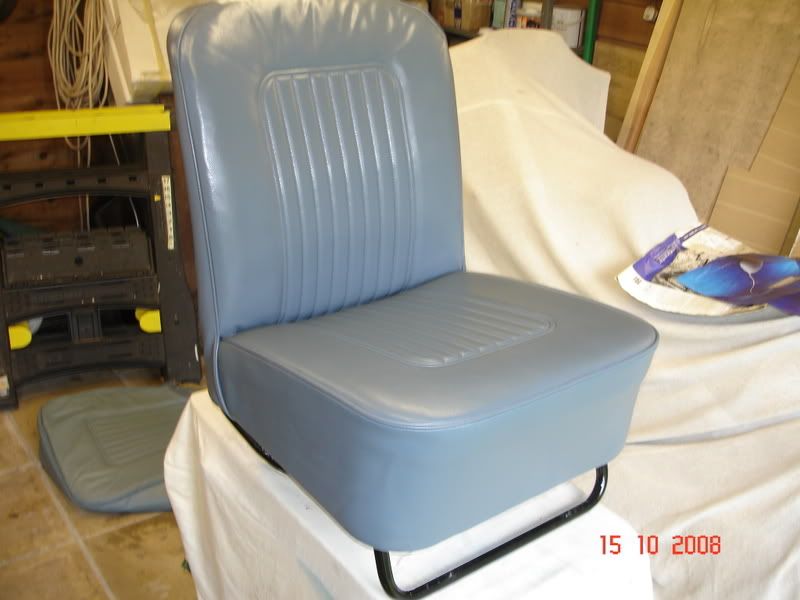
I'm pretty please with the result - the seat base seems a little "longer" than the original one, but I don't think this matters. It's comfortable, too - well, you've got to have a trial "sit" haven't you!
I'll post up some pics of the finished article when it's back in the car - my wife's taken it to work again, so it will get fitted to the car later!
Cheers!
Posted: Wed Oct 15, 2008 1:24 pm
by Luxobarge
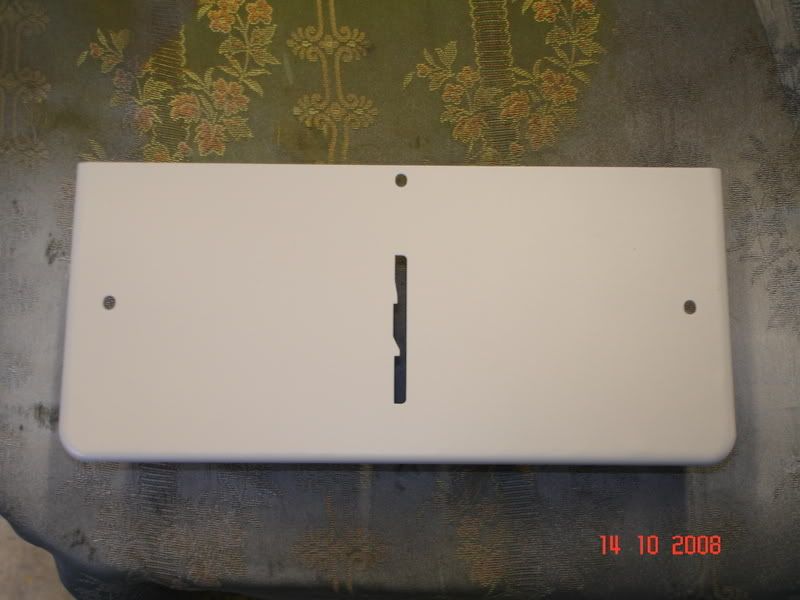
Another thing that's been bugging me since we got the car is the heater fascia panel - so over the last 24 hours I sorted this too.
This is what it used to look like:
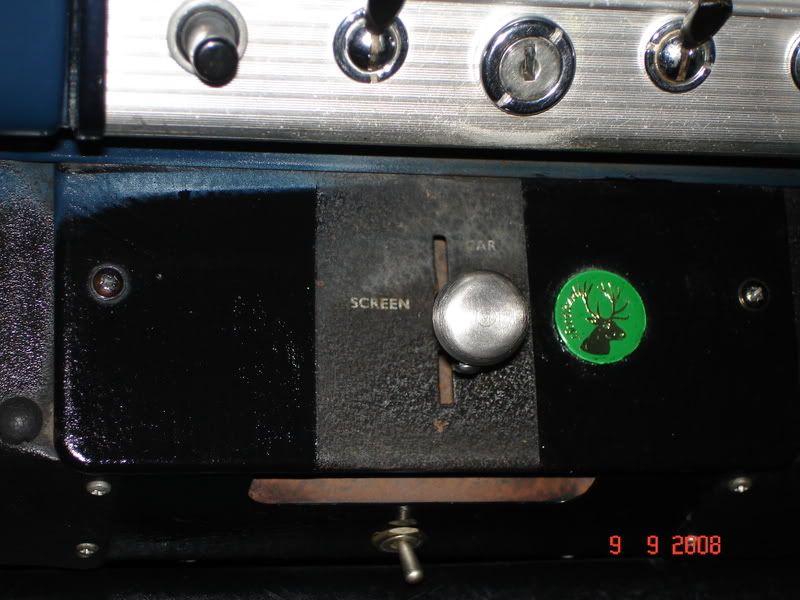
The previous owner had tried to smarten it up a bit by painting the outer sections with hammerite, but now the rest of the interior is so smart it's really standing out as the main remaining shonky bit, so I decided to re-paint it.
The kind chaps at ESM have sent me a replacement "oringinal style" black plastic flat heater knob, so that will get fitted when it goes back on the car.
Here is a close up of the panel off the car, so that later I can get the position of the lettering back as close to original as possible:

Then I scraped all the old paint off with an old chisel, and cleaned the panel up to bright shiny steel with a wire brush in a drill, and gave it a light coat of my favourite etch-primer:
Then a few coats of black wrinkle finish paint - I got mine from
www.frost.co.uk
Here it is after initial spraying:

Now this stuff takes ages to dry fully, and is quite temperature sensitive (I'd done the spraying in the garage with a fan heater on) so once tacky-dry, I put it in the oven overnight, on a setting of about 80 degrees C to speed up the curing process - the instructions on the can state you can do this.
This is how it came out in the morning:
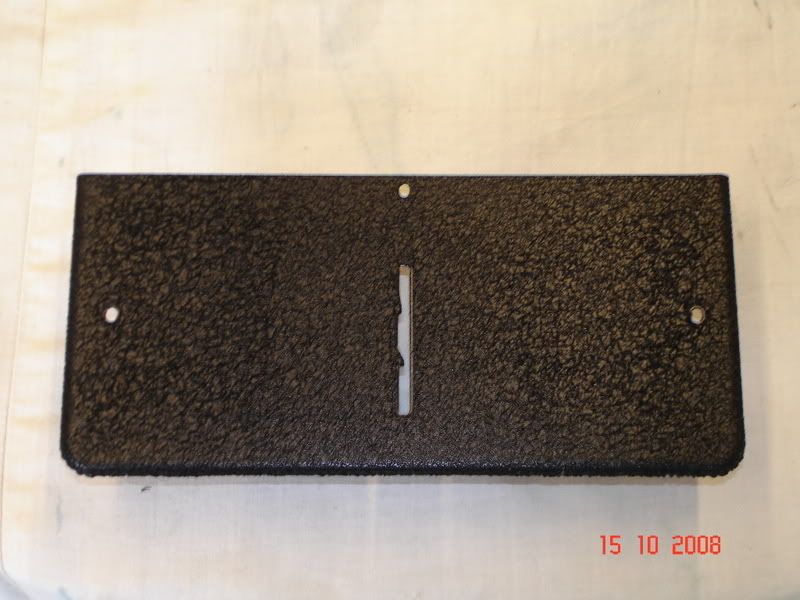
The wrinkles have come outslightly high/large, so if I did it again I think I'd put less paint on, (fewer coats) which would give a lighter wrinkle finish, but it looks OK enough for now.
Next was to refer to my picture of the original panel and put the lettering on. I'd already ordered some suitable LetraSet lettering, as the decal for this is not officially available, so I sat down with my lettering sheet and a pencil and this is the result:

Cool eh?

Just need to re-fit it to the car when it's home and job done!
OK, just the driver's seat to do now.......
More anon!
Posted: Wed Oct 15, 2008 5:35 pm
by Luxobarge
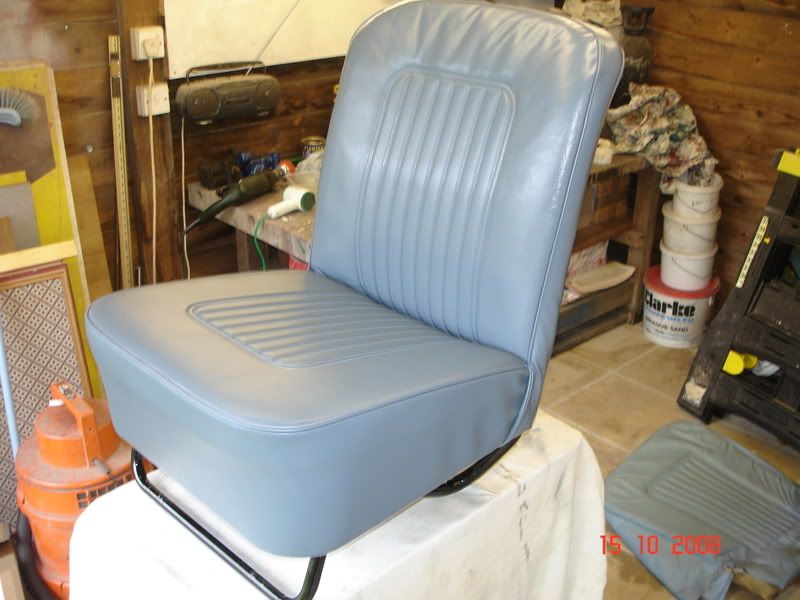
Got to put the heater fascia and passenger seat back in the car tonight - here is the fasica back in:
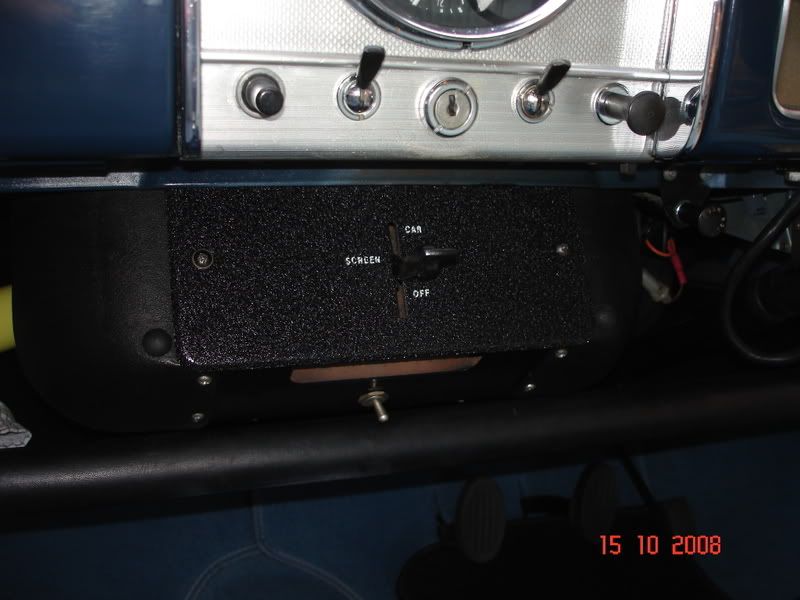
That's better, isn't it?
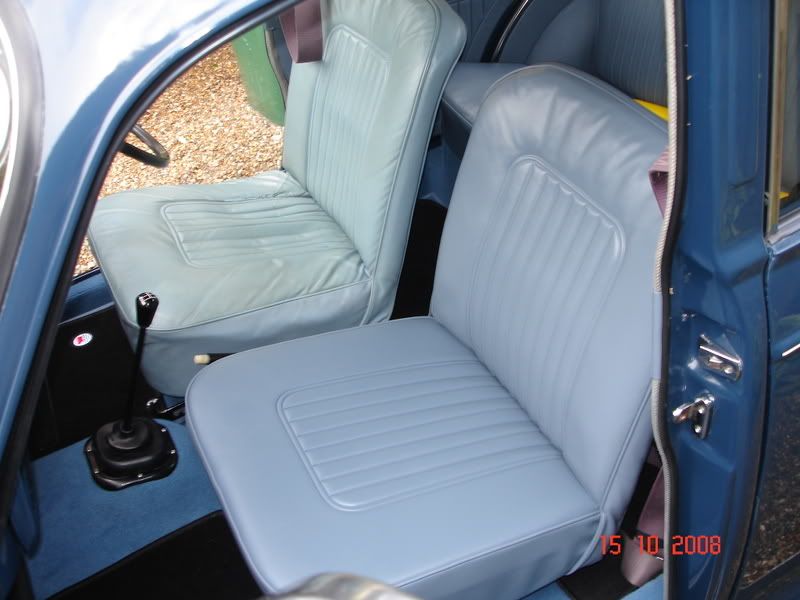
And the passenger seat - you can really see the difference, even in these photos, and the difference in quality and colour is even more evident when you see it in the flesh. That's why I am doing this work!
Just the driver's seat to go now - might be a few days to do that, as we need to use the car on Friday!
Cheers!
Posted: Wed Oct 15, 2008 10:02 pm
by Onne
You could swap them round for a couple of days?
Excellent work! Well done.
Posted: Wed Oct 15, 2008 10:33 pm
by MGFmad
The new seat base is an excellent match - well done.
Posted: Wed Oct 15, 2008 10:46 pm
by Luxobarge
Onne wrote:You could swap them round for a couple of days?
Excellent work! Well done.
Yeah, we thought of that, might well do that, only thing is that the passenger seat is (of course) non-adjustable, and it might be the wrong position for my wife to drive the car. We'll see!
Use a cushion, I said......
Posted: Sat Oct 18, 2008 6:15 pm
by Luxobarge
Made a start on the restoring/re-colouring/re-covering of the driver's seat today.
Here is what we start with:
And the underneath (I took lots more like this so I can remember where the various clips etc. go)
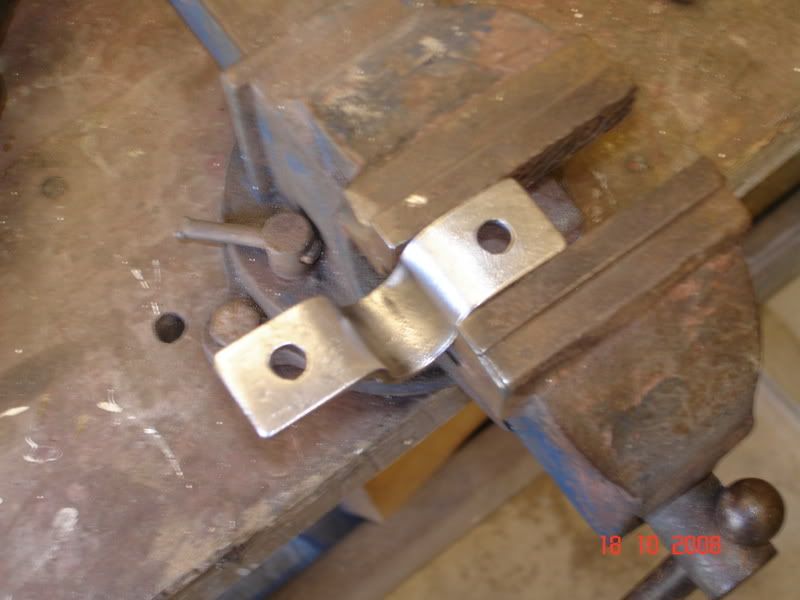
Cleaning up the U-brackets that bolt the seat to the floor:
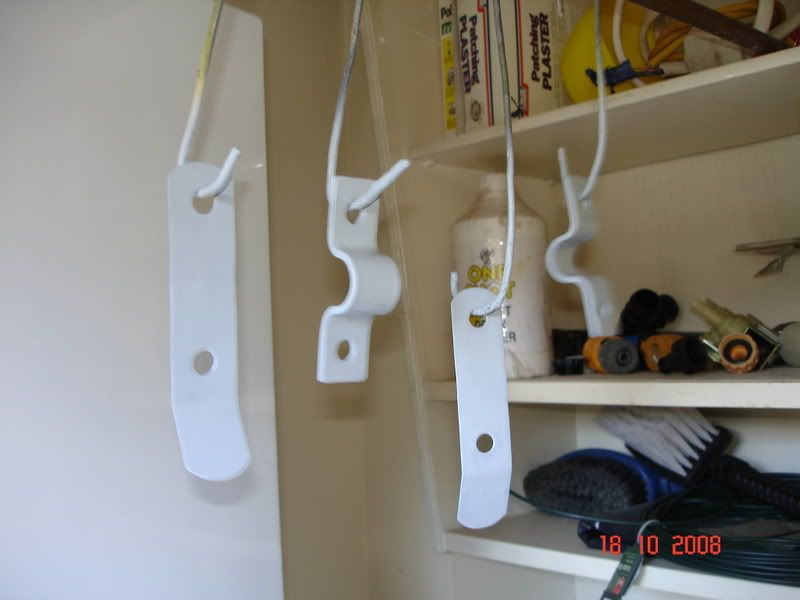
And all the brackets/spacers in primer, drying out in the boiler room!
And here's the seat with the seat cushion removed:
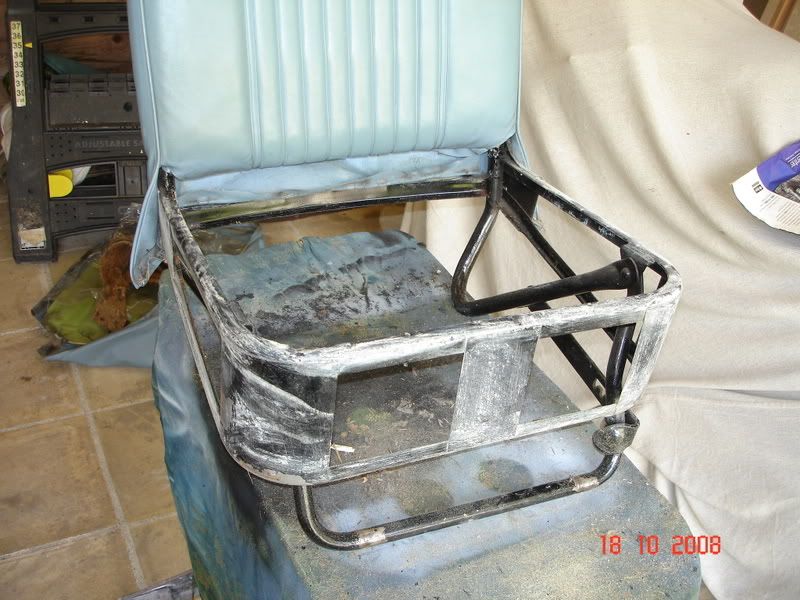
The next stage took me a long time, but using an old chisel, wire brushes on a drill and glasspaper, I got most of the shonky old paint off and down to bare metal:
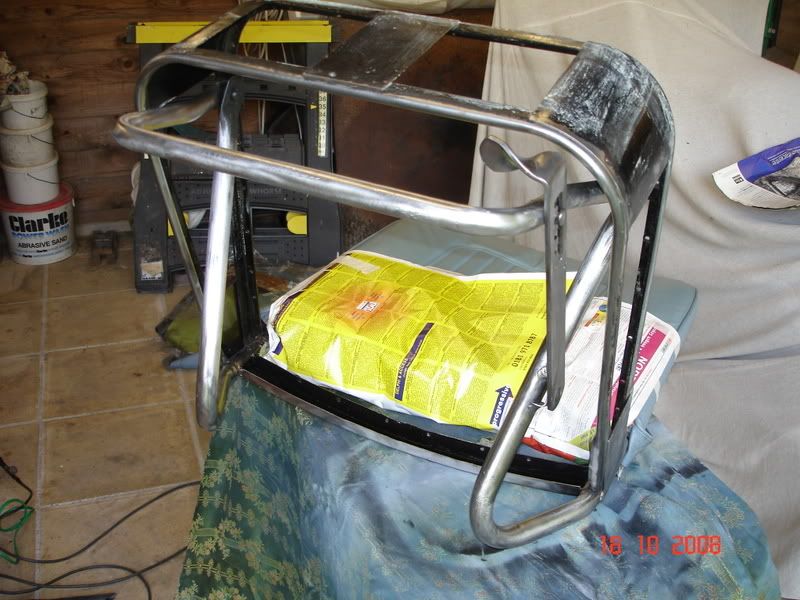
I then sprayed it all in etch primer, but only when I'd done this did I notice this crack:
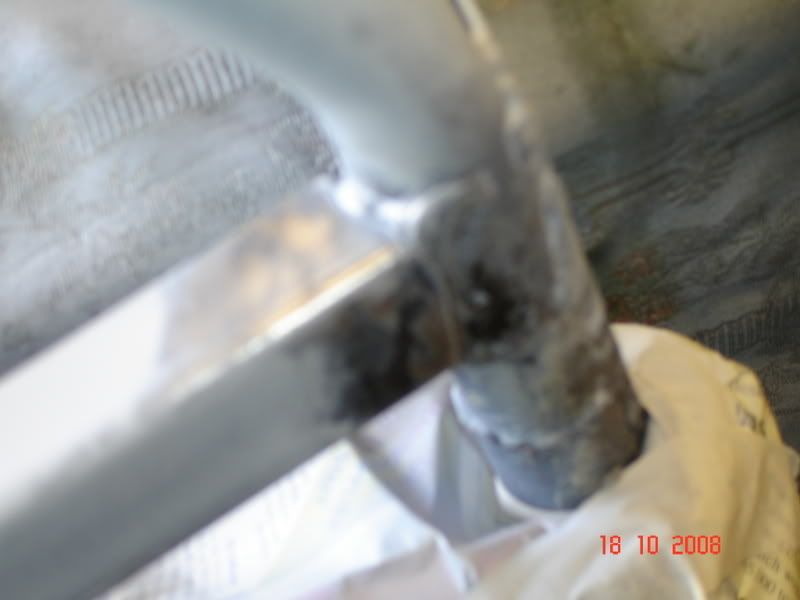
So, out with the welder and 10 minutes later we have this. Note the wet towel wrapped around the area to be welded - to stop the masking paper and the vinyl of the backrest catching fire, which would have turned today into a
bad day!
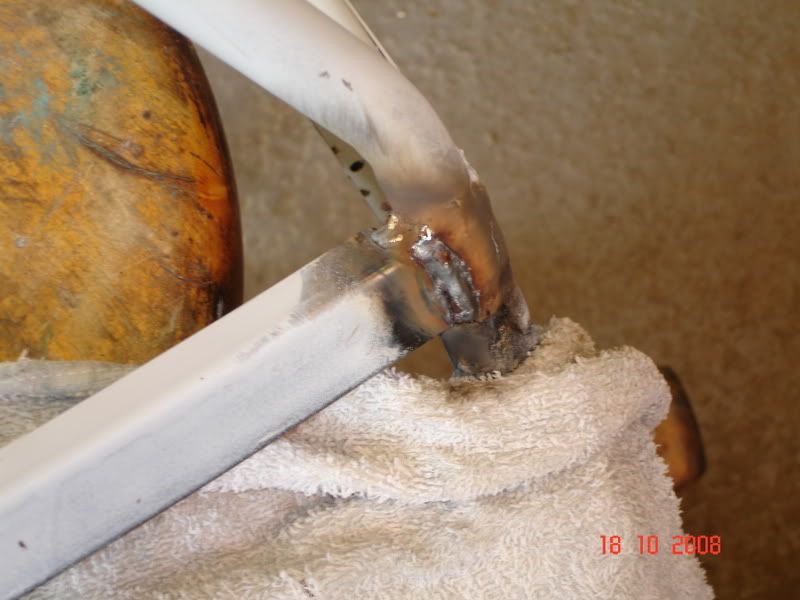
Grind down the excess bits of weld and here we are:
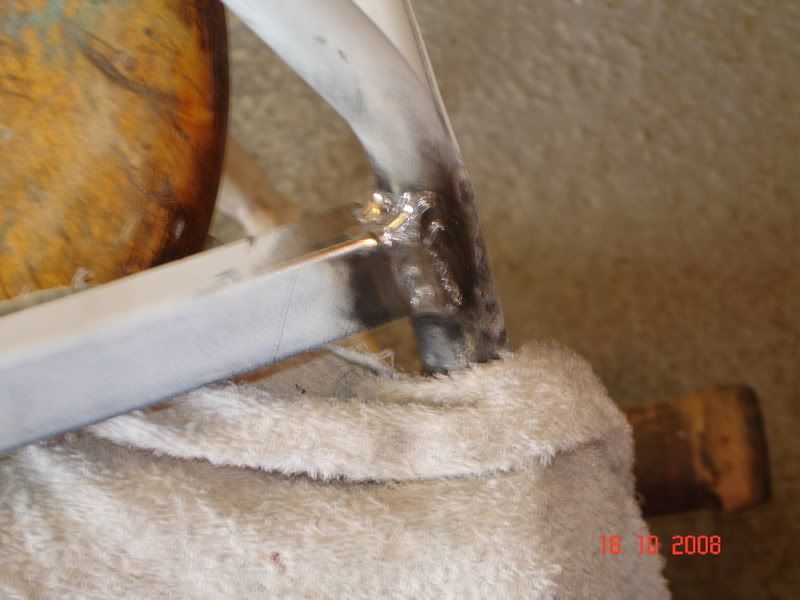
I actually found further cracking where the backrest tube attaches to the seat frame, so I welded that up too, but didn't take any specific pics of this.
I'm glad I found these cracks - I'd far rather sort them now than have the seat collapse at some future date!
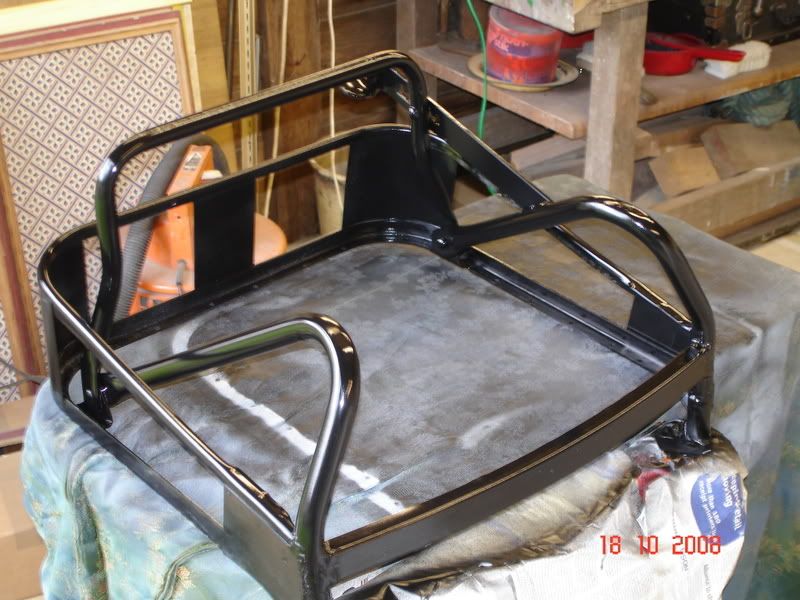
After touching up the primer in this area, we finally got to spray on a coat of gloss black, followed by a further coat of chassis black brushed on to the tubes (which are most visible and vulnerable). A day's work!
Next job is to clean and colour the vinyl on the seat back, which is being retained.
Cheers!
Posted: Mon Oct 20, 2008 12:49 pm
by Luxobarge
OK, got a little more time to work on this driver's seat. Now the frame is painted, the next stage was to thoroughly clean all the vinyl on the seat back cover, then wipe thoroughly with Vinyl prep and then spray on the colouring/dye. A good 3 hours work to clean it all properly and spray it!
The process is the same as all the other parts I've done, so I'll not bore you with loads of pictures!
Here is the seat-back cover finished:
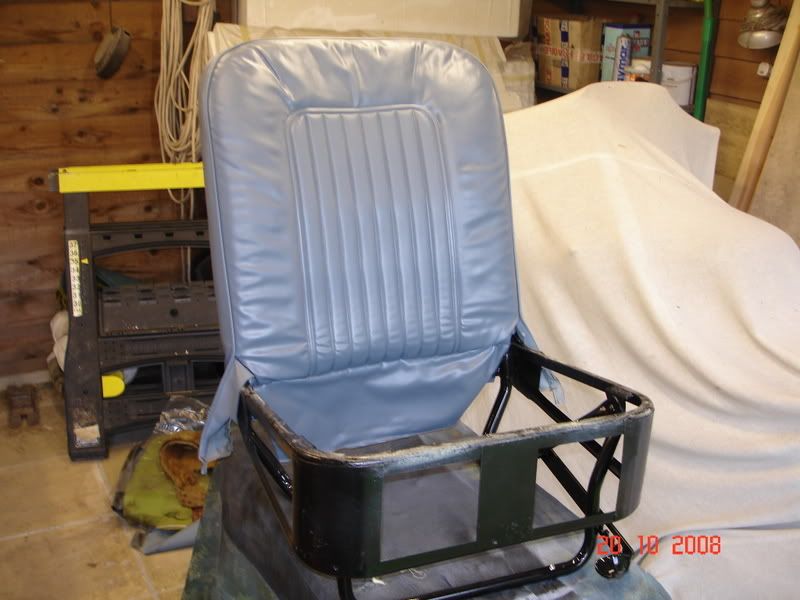
This now needs to dry/cure for 24 hours, hopefully tomorrow will get time to put the new cover and foam kit on the seat base, and we'll be done!
Cheers
Posted: Mon Oct 20, 2008 2:27 pm
by millerman
Very good tidy work.
I would be interested to know where you obtained the colour/dye & prep fluid from together with an idea of the cost
Many thanks
Posted: Mon Oct 20, 2008 2:37 pm
by bmcecosse
Good work there - that vinyl paint seems to work well - but will it stand up to daily use I wonder! My MOT place won't pass my car with an adjustable seat like yours - they say it is 'too wobbly' - so each year I have to remove that adjustable seat and fit an old fixed back seat for the Test - then swap them back afterwards! Grrrrrrr.
Posted: Mon Oct 20, 2008 3:07 pm
by Luxobarge
millerman wrote:Very good tidy work.
I would be interested to know where you obtained the colour/dye & prep fluid from together with an idea of the cost
Many thanks
Thanks for the kind comments!
I got both good verbal advice and the products themselves from Woolies:
http://www.woolies-trim.co.uk/c-13-renovation.aspx
Look on here, and you will see they do a colour-match service, as well as a range of standard primary colours.
Remembering that I've done the entire interior except for two front doors and two front seat base covers, it cost me around £122 - so not cheap, but a heck of a lot cheaper than buying all new covers for the seats and interior! The kit they sold me contained the following:
Two bottles of Vinyl Kleen
Two bottles of Vinyl Prep
5 Aerosols of Vinyld Dye/Paint
I've now done the whole job, and still have one bottle of Vinyl Prep left over, and one full aerosol, but I nearly ran out of Vinyl cleaner - one more bottle of this and one less of Prep and I'd have anough to do the
entire interior I think.
I believe you want to do a similar job on leather - as I mentioned in another thread, Woolies will be able to help, but personally I'd probably look at Gliptone (liquidleather) first.
Cheers!
Posted: Mon Oct 20, 2008 3:15 pm
by Luxobarge
bmcecosse wrote:Good work there - that vinyl paint seems to work well - but will it stand up to daily use I wonder! My MOT place won't pass my car with an adjustable seat like yours - they say it is 'too wobbly' - so each year I have to remove that adjustable seat and fit an old fixed back seat for the Test - then swap them back afterwards! Grrrrrrr.
Thanks BMC!
Yes, good question, I asked Woolies some very searching questions on this point when I talked to them, and they assured me that it would be very hard wearing and would never lift off or wear off
providing that I went through the whole process thoroughly, especially the cleaning of the vinyl in the first place. This view and advice was strongly supported by an experienced car trimmer that I know from another (general classic car) forum.
So that's why I have been as thorough as possible when doing this job, and have cleaned the vinyl as if my life depended on it - that would also explain why I've got through nearly all of the cleaning solution they supplied, and quite a few clean cotton rags! It's amazing stuff though I have to say....
Whether it does indeed stand up to the ravages of time and daily use we will see, but be assured you'll get to hear about it on here!
Regarding the adjustable seat - what a pain! My MOT station would never fail it on this, it's not really any more "wobbly" than the non-adjusting side, this sounds like jobs-worth mentality to me! Still, at least you have a way round it, just a PITA eh?
Cheers!
Posted: Tue Oct 21, 2008 12:11 am
by mrbenn
Very nice job! The heater panel looks good. Funnily enough I only recently noted that my heater control lever was without its rubber, after 7 years of ownership

Posted: Tue Oct 21, 2008 11:37 am
by Luxobarge
It's finished!!! well, as much as any classic is ever finished.....
Put the seat base cover on today - a cold morning so I used the trusty hair-dryer to warm the vinyl up in places. The process is exactly the same as the passenger seat I did last week, so I won't bore you with lots of repetition, but here's the finished article:
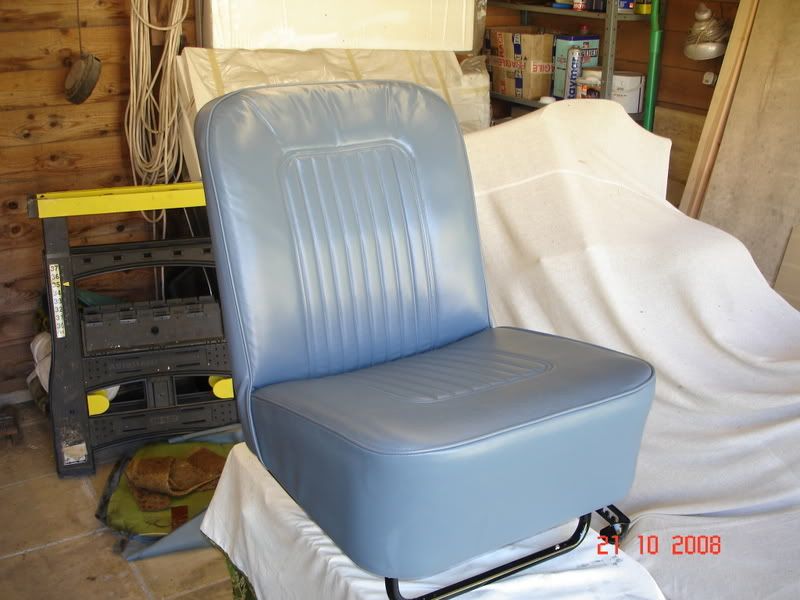
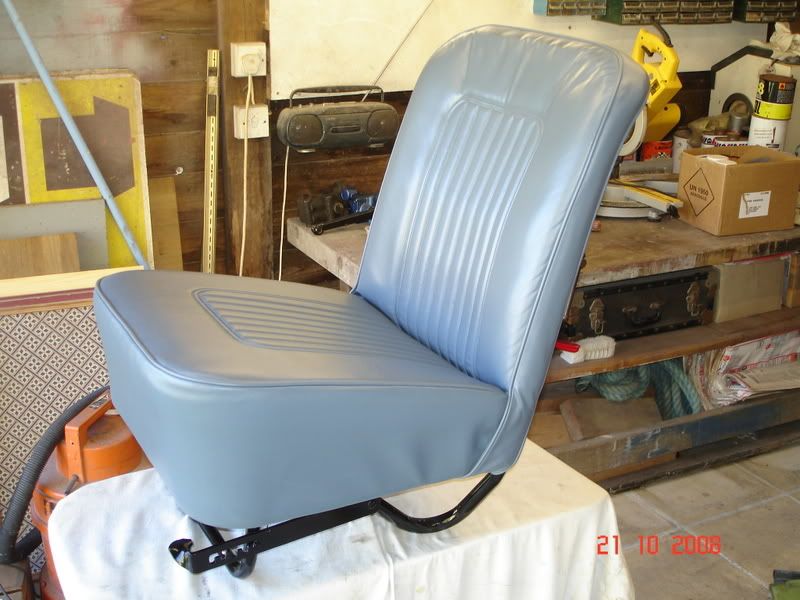
A smear of vaseline to lubricate the U-brackets that hold the seat to the floor (so it can pivot) and 4 x 1/4" W bolts to bolt it back in the car, and it's all done!
Here are the final pictures of the seats back in the car:
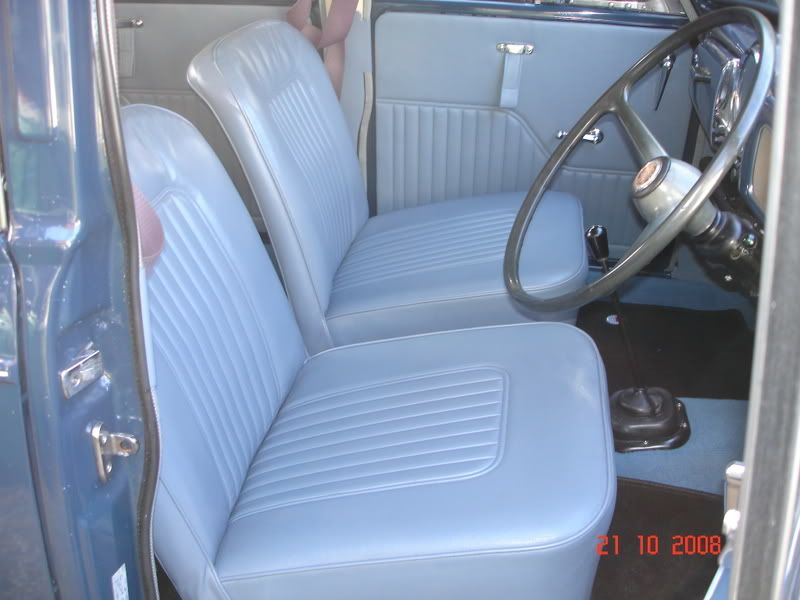
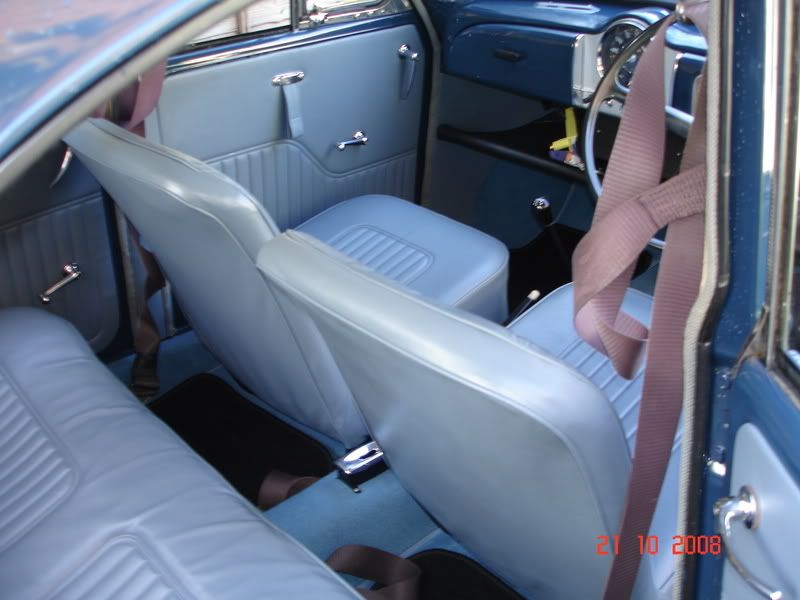
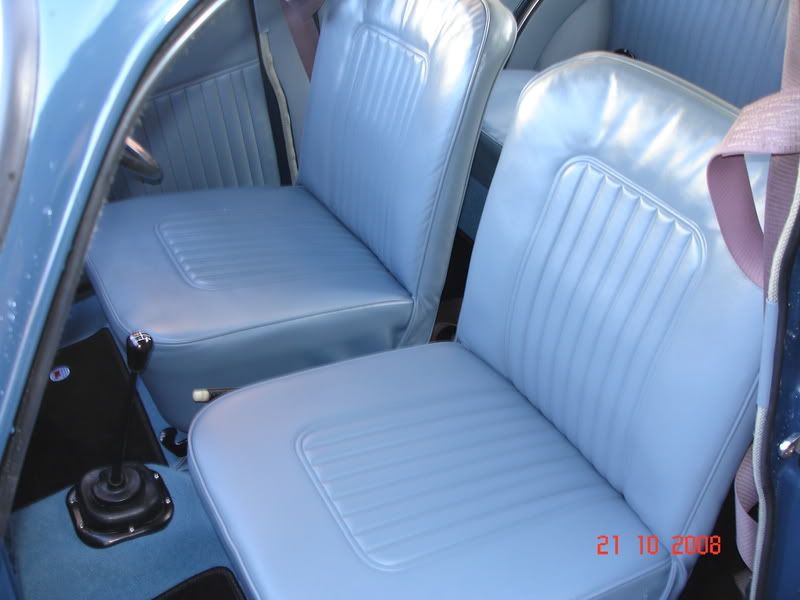
I'm really pleased with the end result - the re-colouring process was definately the right way to go rather than replace ALL the interior panels and covers to match, and certainly a lot cheaper.
It now remains to see how they fare in daily use - I'm pretty confident that they will be fine, but if I get any problems you can be sure I'll post it all on here!
Many thanks for all the kind comments and encouragement - it really does help!
Cheers - for now!
Posted: Tue Oct 21, 2008 11:44 am
by alainmoran
wow .. now that's impressive ... yeah, keep us posted as to how well the colouring wears over time, if it can maintain that quality of look then I for one will be looking into doing that to masie.