Page 25 of 103
Re: Pickup restoration part three
Posted: Mon Aug 29, 2011 6:13 pm
by davidmiles
great auto jumble at Hellingly today, looked down into a box of bits and this accelerator guide was the first thing I saw. Love it when it comes together that easily.[frame]

[/frame]
Re: Pickup restoration part three
Posted: Mon Aug 29, 2011 9:53 pm
by chrisryder
Hard to tell from the angle, is that 2 inches long or 1?
Releasing my inner-nerd here, the Minor one is 2 inches long, and MGA's had a 1 inch long one. Both are interchangeable, i have a feeling the MGA one was just shorter for installation 'issues'. If it is only 1 inch long, I wouldn't worry, i'm just curious to know if you found a Minor one or not!
Re: Pickup restoration part three
Posted: Tue Aug 30, 2011 11:33 am
by davidmiles
the cable guide is two inches long Chis, guess the autojumble stallholder sold me the correct one.[frame]

[/frame]
Re: Pickup restoration part three
Posted: Tue Aug 30, 2011 11:37 am
by davidmiles
the passenger seat belt fitted very easily, they give you several alternative fitting options in the kit, it all bolted on without a hitch, I'll do the drivers side when I get her down off the axle stands, then I'll make more room on the drivers side to work in.[frame]

[/frame]
Re: Pickup restoration part three
Posted: Tue Aug 30, 2011 1:48 pm
by davidmiles
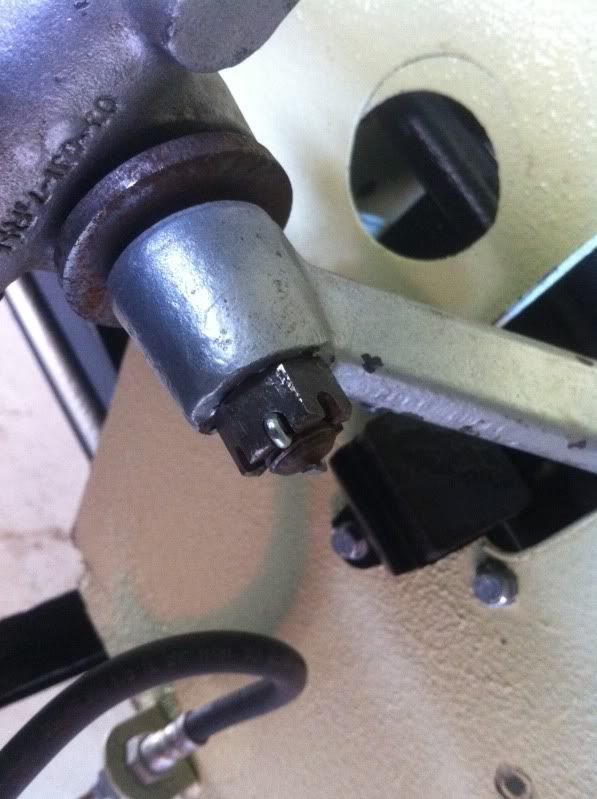
I'm rather puzzled here, Bob mentioned earlier that this nut should have a split pin on it here.[frame]

[/frame]
Re: Pickup restoration part three
Posted: Tue Aug 30, 2011 1:52 pm
by davidmiles
Ive cleaned off the threads and prodded and poked, but for the life of me, can't find a hole for a split pin in there, and to make matters even more confusing can't find a reference to one in the Haynes or the Catalogue. The exploded views just don't show them. So am I barking up the wrong tree? is it a wrap around wire?[frame]

[/frame]
Re: Pickup restoration part three
Posted: Tue Aug 30, 2011 2:54 pm
by mogbob
David
I'm confusing the split pin requirement ,apologies, it should be on the other end of the lever arm( on the damper ).As you were.
Bob
Re: Pickup restoration part three
Posted: Tue Aug 30, 2011 4:36 pm
by ptitterington
There Must be different versions.
Just had a look and both the traveller and the pickup have split pins.
It is really something that does not want to come undone while driving around.
Re: Pickup restoration part three
Posted: Tue Aug 30, 2011 5:17 pm
by davidmiles
That was lucky you pointed that out Bob, I had one missing one side, quick fix.[frame]

[/frame]
Re: Pickup restoration part three
Posted: Tue Aug 30, 2011 5:21 pm
by davidmiles
the pin was already in on the other side.I'm going to have to do a once over before I send her in for the MOT, check there are pins in where they should be.[frame]

[/frame]
Re: Pickup restoration part three
Posted: Tue Aug 30, 2011 5:28 pm
by les
The pin hole should be there, in fact in your picture I think I can see a break in the thread where the previous splitpin has sheared, a couple of threads in!
Re: Pickup restoration part three
Posted: Tue Aug 30, 2011 5:41 pm
by taupe
Yes
If you look at your first pic you can clearly see the small circle of different colour steel from the old split pin.
You can use a pin punch to clear the hole or drill through.
CAB
Re: Pickup restoration part three
Posted: Wed Aug 31, 2011 1:58 am
by Fingolfin
It's true you need "split pins" (we call them cotterpins) in the eyebolt-like thing that ties the kingpin onto the damper arm. I need to replace the ones on Mog, too.
David -- I just looked at your originalmost thread on this pickup -- you properly began restoring it (her? him?) on 1 April 2009. Back then you'd budgeted five years; and look! You're nearly there after only half that time!
Still gonna call the pickup "Ratty"?

Re: Pickup restoration part three
Posted: Thu Sep 01, 2011 6:18 pm
by davidmiles
Cheers Fin, welcome comment. The split pin conundrum will be solved at a later stage, probably with professional help as I can't find the holes, and I know where you guys mean on the picture but it just isn't there. option one. drill fresh holes, option two replace the bolts both sides, option three, is there a wrap around wire option?
Anyway, moving onto the windscreen wipers, the two wheel boxs are ok, just need new ends and screw on collars. I don't know if you can get them separately.[frame]

[/frame]
Re: Pickup restoration part three
Posted: Thu Sep 01, 2011 6:26 pm
by Fingolfin
The wheelboxes seem to only be available as a unit, sadly. They're pretty pricey too. But I haven't done much here -- somebody more knowledgeable might know differently!
You're going to get your pickup on the road before I get Mog on the road.

Re: Pickup restoration part three
Posted: Thu Sep 01, 2011 6:32 pm
by aupickup
try ebay for them if not i may have a pair
Re: Pickup restoration part three
Posted: Thu Sep 01, 2011 11:02 pm
by davidmiles
Thanks Dennis,I'll check them out on e bay. It looks like I originally purchased a pin without a hole drilled for the split pin.Maybe this was made prior to any change in split pin MOT policy, looks like I'll need it drilled.
[frame]

[/frame]
Re: Pickup restoration part three
Posted: Sat Sep 03, 2011 2:20 am
by drivewasher
IRC the split pin is only req on mot if there is a hole for one and a castleated nut. Track rod ends used to be like this. However if there is no hole in the end of the threads then fit a Nylock nut instead.
Do you see what I mean, MOT tester only looks for missing pins.
Re: Pickup restoration part three
Posted: Sat Sep 03, 2011 5:38 pm
by Fingolfin
Hmm, a "Nylock" nut may be a suitable replacement. After all, lock nuts (that's what we call them, dunno about you guys) are used safely on the steering column clamp bolt and the front rear spring mounts, both of which experience lots of twisting.
You may be interested in this, David:
http://morrisminorspares.co.uk/shop/pro ... 827d86b53e They do a kit, complete with split pin and castle nut! Shame to have to knock the existing "top trunnion bolt" out of there, though...
Re: Pickup restoration part three
Posted: Sat Sep 03, 2011 6:12 pm
by ptitterington
It would only take a couple of minutes to drill a hole and put in a pin. Peace of mind and all that!