Page 3 of 4
Posted: Tue Jan 02, 2007 5:22 pm
by bmcecosse
Excellent drawing - and pictures - most helpful. Many thanks. So just to confirm - that is MG Metro 4 pot calipers with Sprite discs on Sprite hubs ?? And - where did you get the uprated rear brake linings - did you use Mini shoes modified for Minor use ?
Posted: Tue Jan 02, 2007 5:36 pm
by IslipMinor
Yes, standard Metro 4-pot solid disc calipers, and standard Spridget steel wheel discs and hubs. All fits straight onto the Minor upright.
Rear shoes are standard Minor with Mintex linings - got them from Questmead in Rochdale. They offer an excellent mail-order service to re-line your exisiting shoes. Not cheap, but worth haggling a bit on the price, which can vary from one enquiry to another!
To make sure that the rears do not lock up under heavy braking (i.e. high line pressure) I have fitted a Mini rear pressure limiting valve under the bonnet. It has been modified to make it adjustable - very easy mod, have the details if you would like them.
Posted: Tue Jan 02, 2007 11:33 pm
by ricombi
Hadn't read this topic for ages! ITS FANTASTIC! Love the wealth of knowledge from this forum. I know a bit on Minors, both mine and my father's first road cars, but this stuff is excellent.
The picture of the "J" Bracket is shear excellence and I shall get it to the machinists ASAP when I return to work.
Tell me, does the setup work with Midget/Sprite callipers, as I think in the regulations I have to use those too.
Also, do you have any dimensions for the spacers required for the bracket??
Posted: Tue Jan 02, 2007 11:48 pm
by IslipMinor
The bracket is only for the Metro caliper. I have a Spridget caliper bracket 'somewhere', will try and find it and draw it up.
When do you need the information for?
The spacers are 5/8" o/d, 21/64" i/d and 3/16" thick - you can increase the thickness with standard 5/16" or 8mm i/d washers, if the caliper needs to be moved to centralise it.
As a bonus the Spridget hub places the wheel 5/8" further out than the standard Minor one - that gives a track increase of 1.25"! I have also spaced the bottom wishbone out by about 3/8" each side to compensate for lowering the suspension, and to get a hint of negative camber. Add the additional offset from the wider wheels and the front track has been increased by more than 4"!!
The front wheel bearings are standard and seem to last about 15,000 miles, which, given the 'enthusiastic' use it gets, is pretty good?
Posted: Wed Jan 03, 2007 12:44 pm
by ricombi
If you have the information I could do with it ASAP. How different is the bracket? Is it just the spacing for the mounting holes of the caliper, or are there many differences?
Sounds good with the extra track width, fantastic for a racing car! Do you know how much negative camber your running with the 3/8" spacing? I was going to do this to try and achieve approx 1-1.5deg negative camber on the front wheels.
If you can find the bracket for the Spridget caliper and get a drawing, that would be fantastic. If not, then I will use the one for the Metro caliper to design my own bracket.
Again, FANTASTIC Stuff!
Posted: Wed Jan 03, 2007 1:17 pm
by IslipMinor
I could do with it ASAP
I suppose that means NOW!! OK then.
Have found the bracket, will draw it up later today and post on this board, together with a picture.
Posted: Wed Jan 03, 2007 1:30 pm
by ricombi
Thats (to quote my favourite word) "FANTASTIC"!!
I've been searching everywhere for a Midget setup, and finally I have hope!
Thanks for all your help, hugely appreciated as always.
Now I just have to spend £££ finsihing the car and gathering more bits!!
Posted: Wed Jan 03, 2007 1:30 pm
by bmcecosse
Excellent stuff Richard - I have 5/16" packing on the bottom arms and I 'think' I have about 1 degree negative from that - the car sitting at more or less standard height. Interesting about the raer locking up - but maybe if the servo was just on the font discs then the rear would be ok . I have a Mini - and am well versed with the rear pressure limiting valve (in fact I just sold some nos ones that I had via Minifinity). I haven't made it adjustable - but I have played about with the spring to get the required braking. Many thanks again for all the drawings and pics. And if the Mutro 4 pot caliper fits - then so will the Fiesta 1 pot calipers which are a whole lot more reliable and have nice big pads too. These are used on Minis in place of the 4 pot to allow use of 10" wheels. Looking at the fitment of the J bracket - is it only J shaped because it has to go on the back face of the suspension leg ?
Posted: Wed Jan 03, 2007 7:37 pm
by IslipMinor
Hopefully this is Ok for ASAP!
Drawing modified to show the Midget caliper bracket design. It's made from 3/8" MS plate, but these days it would be 10mm. It could also be 12mm and you would need less spacer thickness.
The
7/16" UNF tapped holes take the standard Midget caliper fixing bolts.
The drawing:
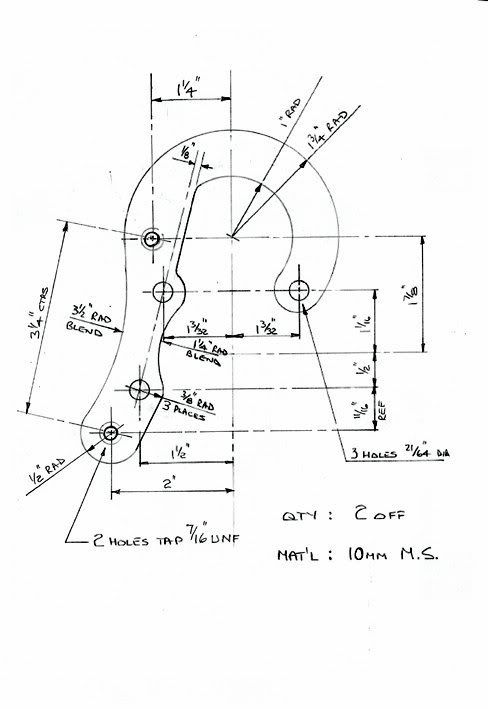 N.B. Please note the correction to the tapped holes, now 7/16" UNF was 3/8" - now is correct!
And the bracket itself:
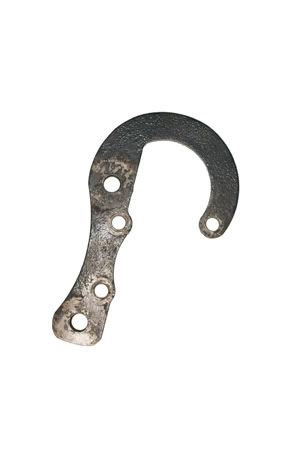
I'm only a few miles down the road from Thame, so if you would like to see an 'actual' bracket please contact me.
Posted: Wed Jan 03, 2007 7:40 pm
by bmcecosse
Great stuff again - is anyone willing to make these brackets for others to use ??
Posted: Wed Jan 03, 2007 7:51 pm
by IslipMinor
bmcecosse,
Yes it's a 'J' shape as it has to be behind the upright to give enough room for the caliper that sits behind the wheel hub.
To maintain even 0° camber with lowered suspension means shimming out the lower wishbone quite a bit. The geometry means that as you lower the front suspension the camber goes more positive. 3/8" is about the maximum possible to keep a full nut thread length on the lower trunnion bolt after passing through the chassis leg. I would like to have 1°/1.5° negative, which would mean about 1/4" more shimming.
It's roughly 1° per 1/8" shimming. There is also another side benefit of shimming out the wishbone, the castor is increased as well, which gives a sharper 'turn in', but slightly heavier steering. Not really a problem in a Minor, just a bit of a surpise after a modern pas vehicle!
Posted: Wed Jan 03, 2007 8:52 pm
by bmcecosse
Yes - I know - I discovered all that stuff 40 years ago with my Rally Minor !! I believe someone makes a longer eye bolt which then allows more shimming - mine is 5/16" because I was concerned about the length of thread left on the eyebolt where the nut screws on !! And yes - the castor increase is well worth having too - it induces more camber on lock. The downside of camber increase is tendency to 'tram-lining' - and of course castor increase results in haevier steering. For others reading this - you must (obviously I think) retrack the front wheels after doing anything like this - and check there is sufficient thread on the track rods where they screw into the track rod ends - they must NOT be holding on by just 2 or 3 threads!! One answer is to weld an additional nut to the track rod end, although there may be longer TREs available these days - I had to just go the welding route in the past.
Posted: Wed Jan 03, 2007 11:42 pm
by IslipMinor
Apologies.
Putting the Midget caliper bracket away I realised that I had put the wrong thread size for the mounting bolts on the drawing.
They should be 7/16" UNF, not the 3/8" UNF I had originally.
Have modified the drawing and re-uploaded it for viewing.
Posted: Wed Jan 03, 2007 11:51 pm
by ricombi
Thanks for the picture, thats excellent. I can get these made locally where I work. I'm not in Thame anymore, as I am away on my year out placement from university in Cheshire. I'm at home for christmas at the moment and am trying to gather as much information as possible before I go back to living in a caravan at work!
All the stuff about suspension geometry is very useful. I'd like to run -1deg of camber, but as you said this is obviously tricky. I'll just have to see how much I can get from it.
Thanks for the picture again Richard.
Posted: Thu Jan 04, 2007 6:40 am
by Kevin
before I go back to living in a caravan at work!
Well I`ll be, you must be the first traveller to be using our notice board

Posted: Thu Jan 04, 2007 10:43 am
by ricombi
Not traveller, merely student on industrial placement with cheapest accomodation going

Posted: Thu Jan 04, 2007 12:19 pm
by Matt
There are lots of travellers on the board... mainly in peoples sig pics ;)
Posted: Thu Jan 04, 2007 1:20 pm
by bmcecosse
No - it's not tricky to go 1 degree negative - just make and fit a 5/16" spacer between eyebolt and chassis, and then retrack the wheels - checking there is enough thread on the TREs.
Re: Midget/Sprite Brake Discs
Posted: Fri Jan 10, 2014 5:13 pm
by LaughingBoy
An old thread I know but here are some photos of my Spridget front disc conversion. I got the kit from a company called Spridgebits back in 1988. As previously mentioned the kit seems to only be available in the States now.I think this is the same as yours Richard ... although I never realised they were Metro calipers.
On a related subject I have just bought some LP917 van wheels and want to fit 165/70's but wonder if there will be enough clearance between tyre and top trunnion. I gather from elsewhere on this forum that the Ford disc conversion gives a bit more clearance than with the standard drums, so I'm wondering if the same is true with the Spridget conversion. Have you run thus setup Richard?[frame]

[/frame][frame]

[/frame]
Re: Midget/Sprite Brake Discs
Posted: Fri Jan 10, 2014 7:15 pm
by IslipMinor
although I never realised they were Metro calipers
No, the kits that were and are available use the standard Spridget caliper. That is what looks like are used in your picture.
I adapted the 'J' bracket so that I could use a Metro 4-pot caliper in place of the Spridget one.
To begin with, I used the standard Spridget 'steel wheel' solid disc and the solid disc version of the Metro caliper. A few years ago I came across the machining requirements on this MMOC forum to fit the vented Metro caliper on to the Spridget hub. So that is what is now on the Minor. Spridget hub, modified Metro vented disc, Metro 4-pot calipers for vented disc and Mintex 1155 pads.