Page 14 of 16
Re: First Time Engine Rebuild
Posted: Sat Jul 16, 2016 2:59 pm
by BLOWNMM
Rob
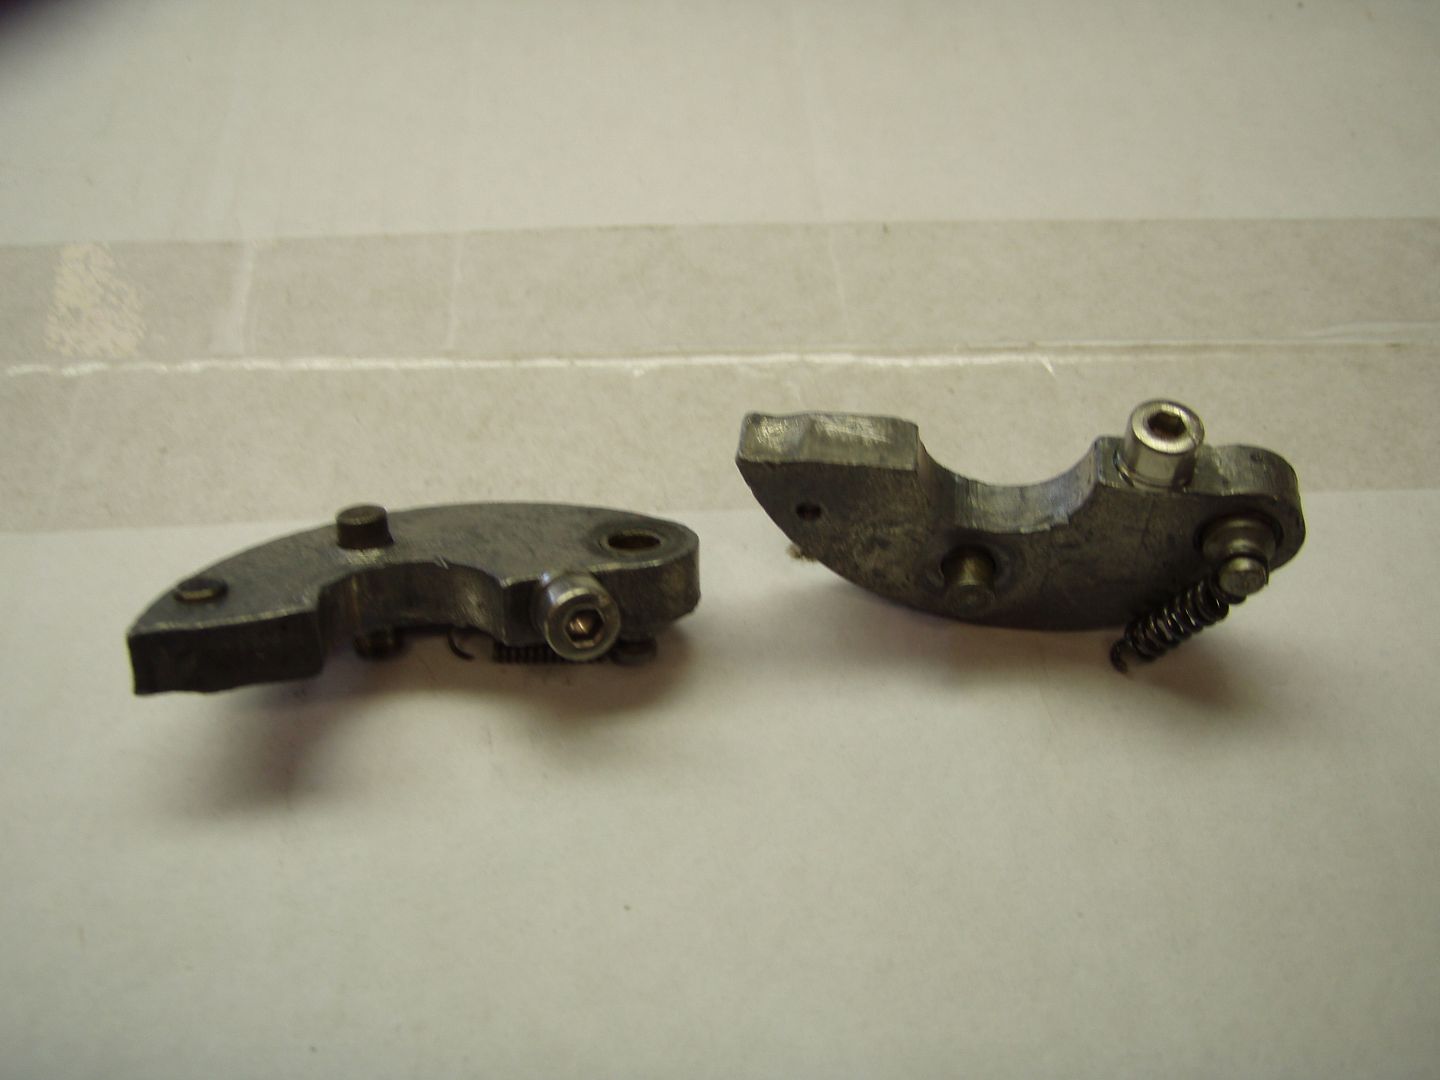
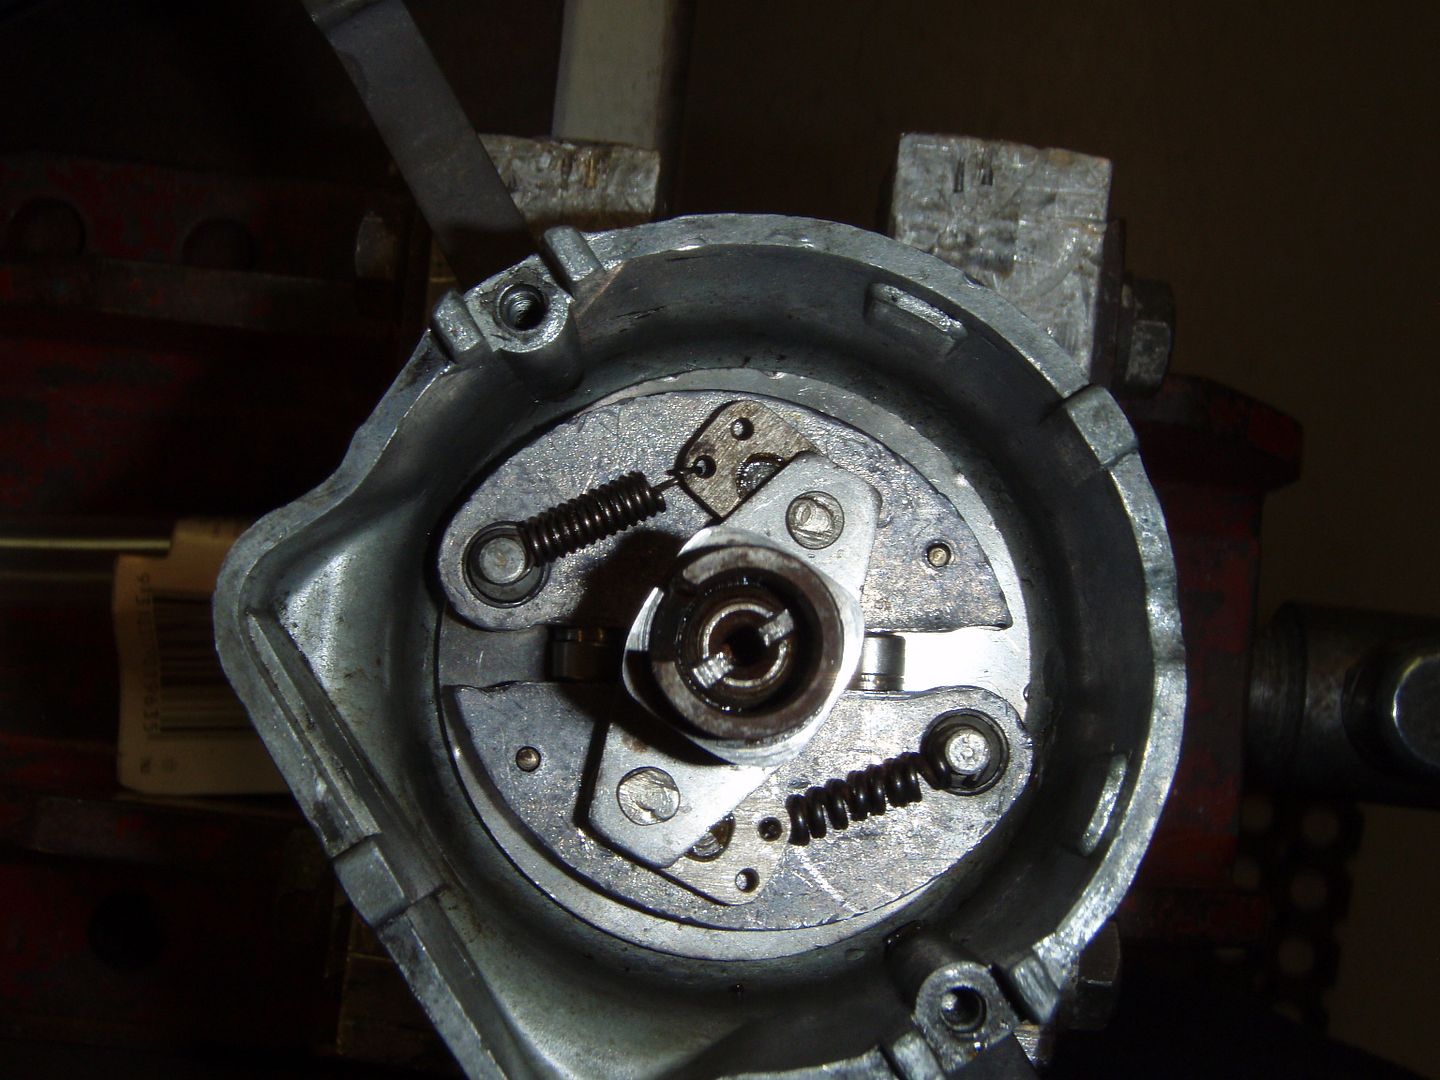
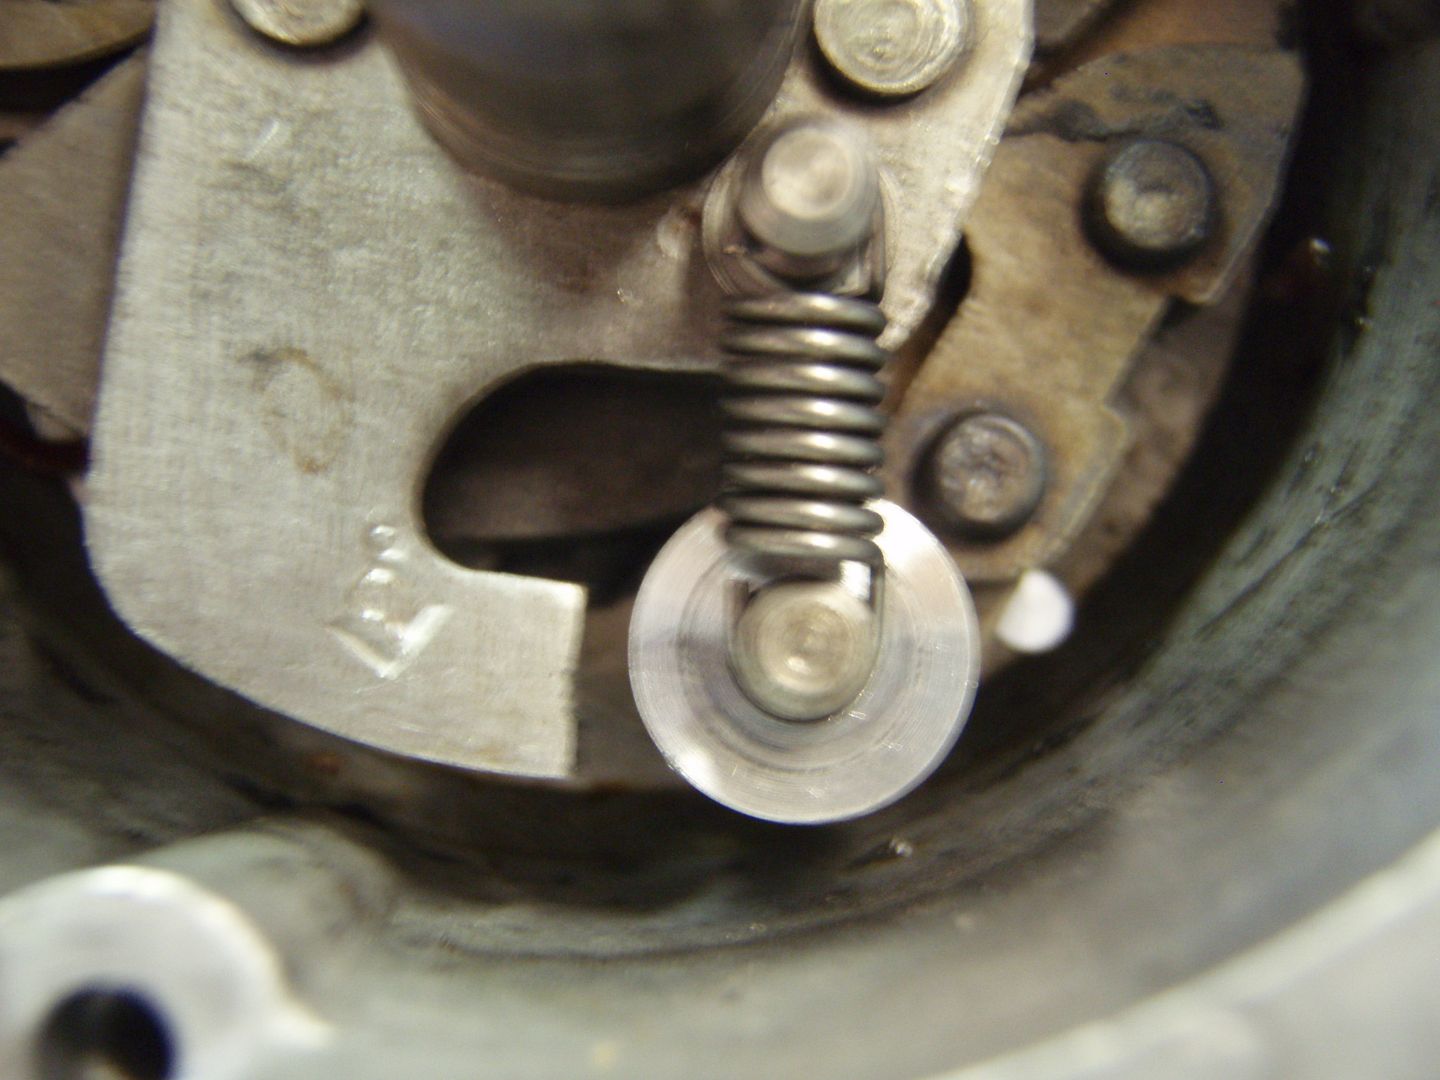
I do not have any knowkedge of the validity of 36 deg. because I have never investigated it. It does seem a lot though. At present my static advance at 900 RPM is 4.5 deg. - distributor advance is restricted to 4.0 deg. (8 engine). I know these settings are precise because my blower at 6000 RPM consumes 12.3 HP. There is no way I could expect the Woodfuf key to take this load especially with the alloy pulley I made. I set the centre of the dividing head of the mill to align with the centre of the quill. Then holding the crank in the chuck TDC was determined with a dial gauge on a crank pin journal by rotating the crank to obtain maximum reading on a dial gauge then locking the dividing head. A 4.0 mm. keyway slot was milled for the full length of the crank nose. The pulley was then fitted and a groove machined at TDC and filled with paint. This is how I know my TDC marks are correct. Even if they wern't I measured the timing after getting home for future reference. The degree of distributor advance on the 23D4 Cooper disy I am using is restricted by a sleeve fitted over the bob weight limiting pin. See pic. For the original DKYH4A dissy it was limited by screwing socket head screws into the lead weights with appropriate washers to obtain 4 deg. adv. This dissy is carried as a spare with known advance characterestics. I don't seem to have any problem seeing the timing marks with the timing light I am using.
Bob

Re: First Time Engine Rebuild
Posted: Sat Jul 16, 2016 3:33 pm
by RobThomas
I have a 23D4 on the 1952 car which is otherwise standard. 15(30) degrees on that compared to the 18(36) on the old SV distributor, allegedly. Starter struggles a bit more but runs better.
Wideband Lambda and Vac gauge today to get a decent starting point on the Tourer. Now it is driveable I'll get hold of a strobe. Thanks for the advice, guys.
Apologies for the thread hijack.

Makes you wonder just how far out the book figures are on modern fuel....
[frame]

[/frame]
Re: First Time Engine Rebuild
Posted: Mon Jul 18, 2016 3:22 pm
by edd_barker
Hands off my thread!! And stop posting pictures of nearly finished immaculate engines, it's not helping!!
Reassembling the oil pipe/banjo from block to filter (switching to mini type screw-on filter).
The workshop manual shows only ONE copper washer in use.
Mine came off with 3 on it!
[frame]

[/frame]
Should I replace with just one as per the manual or is there any method to the madness?
I am therefore assuming that NO other sealing washers are involved in the other joints leading to the oil filter?
[frame]

[/frame]
Many thanks,
Edd
Re: First Time Engine Rebuild
Posted: Mon Jul 18, 2016 5:26 pm
by amgrave
On a banjo joint there is usually one copper washer either side to form the seal.
Re: First Time Engine Rebuild
Posted: Mon Jul 18, 2016 5:37 pm
by philthehill
Edd
Regarding the copper washers - there should only be two - one either side of the banjo.
They will most likely be rock solid (which is most likely why there are three) which is no good to man nor beast - anneal them by warming to cherry red and dunking in cold water. Even the new ones anneal. They may have been on the shelf a long time.
Regarding the filter head - your type does not need a seal or washer where it fits into the filter head - just tighten up until it is nipped - a smear of Loctite on the taper threads will not go amiss.
Dependent upon where and what vehicle the filter head and pipe came from/off the pipe may need to be realigned to ensure that the banjo fits as it should to the block seat. If there is any strain on the pipe you must make sure that the strain is removed. There is a mod to replace the metal pipe with a stainless braided rubber pipe which removes the possibility of strain fracture completely. See:
http://www.minispares.com/product/Class ... lassic/oil filter pipe.aspx|Back to search as an example.
Note: Some of the filter heads have a straight threaded union into the filter head and whilst not strictly original a Dowty Washer between the union and filter head is recommended.
Phil
Re: First Time Engine Rebuild
Posted: Mon Jul 18, 2016 6:12 pm
by oliver90owner
Copper is one of the metals which can be air cooled slowly or fast quenched when annealing. If annealing a washer or ring, I usually track around the object and then move the flame away. Has worked OK for 50 years, for washers to head gaskets.
Re: First Time Engine Rebuild
Posted: Mon Jul 18, 2016 6:24 pm
by bmcecosse
One washer each side - take great care with the pipe - it twists/distorts very easily.
Re: First Time Engine Rebuild
Posted: Mon Jul 18, 2016 6:37 pm
by oliver90owner
Yes, thicker single washers are better than multiple thin ones. Particularly important to be a sure the trheads on the fitting do not bottom out.
Re: First Time Engine Rebuild
Posted: Mon Jul 18, 2016 6:48 pm
by edd_barker
Thanks all,
I have two new copper washers with which to replace. And also a blowtorch to anneal, which is a process I am not familiar with, but it seems straightforward enough.
I don't think the pipe will line up perfectly with the new filter housing, how should I go about bending it to relieve any strain, with heat?
Phil, the stainless hose looks an excellent solution, but I am reluctant to spend another £60 without trying to re-use the original pipe if I can.
Many thanks,
Edd
Re: First Time Engine Rebuild
Posted: Mon Jul 18, 2016 6:57 pm
by philthehill
Edd
The pipe can be bent cold to suit without much difficulty - just take it very easy and do a little at a time and keep checking the fit.
It is most important that the pipe is not under any stress when fitted.
Phil
Re: First Time Engine Rebuild
Posted: Tue Jul 19, 2016 12:27 pm
by BLOWNMM
Ed
My apologies also for the thread hijack!
Bob
Re: First Time Engine Rebuild
Posted: Tue Jul 19, 2016 5:15 pm
by philthehill
Bob
I am glad you posted re your distributer as they are interesting mods and the more info we have the more power to our elbow (let alone motor) so to speak.
Phil
Re: First Time Engine Rebuild
Posted: Wed Sep 07, 2016 10:58 am
by edd_barker
Hi all,
finally back in the garage this week! Cracking on with the final touches to the rebuild, but I have a run in to a couple more snags I could use some advice on.
1. The reconditioned rockers I bought were not the sintered kind as photographed from ESM (typically photo has now changed!) but the standard pressed kind. I popped them on using both the Minispares spacer kit, and then back to original springs with shims, but could not centralise them properly over the valve tips. Material will need to be removed from either the arms or the posts. I do not have the mechanical facilities to do this, and am reluctant to hand file as there is a fair bit of material to remove. Photos attached for your consideration:
[frame]

[/frame]
[frame]

[/frame]
[frame]

[/frame]
[frame]

[/frame]
I could take the parts to my local engineers who are £40 an hour and have them put in the lathe, could end up quite expensive though! Any other suggestions? To my mind the easiest option is to get hold of the sintered, they are not available reconditioned, what am I looking for on 2nd hand eBay sets? No wear ridge on contact pad? They all seem to have an obvious wear-area. I will of course stick them on the rocker shaft that came with the recon-ones.
Are the sintered rocker pillars interchangeable with the pressed arms, this might give me more clearance?
Any suggestions much appreciated!
Thanks,
Edd
EDIT
Will these forged arms accept the off-centre valve tips? They are cheaper than the new sintered ones from minispares
http://www.minispares.com/product/Class ... |Back%20to
Re: First Time Engine Rebuild
Posted: Wed Sep 07, 2016 11:02 am
by edd_barker
2nd issue:
Refitting the pipe from the new filter head to block, there was a very minor amount of stress on the pipe. I tightened the filter-head end first to ensure that this went on straight, the banjo end at the block then required angling maybe 1mm towards the block in order to eliminate stress. My first attempt to bend this by hand was a real struggle, until the pipe kinked. I have a spare, does anyone have any bending tips? It feels too tough to do round a bottle like with brake pipes. I may just give up and go for the minispares rubber pipe cure.
How much 'stress' is acceptable? The fitment was very, very close. But not 100%.
Many thanks,
Edd
Re: First Time Engine Rebuild
Posted: Wed Sep 07, 2016 12:35 pm
by bmcecosse
The pressed steel rockers are much better - stick with them. Compare each one for thickness - there may be enough variation there for you to mix and match to get a better alignment. But filing will be easy - just keep it square and of course you may need some washers to make up any gaps. But frankly - the offsets there are not great - it's not a high performance engine - and could well just be left as they are without any worries. I did warn you about the pipe... Would an extra washer make up the difference? Otherwise - just fix both ends 'loosely' and then tighten them up progressively - it will be fine unless there is some serious misalignment.
Re: First Time Engine Rebuild
Posted: Wed Sep 07, 2016 2:43 pm
by edd_barker
Hi BMC,
Thanks for your response.
RE the rockers, should I file the arm or the pillar? The arms have a small amount of bush poking out each side which could be filed, but I am conscious of friction surfaces as there are no washers between arm and pillar on the re-con set, which I believe is standard. I will spend more time swapping everything about.
The banjo feed pipe needed angling rather than spacing out with an extra washer, but thinking about it there were two washers in there before, so I will try that. The misalignment was minimal at either end, but I wasn't sure how perfect it needed to be.
Thanks again, I hope you are feeling better recently?
Best,
Edd
Re: First Time Engine Rebuild
Posted: Wed Sep 07, 2016 2:44 pm
by philthehill
The sintered and pressed steel rockers are interchangeable but only in full sets.
Which ever way you go to align the rocker over the valve tip i.e. filling the side of the rocker or reducing the width of the rocker pillar you end up with the adjuster ends of the rocker extremely close to the rocker pillar.
When I centralized mine I had to take a shaving off the rocker pillar to allow for a working clearance between rocker pillar and rocker.
If you reduce the width of the rocker to centralise over the valve tip you are actually reducing the load bearing area of the rocker - whilst not much it does make a difference which may lead to more rapid wear of the rocker and shaft.
As regards the oil transfer pipe between block and filter head - there must be absolutely no stress induced into the pipe.
Even leaving both end loose and gradually tightening alternate ends is no good as the slightest stress will fracture the pipe and at worst snap off the oil filter head.
The main reason for fitting the flexible pipe is to remove any stress in the pipe as the failure of the screw on filter type filter head caused by misalignment/stress of/in the pipe is a well known problem.
Phil[frame]

[/frame]
Re: First Time Engine Rebuild
Posted: Wed Sep 07, 2016 3:22 pm
by edd_barker
Hi Phil,
Thanks for the reply. I think I will file the rocker arms down a small amount, and then leave it as good as I can get it, if you agree with BMC that the current set-up is tolerable in a road engine?
RE the pipe, I will have another go at bending my 2nd pipe then, if no joy I will buy the flexible pipe. Better to be safe than sorry! Would you mind confirming what size I need from following pictures? I must confess I cannot work out what thread size this converts to, and minispares do 3 types:
[frame]

[/frame]
[frame]

[/frame]
[frame]

[/frame]
I've loc-tited the Union in the filter head or I would remove for a better photo!
Many thanks,
Edd
[frame]

[/frame]
Re: First Time Engine Rebuild
Posted: Wed Sep 07, 2016 4:22 pm
by philthehill
Edd
As regards the alignment of the rockers with the valve tips - I have seen worse - but personally if I was spending all the time/money as you have on the engine I would want the rockers just right.
Your filter head (12A2032) has a 1/4" NPT (taper) thread for the union on the filter head and a 5/8" UNF thread for the block.
Therefore I suggest that the pipe you require with adapter unions is the one in the link attached.
http://www.minispares.com/product/class ... AIDED.aspx
Phil
Re: First Time Engine Rebuild
Posted: Wed Sep 07, 2016 6:40 pm
by edd_barker
Thanks Phil!
I will order that pipe if I fail in bending my other original one. Link much appreciated, I am still not 100% familiar with old-style threads.
Cheers,
Edd