Page 14 of 103
Re: Pickup restoration part three
Posted: Fri Jun 17, 2011 3:25 pm
by Matt Tomkins
looking really good - i'm ordering that too

so the big question... final big push and ready for national?!
Re: Pickup restoration part three
Posted: Sun Jun 19, 2011 2:03 pm
by davidmiles
no chance Tom, there's way to much still to do before she's street safe, Ive just realised I'll have to take the water pump out a few millimeters to get this connecting pipe in, blast, wish I had fitted that earlier. Ive got a few holes to drill in the radiator and front panel to secure them to the front, then I'll be able to mount the radiator.[frame]

[/frame]
Re: Pickup restoration part three
Posted: Sun Jun 19, 2011 2:51 pm
by chrisryder
that hose is all ribbed (convoluted) so that you can fit it without removing water pump or head. you should be able to squish it down, or bend it in the middle and ease each end over each 'tube' then push the middle to get it to spread out in place.
if you're going to the trouble of removing the pump to fit it, you may aswell fit a solid (non-convoluted) bit of hose as it's less likely to go than a convoluted one. although yours is silicon, so it should last!
Re: Pickup restoration part three
Posted: Thu Jun 23, 2011 6:53 pm
by davidmiles
fitted the bypass hose at last, I tried to do it the Chris way, by squishing it in, but it wasn't having it, so off came the fan, fanbelt. and the securing bolts for the waterpump and the positioning nuts for the dynamo, finally I had enough clearance space to fit the hose, its a tough little part, hope it lasts. Progress has moved on at a snails pace recently, parts, cost, heavy rain have all conspired against me. Plus I had my eye on a Lilac two door on someone's driveway in Worthing, The wife of a daily use Minor owner pointed it out to me, went to the door cap in hand, "scuse me sir, but is the morris minor on your drive for sale? Not at the moment, was his guarded reply, belongs to his Daughter. It's got mould and growing rust and If someone doesn't do something soon It'll end up at the scrappers. I'll watch that space and ask again next year, if it's still not moved.[frame]

[/frame]
Re: Pickup restoration part three
Posted: Thu Jun 23, 2011 11:44 pm
by DAVIDMCCULLOUGH
A lilac 2 door, a million by any remote chance???
Re: Pickup restoration part three
Posted: Fri Jun 24, 2011 5:43 am
by mogbob
David
In your shoes, I'd drop a note through the door ,with your contact details,reminding them of your visit and asking for "first refusal ", as a committed Morris man, it would go to a good home, etc., etc.
If you have sown the thought... somebody else might benefit from your softening up process.You've nothing to lose after all ,other than the car !!
Bob
Re: Pickup restoration part three
Posted: Fri Jun 24, 2011 7:53 am
by chickenjohn
davidmiles wrote:no chance Tom, there's way to much still to do before she's street safe, Ive just realised I'll have to take the water pump out a few millimeters to get this connecting pipe in, blast, wish I had fitted that earlier. Ive got a few holes to drill in the radiator and front panel to secure them to the front, then I'll be able to mount the radiator.
No need to drill any holes!!!!!

The radiator already comes with four 5/16 BSF captive nuts (or sometimes metric on new rads_ and the cowl panel , the piece behind the front panel already comes with four holes/ slots.
You can get the correct length and thread bolts from any Minor specialist very cheaply.
Re: Pickup restoration part three
Posted: Fri Jun 24, 2011 2:39 pm
by davidmiles
yes Bob thats a good idea, by the time this is roadworthy I'll be champing at the bit to start another project, I'll drop in a note as you suggest.
John, yes you are right too, thanks, there are captive nuts that Ive made full use of after a visit to namrick nut and bolt shop in Hove. I did have one hole to drill in the rad panel, at the bottom where it contacts the flange at the front of the tie plates.[frame]

[/frame]
Re: Pickup restoration part three
Posted: Fri Jun 24, 2011 2:42 pm
by davidmiles
there were holes in the right places but one, now with the radiator and front panels held in place by temporary bolts I can adjust the front wing fit and use the hockey sticks, don't want to scratch the chrome.then I can drill through the bottom of the front panels and bolt them together. [frame]

[/frame]
Re: Pickup restoration part three
Posted: Fri Jun 24, 2011 2:46 pm
by davidmiles
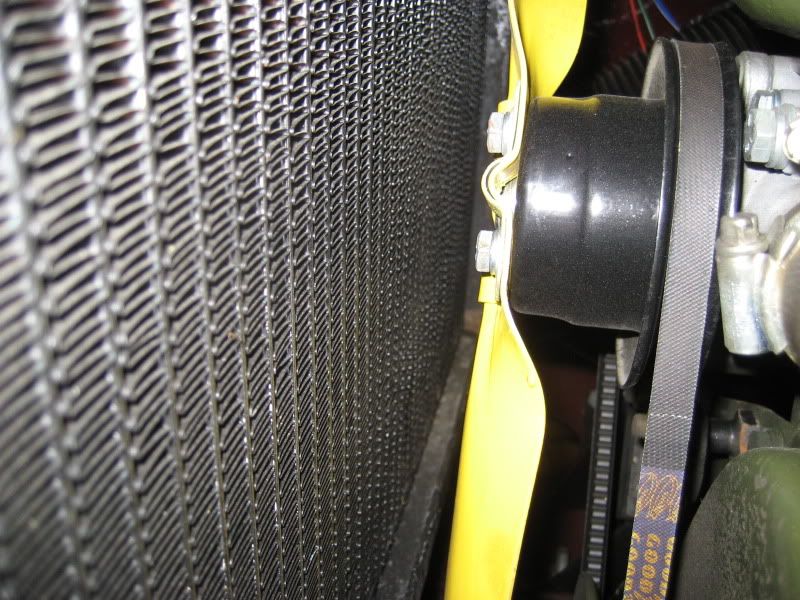
bit concearned about the tiny amount of clearance between the fan blade and the radiator. there's only a couple of mm clearance, what happens when things get hot and expand? is it done to bend or tweek the fan just a bit
[frame]

[/frame]
Re: Pickup restoration part three
Posted: Fri Jun 24, 2011 3:59 pm
by chickenjohn
davidmiles wrote:-snip-
John, yes you are right too, thanks, there are captive nuts that Ive made full use of after a visit to namrick nut and bolt shop in Hove. I did have one hole to drill in the rad panel, at the bottom where it contacts the flange at the front of the tie plates.
Good one! If you are worried about the clearance, you could enlarge the holes through the cowel (radiator mounting) panel so the radiator can be mounted further forwards. You are right David, the clearance does look tight between fan and rad! I'd want to see a half inch or so at least.
Re: Pickup restoration part three
Posted: Fri Jun 24, 2011 8:46 pm
by ptitterington
Looks a bit close to me this is my traveller,
Peter
Re: Pickup restoration part three
Posted: Sat Jun 25, 2011 12:25 pm
by davidmiles
yes Peter, but it's not the fan to matrix clearance I have a problem with, Ive got a full 25mm clearance here.[frame]

[/frame]
Re: Pickup restoration part three
Posted: Sat Jun 25, 2011 12:27 pm
by davidmiles
its here at the top end my problems abound, there is no clearance at the tip of the blade with the top of the Radiator where it catches that ridge.[frame]

[/frame]
Re: Pickup restoration part three
Posted: Sat Jun 25, 2011 12:30 pm
by davidmiles
there is the slightest amount of play between the radiator shoulder and the rad panel that I might be able to exploit if I re- drill the mounting holes as John suggested.[frame]

[/frame]
Re: Pickup restoration part three
Posted: Sat Jun 25, 2011 2:03 pm
by davidmiles
so out came the radiator and I used a round edge file to modify the radiator bolt mounting holes, to elongate them toward the front. I'm only after a 5 mm clearance for the blade to the ridge.[frame]

[/frame]
Re: Pickup restoration part three
Posted: Sat Jun 25, 2011 2:07 pm
by davidmiles
Radiator, back in, bolted up as far forward as I could get, and yes a good 5mm clearance for the blade to clear the ridge. the blades are quite stiff, so hopefully there's no lateral movement when its running. Now on with the wings to front panel fit.
[frame]

[/frame]
Re: Pickup restoration part three
Posted: Sat Jun 25, 2011 2:55 pm
by chrisryder
it may be a good idea to get someone to be inside with their foot down on the clutch, and you look again at that gap. you may find it closes up with the pressure on the back of the engine.
when you're on the road, you could also find that it catches under heavy breaking as the engine lurches forwards. you'll notice that by a tapping noise, or worse, a sudden loss of water!
Re: Pickup restoration part three
Posted: Sat Jun 25, 2011 10:59 pm
by ian.mcdougall
I dont know if it makes a difference but sure I heard it on here before but were the engine towers fitted the correct way around
Re: Pickup restoration part three
Posted: Sat Jun 25, 2011 11:47 pm
by Roni
Another thing that might get a bit more clearance is to mount the fan next to the pulley and then the fan blade stiffener over the fan. It won't be much , but it may help.