Page 13 of 75
Posted: Wed Nov 11, 2009 4:26 pm
by davidmiles
Back to the Morris, Ive cleaned up these drums as best I can, the inner surfaces look ok, just lightly scored, I don't have the use of a lathe, can anyone advise a good method of restoring these, or is it just sit there with some emery cloth and rub away at the inner curve till its smooth?<br>

<br>
Posted: Wed Nov 11, 2009 6:35 pm
by MarkyB
There doesn't seem to be a ridge on them which is good.
I'd suggest a quick rub round with some quite coarse emery cloth and let the brakes shoes do the polishing.
Posted: Tue Nov 17, 2009 3:00 pm
by davidmiles
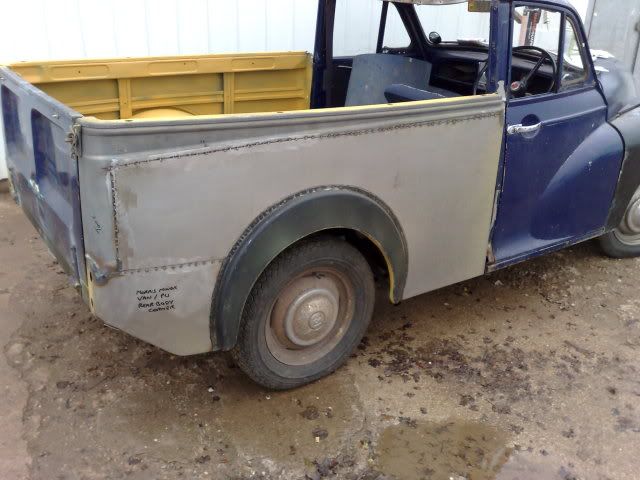
The sun shone today so it was a rare chance to get the rear tub side panels out for a comparison, Ive got two sets, one from the field find pickup relic and one from my basket case purchase. which pair to use?
This is the basket case offside interior and exterior view
<br>

<br>
Posted: Tue Nov 17, 2009 3:01 pm
by davidmiles
this is the nearside from the same set...<br>

<br>
Posted: Tue Nov 17, 2009 3:03 pm
by davidmiles
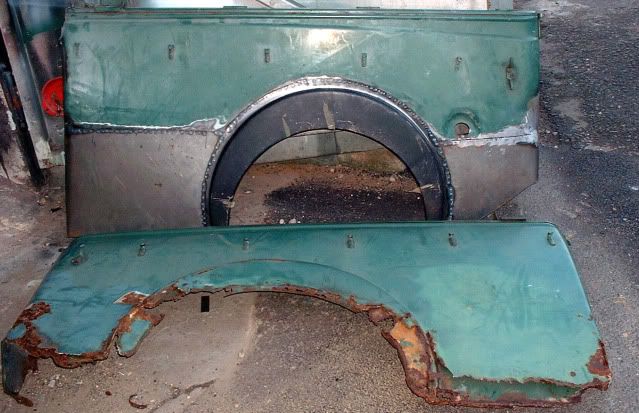
Not perfect by a long chalk, here are the relic offside set, quite a lot of rust in there...<br>

<br>
Posted: Tue Nov 17, 2009 3:05 pm
by davidmiles
and the offside, tops are solid, and they are complete, but there's been bad repairs on both sets.
<br>

<br>
Posted: Tue Nov 17, 2009 7:44 pm
by d_harris
Is it my imagination or have the green ones seen a welder already? They look the best of the two sets.....
Posted: Wed Nov 18, 2009 12:49 am
by davidmiles
Yes Dan, both sets have seen rather bad repairs in the past, this is the first time Ive been able to directly compare the sets and you are right, the green ones look far more healthy. can you get part repair panels for these? I don't mean the whole side panel.
Posted: Wed Nov 18, 2009 1:15 pm
by ASL642
I believe you can get the wheelarch repair section.
Posted: Wed Nov 18, 2009 7:41 pm
by d_harris
Wheel arches aside, the bits that have corroded are really just flat panel with a curved edge, shouldn't be too hard to fabricate.....
Posted: Thu Nov 19, 2009 12:45 am
by davidmiles
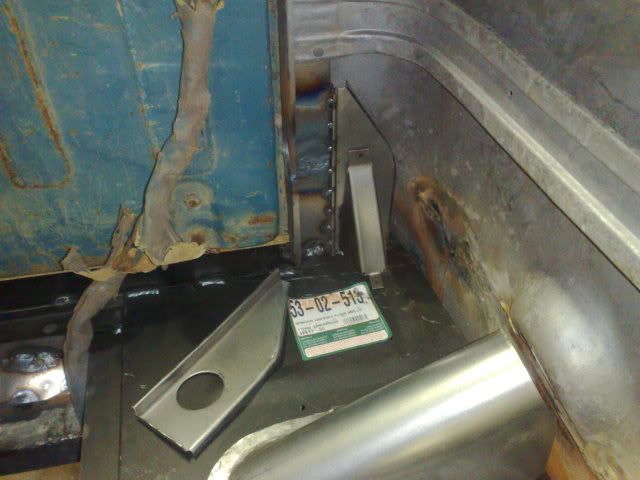
Yes, I guess so, here's a close up of some rusted through areas,odd that it is so clean and has paint on it. This is where the floor and side meet, is it an area to watch for moisture collection? do you recon its worth getting them sand blasted? Might come back with just the tops intact and the panels blasted away. Still, I'll know what solid metal Ive got then.
<br>

<br>
Posted: Thu Nov 19, 2009 12:54 am
by davidmiles
Here is one of the old repairs, scarred quite badly, its going to need some smoothing down with a grinding disc.
<br>

<br>
Posted: Thu Nov 19, 2009 8:41 am
by MarkyB
It looks like the same system that the vans use to "seal" between the floor edge and the sides.
Not only will it be a water trap, but a dirt and dust trap too. No doubt leading to a nice grinding paste forming which will wear away at any paint in the area.
I'd suggest repairing that line of holes before you take it anywhere near a sand blaster.
You have the luxury of a template you can use to repair the grey sides, would it be worth fixing them for sale to help fund the rest?
Posted: Thu Nov 19, 2009 10:12 am
by jonathon
I'd suggest that you hand strip/chemical strip rather than sand blast it. Blasting will stretch the steel. Media will also bare metal areas where you cannot get to , in order to apply a coat of paint or rust inhibitors.
Re brake drums above there seems to be a few grooves on the r/h one,, if fitting new shoes then I'd have the drums skimmed on a lathe rather than try and flatten by hand, or simply buy some new ones.
Posted: Thu Nov 19, 2009 8:41 pm
by IaininTenbury
Yes, do avoid any blasting process, I've seen plenty of these panels badly rippled. If it were me, I'd have the original rustiest ones chemically dipped and repair those. They look the straightest, most unmessed with ones and the green ones with previous repairs on are good enough to fetch a good price if you sell them.
All repair panels are available to above the line of the floor edge where they nearly always start rusting through, and the area in front of the wheel arch isn't quite flat, but has 'shape' in it. Most car panels do have some shape to give them stiffness and stop them vibrating.
I've just done a pickup that had been shot blasted years ago. The filler was 3/4" deep in places to hide the ripples and had started cracking and lifting. Only way forward was wholesale replacement of the side area with a panle wheeled up to shape, with conventional wheelarch and rear corner used. Makes yours look very repairable!

Posted: Thu Nov 19, 2009 9:11 pm
by IaininTenbury
The usual three repair panels for a pickup side.
You'll probably need these if you repaired the grey ones, and probably the green too, to be honest. I'm guessing the box section up the inside of the rear corner will need the lower end reconstructing, to a certain extent and probably new triangular corner gussets (behind the indicators) too.
Posted: Fri Nov 20, 2009 6:26 pm
by davidmiles
Ok, thanks Ian, I had the intention of repairing the green one's, but I think your right, the greys may as well be done as I'm cutting out old metal, may as well cut out really bad metal while I'm there.
This area looks as bad as it is complex.
<br>

<br>
Posted: Sun Nov 22, 2009 8:43 pm
by davidmiles
Steadily working through the different parts and cleaning them up, here's the spare starter motor from under the seat in the original relic field find, the basket case didn't come with any engine components at all. Still, this one cleaned up reasonably well, I recon it was placed there ready for a re fit and they never got around to it. Looks a lot better now Ive cleaned off the earth kicked over it by generations of burrowing rabbits. I wonder if it still works?
<br>

<br>
Posted: Sun Nov 22, 2009 8:52 pm
by IaininTenbury
You can get the bits for the inside of the rear corners too. The box section pillar comes in two parts, the deep channel section which continues down below the floor level to join to the inner rear valence, and the outer flatter part that you see when you open the tailgate. The corner gusset with the hole for the back of the indicator light just welds on and stiffens up the rear corner/side join and the little 'pyramid' cover just screws on and stops a shifting load hassling the wiring to the indicator.
Hope that makes sense!
The rear pillar pieces are easy enough to fold up if you've got a folder and don't want to buy them.
The outer rear side/corners don't include the 'domed' area where the flat light area merges into the curved rear corner, but its not too difficult to make up a little curved piece to fill the gap, as yours have been repaired beyond this. I'll get some more pics if theres any bits you need help with as its not always obvious when its all apart.
Posted: Sun Nov 22, 2009 8:57 pm
by davidmiles
Thanks Ian, any pictures would provide detailed info on that area would be a real help, I can refer back to it when I'm making the repairs.