Page 2 of 2
Re: How to repair a damper
Posted: Sat Jan 15, 2011 5:55 pm
by bmcecosse
Ooooh - thanks! So you have destroyed that piston to show the little ball ??? The pistons are identical - yes ?? So - if I'm looking at it all correctly - the only thing that holds the shaft in the damper is the tight fit of the splined shaft in the piston carrier ? No retaining fixture at the rear - just a 'seal' to stop oil flooding out ??
Great exposé Declan - many thanks ! The next great piece of research would be to find larger dampers that could be fitted in place of the standard items........especially at the rear. I suppose the fronts are pretty much unique/designed for the job in hand - although there is always the mystery of the alternative mounting holes on the bulkhead to explore!
Re: How to repair a damper
Posted: Sat Jan 15, 2011 6:14 pm
by Declan_Burns
Quote..
So - if I'm looking at it all correctly - the only thing that holds the shaft in the damper is the tight fit of the splined shaft in the piston carrier ? No retaining fixture at the rear - just a 'seal' to stop oil flooding out ??
That's it Roy. There's nothing at the rear to fix it.
I'm sure that is a photo of the piston from the rear damper we sacrificed-but it's repairable.
Regards
Declan+
Hans Dieter Gollus
Re: How to repair a damper
Posted: Sat Jan 15, 2011 6:40 pm
by bmcecosse
The two pistons in your picture 9 look slightly different - or is that just the exposure/light effect ?
Re: How to repair a damper
Posted: Mon Jan 17, 2011 2:45 am
by katy
Thanks for the info Declan, very informative thread.

Re: How to repair a damper
Posted: Tue Jan 18, 2011 6:40 am
by Declan_Burns
bmcecosse wrote:The two pistons in your picture 9 look slightly different - or is that just the exposure/light effect ?
Roy,
The pistons are identical, the shaft on the front is thicker. Here they are side by side, rear and front.
Declan +
Hans Dieter Gollus[frame]

[/frame]
Re: How to repair a damper
Posted: Tue Jan 18, 2011 7:51 am
by bmcecosse
One seems to have two thin lines - and the other a thick black 'insert' - or is it just a trick of the light ?
Re: How to repair a damper
Posted: Tue Jan 18, 2011 8:55 am
by Declan_Burns
Roy,
Ah, the thick black band is the rubber piston seal, look at the fourth photo at the very beginning of this thread where you can see it a bit better.
Only one piston has a seal, the other has two grooves.
Regards
Declan+Hans Dieter Gollus
Re: How to repair a damper
Posted: Tue Jan 18, 2011 7:19 pm
by bmcecosse
Right - so they are different. Does the seal look as though it will survive? I guess it may be hard to get a new one!
Re: How to repair a damper
Posted: Tue Jan 18, 2011 9:30 pm
by Declan_Burns
Roy,
When I stated identical I meant that the piston with the seal on the front damper is the same as the piston with the seal on the rear. The same applies to the other piston with the grooves. The seals looked quite good with no sign of wear and I would think they might not need replacing. We will take a closer look and see if we can source replacements.
Regards
Declan+Hans Dieter Gollus
Re: How to repair a damper
Posted: Mon Mar 28, 2011 9:32 am
by klm
Declan,
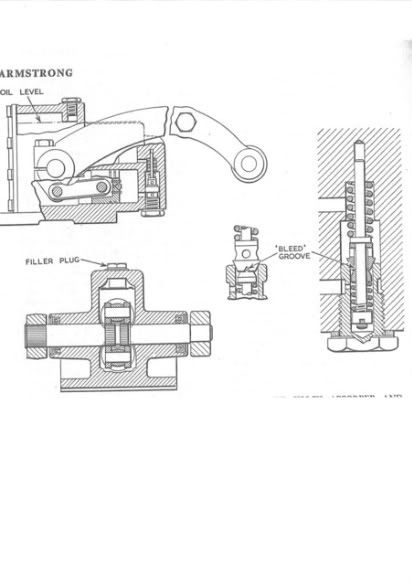
I have just disassembled two front and two rear dampers for refilling with fresh oil and the valve assembly fitted to both type dampers is shown on the following diagram. Your posting on 15 January shows the components of the valve assembly and it shows an 'O' ring and a fibre or copper gasket. On all 4 dampers I disassembled there were no 'O' rings or fibre (copper) washers. There is a tapered rubber washer for sealing of the plug with an aluminum washer and it is possible that the rubber washer would get damaged if I attempt to remove from the plug. The diagram shown below does not show an 'O' ring and I would like to know where the 'O' ring goes if there is one originally fitted.
Thanks, klm
Re: How to repair a damper
Posted: Tue Mar 29, 2011 6:21 am
by Declan_Burns
Klm,
Maybe your dampers are different. Here's a photo of the valving on the rear damper that H.D took yesterday. There are no fibre washers. The O-ring does look tapered but we are convinced it's just a standard O-ring that has been compressed over the years.[frame]

[/frame]
Declan +
Hans Dieter
Re: How to repair a damper
Posted: Wed Mar 30, 2011 11:06 am
by klm
Declan,
Many thanks for your response. This photograph is very clear and this is exactly I found on my dampers and it is consistent with the diagram I posted. I first thought that the O ring goes on the recessed part of the plug. Thanks again. klm
Re: How to repair a damper
Posted: Mon Oct 03, 2011 11:39 am
by Trickydicky
After reading this article it is now quite clear as to how the dampers work and why they fail, The reason for the leaking shaft would more than likley be due to the damper arm wearing the machined bearing hole they are in "egg shaped". This is due to the degree of movement of the damper arm.
More than likley all the companys who refurbish the dampers do is to bush the machined bearing hole and posibly replace the piston seal if required and then replace the front seals.
From experience I would say It could be possible to repair a damper and to machine a seal cap, then if you have a press, make a dolly to press the replacement seal back in, quite a time consuming project but obviously you would need all the required machine tools. (Lathe, Milling Machine and a Press.)
Re: How to repair a damper
Posted: Sat Jun 16, 2012 8:03 pm
by bmcecosse
Did anyone ever manage to find the 'Minor Monthly article on refurbing a damper - to see how it compares ?
Re: How to repair a damper
Posted: Mon Nov 19, 2012 4:44 pm
by Declan_Burns
I just would like to mention that I have finally found a lipseal that fits the front damper and we sucessfully fitted one on Saturday.
The size is 28x38x7mm and costs 1.80€. The seat for the seal is 37.6mm and it may be necessary to turn the seal down a tad. In my case it fitted without modification. We made up the core plug from PVC and measures 25.2mmx3mm The edges were chamfered and it tapped in nicely.
BEFORE[frame]

[/frame]
AFTER-using a solid seal which we later exchanged for the lipseal[frame]

[/frame][frame]

[/frame]
Regards
Declan
Re: How to repair a damper
Posted: Sun Mar 17, 2013 7:03 pm
by Trickydicky
I have sucessfully replaced the front seals on my rear leaking damper following Declans method but I dont have access to a lathe to make the rear plug seals. I have taken a rather drastic step to reseal the rear of the damper. Here is how I did it,
I carefully removed with a sharp chisel the housing for the plug seals to make recess in the the rear housing flush.
The recess in the rear of the damper I measured as 2.5mm deep so I made a plate from 3mm flat aluminium plate, I made the plate slightly smaller about 2mm all round, drilled two counter sunk holes for 4mm slotted screws, then I drilled and tapped two blind 4mm holes 5mm deep in the rear of the damper.
I fitted the plate and filed the plate flat so it was flush with the rear of the damper body. I removed it and refitted it with some instant gasket. I then made sure the plate was flush with the damper body and filed a little more off it and refitted it back on the car. The damper may now last another 25 years +

[frame]

[/frame][frame]

[/frame][frame]

[/frame]
Re: How to repair a damper
Posted: Sun Mar 17, 2013 8:24 pm
by bmcecosse
Well done -excellent job!

Re: How to repair a damper
Posted: Mon Oct 19, 2015 8:43 am
by danielvoorwerk
With the useful 'how to' from Declan and co. I recently started me own overhaul of (spare) rear dampers; instead of the milling and screwdriver-wiggle tric to get the back-plug out, I used a (welded on) impact extractor, wicht worked like a treat !
Now I have to source lipseals and make some seals for the top-lid....[frame]

[/frame]
Here a pic of (a kind of) impact extractor, in my case I welded the tip of the extractor to the back-plug, still visible on the lower picture...[frame]

[/frame]
Re: How to repair a damper
Posted: Mon Oct 19, 2015 10:06 am
by Declan_Burns
Daniel,
You will need to source 17x 27x6mm lip seals for the rear damper-if you have a problem sourcing them, let me know.
A ready made plug for the rear of the damper is also available. I can confirm that machining is no longer required. We also have a source for the piston seals in PU. We have them but have not yet tested them.
Regards
Declan