Page 9 of 11
Re: Differential overhaul
Posted: Sun Nov 03, 2019 4:41 pm
by ndevans
Declan-so if I understand you correctly, you are suggesting using a shim to take up the wear in the bearings?
Re: Differential overhaul
Posted: Sun Nov 03, 2019 4:56 pm
by Declan_Burns
Neil,
Yes as that is the only reason that I can see that you have lost the preload other than somebody over crushed the spacer which I doubt.
Think of it this way. When everything is new and set up correctly the spacer length is fixed by -either solid or crush spacer, it does not matter and preload is correct. As the bearings wear, they still cannot move closer together due to the fixed length of the spacer. The first thing you loose is the preload. The only way to restore it is to compensate for the wear in the bearings by increasing the spacer length. Notice I don't even mention the pinion height as it has not (in theory) changed as long as the bearings are not too worn so that the whole pinion could move.
Regards
Declan
Re: Differential overhaul
Posted: Sun Nov 03, 2019 5:03 pm
by ndevans
Right, thanks, I now have a better understanding!
I will get the pinion out of the 4.22 this week, and find out what sort of spacer I have.
Cheers N
Re: Differential overhaul
Posted: Mon Nov 04, 2019 3:57 pm
by ndevans
philthehill wrote: ↑Fri Oct 18, 2019 7:55 pm
The yellow marking compound used in the link above to determine the tooth meshing is available from English Diff
sales@englishdiff.com
It is supplied with an application brush as part of the purchase.
It also comes with instructions for use and examples of right and wrong tooth pattern.
Also this tool may useful and looks as if it may adaptable for the Minor diff:-
https://www.bearingkits.co.uk/BMW-1-Ser ... t/1254.htm
Phil,
What is that marking compound called please? I googled English Diffs, got redirected to bearingkits.co.uk. Rang them, they haven't got any.
Cheers N
Re: Differential overhaul
Posted: Mon Nov 04, 2019 4:15 pm
by philthehill
Re: Differential overhaul
Posted: Mon Nov 04, 2019 6:43 pm
by ndevans
Thanks Phil.
Before I go too much further, two questions.
1-am I right in thinking that using the marking compound to check and adjust the meshing pattern removes the need to use the dial indicator and slip gauge to measure the pinion height wrt the cage bearing seats, as described in the BMC manual?
2-before I strip the pinion on the 4.22, is it worth me temporarily reassembling the crown wheel and cage, and using marking compound to see how it meshes now?
Cheers N
Re: Differential overhaul
Posted: Mon Nov 04, 2019 6:47 pm
by philthehill
Yes for both questions
It will also give you practice on setting the meshing without the use of specialist tools.
Re: Differential overhaul
Posted: Thu Nov 14, 2019 3:28 pm
by Banned User
What do you chaps think of this then?
BTA housing, ATA carrier and a BTA CWP?
ETA: For clarity, the picture of the crown wheel is with it mounted on a LSD not the carrier that was in the diff.
Re: Differential overhaul
Posted: Thu Nov 14, 2019 6:12 pm
by philthehill
My understanding is that:-
The ATA carrier will fit the BTA Housing and carry a BTA crown wheel.
The only difference between the ATA carrier and the BTA carrier is the strengthened webs of the BTA carrier
The problem lies with the BTA pinion which will only fit the BTA housing.
I am happy to be corrected if wrong.
So my view on the above post is that the combination is not unusual.
Phil
Re: Differential overhaul
Posted: Thu Nov 14, 2019 7:42 pm
by Banned User
philthehill wrote: ↑Thu Nov 14, 2019 6:12 pm
My understanding is that:-
The ATA carrier will fit the BTA Housing and carry a BTA crown wheel.
The only difference between the ATA carrier and the BTA carrier is the strengthened webs of the BTA carrier
The problem lies with the BTA pinion which will only fit the BTA housing.
I am happy to be corrected if wrong.
So my view on the above post is that the combination is not unusual.
Phil
Sorry, I misinterpreted this.
philthehill wrote: ↑Tue Oct 08, 2019 7:44 am
As I have previously stated the ATA and BTA carriers are not interchangeable. There are differences in the carrier that do not allow the interchange.
To confirm the above statement I have just looked at various MG/Sprite articles/publications regarding the interchangeability of the differential parts and all state that the carrier is not interchangeable between ATA and BTA units. They also state that problems arise with the interchangeability of pinion, pinion bearings and spacer.
Re: Differential overhaul
Posted: Thu Nov 14, 2019 7:59 pm
by philthehill
Poolguy
Well I am totally confused.com now.
You say that the BTA crown wheel was found to be fitted on a ATA carrier which was fitted into a BTA housing.
It could be that the carriers are interchangeable one way i.e. ATA to BTA but not BTA to ATA.
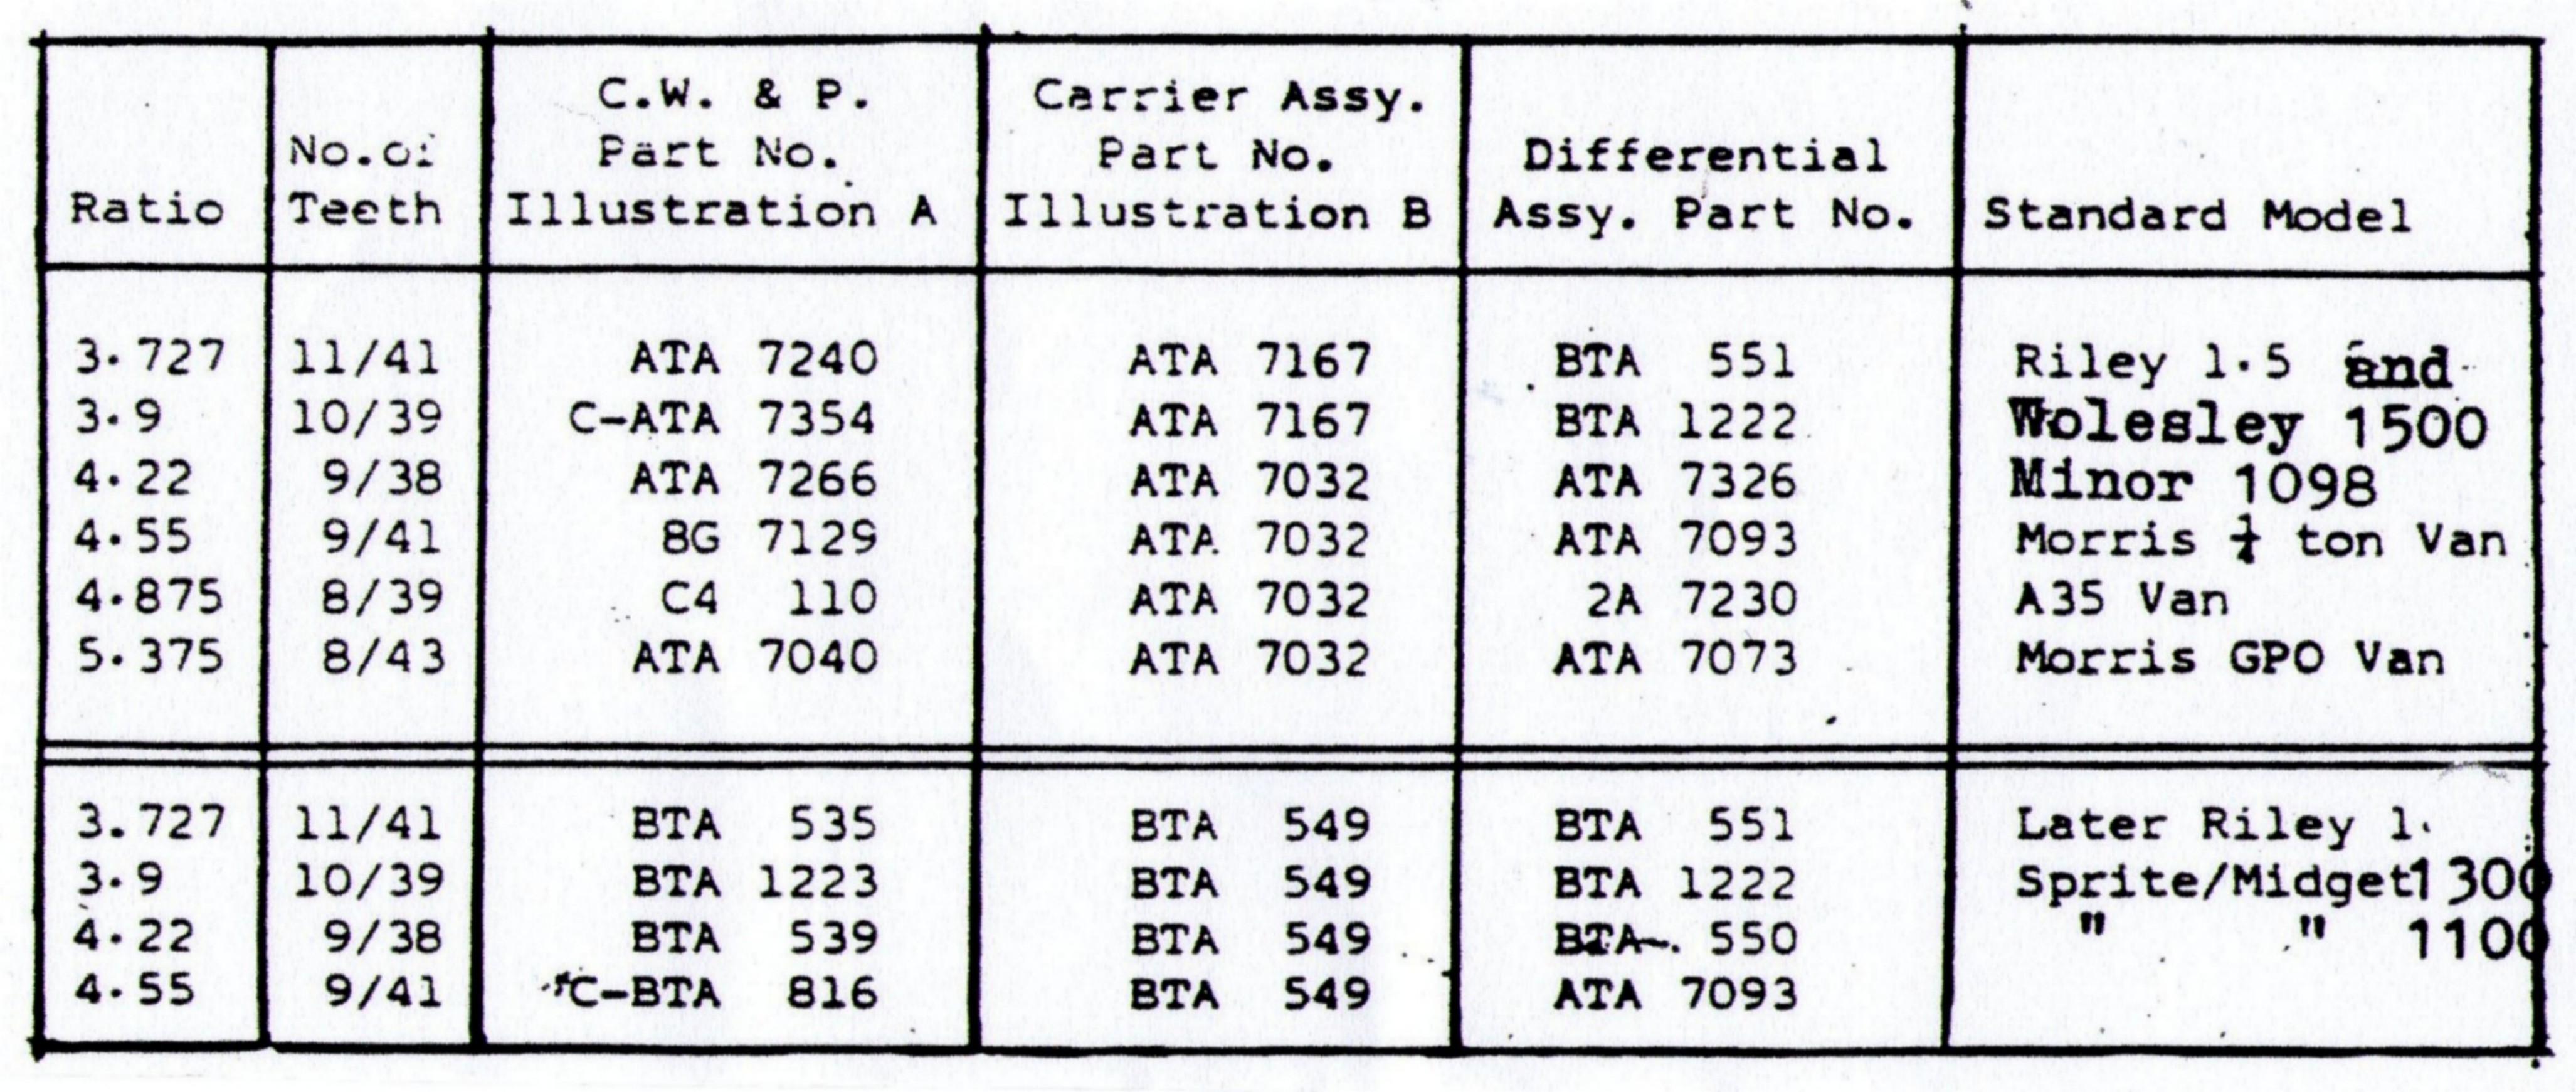
- Diffs Ratios and Pt Nos.jpg (982.73 KiB) Viewed 3867 times
Re: Differential overhaul
Posted: Thu Nov 14, 2019 8:03 pm
by Banned User
That is correct Phil. What I can't say though is how well it worked as it was an Ebay purchase. But it didn't show any signs of being tight like the one that Declan has.
Re: Differential overhaul
Posted: Thu Nov 14, 2019 9:53 pm
by ndevans
Nothing to report on my part, I'm afraid. I've not had time, last couple of weekends, and this weekend, are taken up with running events (as in racing).
Probably late Nov-early Dec I'll start to make more progress.
Cheers N
Re: Differential overhaul
Posted: Thu Nov 14, 2019 11:11 pm
by philthehill
I was just about to post a detailed reply about Poolguy's diff but when submitted it would not go as the MMOC site could not be reached and all was lost.

So a quick reply is in order at this time of night. In a summery the diff pictured by Poolguy is a standard 3.9 diff including the ATA 7036 carrier. BMC cast/stamped numbers do not always follow those number in the parts list.
Phil
Re: Differential overhaul
Posted: Mon Jan 06, 2020 11:12 am
by ndevans
Happy New Year all!
I ordered some marking fluid from Avion before Xmas. It finally arrived at the weekend, but they've sent the blue stuff instead of yellow. Also, despite saying full instructions enclosed, there's just a bottle of fluid.
Since they're in Ukraine, and it took 3 weeks to get the first lot, I'm not inclined to potentially waste another 3 weeks waiting for the yellow stuff, or for a request for instructions to be dealt with.
Has anyone got some of this stuff, complete with instructions, and if so, would they mind scanning and emailing to me please?
Cheers N
Re: Differential overhaul
Posted: Mon Jan 06, 2020 2:41 pm
by Declan_Burns
Neil,
To quote from the Billavista website:
2. Using a small, stiff brush apply gear-marking compound to three or four teeth of the ring-gear, in at least two different places. Use the marking compound sparingly, but be sure to completely cover both the coast- and drive-side of the teeth. Some folks like to mix a little gear oil with the marking compound to aid in application but I found using it straight worked best for me. If you have new gears or gears with a dark finish the yellow coloured compound works well, but if you have used gears or gears with a silver or metallic finish, you may have more success with the blue coloured marking compound – a popular brand is “Prussian Blue” made by Permatex.
You should be OK with the blue. I prefer the yellow. You can pop down to a local artist shop and pick up a tube of yellow ochre oil paint which is what I use. It is a lot nearer than the Ukraine!

Regards
Declan
Re: Differential overhaul
Posted: Mon Jan 06, 2020 11:38 pm
by ndevans
Thanks Declan. I had hoped that the pack would come with some example contact patterns, and guidance on how to interpret them, but it doesn't.
I've looked on the web, and the are many "how-to's" on YouTube etc. I've found this guide here, which looks useful:-
https://www.autozone.com.mx/repairinfo/ ... le=service
Is this applicable to the Minor diff, should I be looking for the same patterns, or is there something unique to the Minor diff?
Cheers Neil
Re: Differential overhaul
Posted: Tue Jan 07, 2020 7:31 am
by Banned User
Re: Differential overhaul
Posted: Tue Jan 07, 2020 7:36 am
by Declan_Burns
Neil,
I think "Billavista" explains it better.
http://billavista.com/tech/Articles/Gea ... index.html
Scroll down to "Setting pinion depth" Fig 28.
He also mentions loading the diff to get a decent tooth pattern which is difficult on the Minor. I find that it is sometimes difficult to read the pattern and it also depends on lighting conditions. You can sometimes see it better with the aid of a torch. For the split axle on the MG TD I made up a jig to load the diff but I don't know exactly how much it is loaded-see photos and resulting pattern.
Regards
Declan
Re: Differential overhaul
Posted: Tue Jan 07, 2020 8:18 am
by philthehill
Declan
I would suggest that painting the crown wheel teeth as per picture above does not help identify or highlight the contact pattern between crown wheel and pinion teeth.
Only three or four contact faces of the crown wheel teeth need to be painted and then the crown wheel/pinion is turned and the contact pattern between crown wheel and pinion is rolled over onto the un-painted teeth.
Only a light application of yellow ochre or engineers blue is required to achieve a result.
Phil