Tomorrow I'm having the first two wheels powdercoated and see how they turn out.
Austin 1970 pickup from Guatemala
Forum rules
By using this site, you agree to our rules. Please see: Terms of Use
By using this site, you agree to our rules. Please see: Terms of Use
Re: Austin 1970 pickup from Guatemala
Tires!!![frame] [/frame]
Tomorrow I'm having the first two wheels powdercoated and see how they turn out.
Tomorrow I'm having the first two wheels powdercoated and see how they turn out.
Gabriel
Re: Austin 1970 pickup from Guatemala
First wheel sandblasted and ready for the powdercoating.[frame] [/frame]
Applying the primer coat.[frame] [/frame]
15 minutes in the oven.[frame] [/frame]
Primer done, ready for the top coat.[frame] [/frame]
Applying top coat.[frame] [/frame]This was done in a friend of my dad's shop since he's the one with the curing oven for the powdercoat. Only had time to do one wheel though, so I'll have to go back during the week or next saturday. He's got several nice vintage cars there so I'll make sure to take some pictures.
First wheel mounted, too bad the shop didn't have less conspicuous lead weights but bear in mind this one was the worse of the five, so it'll probably be the spare.[frame] [/frame]
The rest of the wheels, waiting to have their old tyres removed. Two will also need to be straightened so I'll get them back on tuesday.[frame] [/frame]
Looking good![frame] [/frame]This picture reminds me I'm not really sure how the front bumper goes. I've seen some drawings but can't figure out if all 6 bumper screws should be the same length (car had none). Also, I know cars with overriders have two "C" shaped pieces for the 2nd and 5th bumper screws but I haven't seen any suppliers sell them or know if a car without overriders would require them.
Other good news, gearbox is finally clean and ready to install![frame] [/frame]The anti-rattle plunger and spring were nowhere to be found though, so I hope they're not inside the gearbox. Should I worry?
Applying the primer coat.[frame]
15 minutes in the oven.[frame]
Primer done, ready for the top coat.[frame]
Applying top coat.[frame]
First wheel mounted, too bad the shop didn't have less conspicuous lead weights but bear in mind this one was the worse of the five, so it'll probably be the spare.[frame]
The rest of the wheels, waiting to have their old tyres removed. Two will also need to be straightened so I'll get them back on tuesday.[frame]
Looking good![frame]
Other good news, gearbox is finally clean and ready to install![frame]
Gabriel
-
thecount
- Minor Friendly
- Posts: 41
- Joined: Sat Mar 06, 2010 2:53 am
- Location: Melbourne, Australia
- MMOC Member: No
Re: Austin 1970 pickup from Guatemala
Hey Gabriel
Fantastic, inspiring work your doing there! Really like the powder coating system for the wheels, may have to look into that for mine I think. Hopefully it's not too long before you can drive it
Cheers
Gav
Fantastic, inspiring work your doing there! Really like the powder coating system for the wheels, may have to look into that for mine I think. Hopefully it's not too long before you can drive it
Cheers
Gav
1955 4Dr Series II
Re: Austin 1970 pickup from Guatemala
Thanks Gav!
Just today I coated the third and fourth wheels. Since the oven only fits one at a time it's a bit time consuming but at least I had some nice stuff to look at while they were cooking.[frame] [/frame]
Back at the shop, installed the clutch fork.[frame] [/frame]The original screw was worn so I had ordered one but it seems RHD cars use a shorter one so I couldn't use it. Luckily my dad found one in his spares that was long enough so that's what went into the car.
And then after several years apart the engine and gearbox were together again![frame] [/frame][frame]
 [/frame]
I finally received the carb and fuel pump repair kits from Burlen so the engine should be pretty much ready to start now. I might do that before putting it in the car in case there are any oil leaks that need to be addressed.
Just today I coated the third and fourth wheels. Since the oven only fits one at a time it's a bit time consuming but at least I had some nice stuff to look at while they were cooking.[frame]
Back at the shop, installed the clutch fork.[frame]
And then after several years apart the engine and gearbox were together again![frame]
I finally received the carb and fuel pump repair kits from Burlen so the engine should be pretty much ready to start now. I might do that before putting it in the car in case there are any oil leaks that need to be addressed.
Gabriel
-
rogerowen
- Minor Addict
- Posts: 519
- Joined: Thu Aug 09, 2007 7:11 pm
- Location: Lymington, Hampshire
- MMOC Member: No
Re: Austin 1970 pickup from Guatemala
Gearbox looks great, how did you clean? Is it protected by clear laquer or similar. Re; photo of classics - what is the 3rd car from the left? 
That's strange R2, the damage doesn't look so bad from here!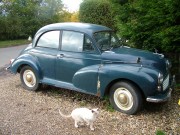
Re: Austin 1970 pickup from Guatemala
Thanks Roger! I'm quite proud of how the gearbox came out.
First cleaning was with dishwashing soap and water, using a wire brush and mechanical means with different screw drivers and needles to get the big blobs of grease unstuck.
Still because the aluminum is porous, and because it had been greased in all the wrong places there were parts where the grease appeared to have penetrated the surface so a light rubbing with diluted caustic soda was done.
This left the surface very clean but looking very dull, and prone to getting dirty again in no time so it was cleaned with a bit of diluted phosphoric acid and then a light coat of Aluma Blast was applied to keep it looking clean and shiny for hopefully a long time.
Aluma Blast (http://www.eastwood.com/ew-aluma-blast-set.html)
The cars in the picture are:
Porsche 911 (I think, maybe 356)
Mercedes Benz (190 SL??)
Austin Healey (3000?? I know it's the 6 cylinder one)
Mustang (that one was easy)
Gabriel
-
rogerowen
- Minor Addict
- Posts: 519
- Joined: Thu Aug 09, 2007 7:11 pm
- Location: Lymington, Hampshire
- MMOC Member: No
Re: Austin 1970 pickup from Guatemala
Thanks Gabriel, that gives a really great finish and I've just checked and we can get it here in the UK from Frost Restoration.
That's strange R2, the damage doesn't look so bad from here!
Re: Austin 1970 pickup from Guatemala
From what I see Frost has almost everything Eastwood has.
Progress has been a little slow lately, mostly because of work as well as some parts that are taking quite a long time to arrive (rant here: http://www.mmoc.org.uk/viewtopic.php?f=1&t=52618)
Sorting through some boxes I found the cab and chassis plates for the donor van I have, which I'll be sending to Chris (POMMReg).[frame] [/frame]I upload the picture here so that I can link to it in the PM.
And in more bad news the fuel pipe which my dad took the time and dedication to weld broke again when I tried to bend it. I think I'll go for a piece of rubber tubing for the moment to fix it and if it really looks too bad change it for a new pipe somewhere in the future.[frame] [/frame]
In good news, the engine is going in tomorrow so there's bound to be good progress soon!
Progress has been a little slow lately, mostly because of work as well as some parts that are taking quite a long time to arrive (rant here: http://www.mmoc.org.uk/viewtopic.php?f=1&t=52618)
Sorting through some boxes I found the cab and chassis plates for the donor van I have, which I'll be sending to Chris (POMMReg).[frame]
And in more bad news the fuel pipe which my dad took the time and dedication to weld broke again when I tried to bend it. I think I'll go for a piece of rubber tubing for the moment to fix it and if it really looks too bad change it for a new pipe somewhere in the future.[frame]
In good news, the engine is going in tomorrow so there's bound to be good progress soon!
Gabriel
-
jagnut66
- Minor Legend
- Posts: 3706
- Joined: Fri Apr 11, 2008 7:28 pm
- Location: Mansfield, Nottinghamshire.
- MMOC Member: Yes
Re: Austin 1970 pickup from Guatemala
Hi Gabriel,
Here's a link to a new replacement for you, should you want to replace that dodgy pipe when you have a bit of spare cash, it might be a better solution in the long term.
Best wishes,
Mike.
http://www.morrisminorspares.net/shop_item.php?ID=2160
Here's a link to a new replacement for you, should you want to replace that dodgy pipe when you have a bit of spare cash, it might be a better solution in the long term.
Best wishes,
Mike.
http://www.morrisminorspares.net/shop_item.php?ID=2160
1954 Series 2: 4 door: "Sally" -- Back on the ground with (slave) wheels, now being sprayed by me, slowly......
1970 Triumph Herald 1200: "Hetty" -- Driven back from Llangollen in Wales (twice.....)
1952 Morris Minor MM highlight with sidevalve engine still fitted, wants work, so joins the queue for now......
1970 Triumph Herald 1200: "Hetty" -- Driven back from Llangollen in Wales (twice.....)
1952 Morris Minor MM highlight with sidevalve engine still fitted, wants work, so joins the queue for now......
Re: Austin 1970 pickup from Guatemala
Just as a note regarding the link to a copper fuel pipe.
Copper fuel and brake pipes are not legal in many markets including US and Australia. I do not know about Guatemala, but certainly worth checking.
For some of those markets copper nickel, (cupro nickel, "kunifer") is ok though, as of course is original steel pipe. Here in the UK copper is the norm, with some preferring kunifer as it polishes up better, but costs almost double.
We do not seem to have a country full of classic cars with broken pipes, suggesting the anti copper legislation is perhaps harsh. The reasoning behind the ban is that copper will work harden and break if allowed to flex when fitted. Certainly something to take care with when changing pipes! Make sure there are no unsupported ends.
1956 Morris Minor Series II
1959 MGA 1600 Roadster
1966 Jaguar Mk2 3.8 MOD
1959 MGA 1600 Roadster
1966 Jaguar Mk2 3.8 MOD
Re: Austin 1970 pickup from Guatemala
Thanks Mike, thanks Neil.
Your comment actually made me chuckle a bit, there are absolutely no laws regarding car maintenance or modifications around here so I could use a piece of straw and not get into any legal trouble. Still I want to do it properly and have a safe car so I was thinking of buying steel pipe like the one that's used for propane and either welding the original end connectors or finding new ones.
Is it very difficult to change the fuel pipe once the engine is in the car? I ask because I'd really like to install the engine to keep progress going and then later decide if I change the fuel pipe. My temporary solution is to use rubber tubing (same type as used between the fuel pump and carb), install the engine and then later change the pipe either for copper or steel. (copper might be easier to bend though)
Gabriel
-
Mark Wilson
- Minor Addict
- Posts: 960
- Joined: Fri Aug 26, 2011 12:42 pm
- Location: West Yorkshire
- MMOC Member: Yes
Re: Austin 1970 pickup from Guatemala
I've just taken the fuel pipe out from my Traveller to renew the cross member - came out through the engine compartment with the engine and all accessories in place no problem (other than quite a bit of jiggling).
Mark
Mark
Re: Austin 1970 pickup from Guatemala
No real problem installing the fuel pipe later, The last bit just pokes up in front of the bulkhead left hand side, before connecting to the pump, so engine is not in the way
-
rogerowen
- Minor Addict
- Posts: 519
- Joined: Thu Aug 09, 2007 7:11 pm
- Location: Lymington, Hampshire
- MMOC Member: No
Re: Austin 1970 pickup from Guatemala
Think I'd be tempted to fit the last run to the pump in steel braided - but not sure if you can get it with the correct union for the pump.les wrote:No real problem installing the fuel pipe later, The last bit just pokes up in front of the bulkhead left hand side, before connecting to the pump, so engine is not in the way
That's strange R2, the damage doesn't look so bad from here!
Re: Austin 1970 pickup from Guatemala
Thanks for the tips! I decided to install the engine and later figure out what to do about the broken fuel pipe; actually I found a fitting that allows either a rubber hose or braided fuel line to be attached to the inlet of the fuel pump so that's a third possibility now.
I have read about people having problems with leaks on braided fuel lines but don't know if that's a problem from the past or if the same happens to new lines.
Ok now, here we go.[frame] [/frame]
Getting near.[frame] [/frame]
Removing the towers.[frame] [/frame]
Everyone getting involved.[frame] [/frame]
And here's why, I forgot to remove the crossmember and that's why the engine support towers had to be removed.[frame] [/frame]
Finally in it's place, getting the towers back on.[frame] [/frame]
Together after many, many years apart.[frame] [/frame]
A few more details and this is the current state of the engine bay.[frame] [/frame]I have been looking at the pictures of how the car came and apparently the mounting point for the engine steady bracket was in very bad shape so the one in the picture was made. The hole, however, was just barely larger than the shaft of the bracket and it was a complete odyssey to get it to the correct size but an hour and about a dozen drill bits later we managed to get it done.
I have read about people having problems with leaks on braided fuel lines but don't know if that's a problem from the past or if the same happens to new lines.
Ok now, here we go.[frame]
Getting near.[frame]
Removing the towers.[frame]
Everyone getting involved.[frame]
And here's why, I forgot to remove the crossmember and that's why the engine support towers had to be removed.[frame]
Finally in it's place, getting the towers back on.[frame]
Together after many, many years apart.[frame]
A few more details and this is the current state of the engine bay.[frame]
Gabriel
-
jagnut66
- Minor Legend
- Posts: 3706
- Joined: Fri Apr 11, 2008 7:28 pm
- Location: Mansfield, Nottinghamshire.
- MMOC Member: Yes
Re: Austin 1970 pickup from Guatemala
Yours looks like a very neat solution to me and I have to admit neater than the one on my car, I may have a rethink at some stage.
I think these do have a tendency to rust / break but it would be interesting to hear the thoughts of others on here. Mine was a piece of angle iron when I bought her and still is, the remnants of the old engine steady bracket attached to the bulkhead looked far too thin for the job anyway.
I think these do have a tendency to rust / break but it would be interesting to hear the thoughts of others on here. Mine was a piece of angle iron when I bought her and still is, the remnants of the old engine steady bracket attached to the bulkhead looked far too thin for the job anyway.
1954 Series 2: 4 door: "Sally" -- Back on the ground with (slave) wheels, now being sprayed by me, slowly......
1970 Triumph Herald 1200: "Hetty" -- Driven back from Llangollen in Wales (twice.....)
1952 Morris Minor MM highlight with sidevalve engine still fitted, wants work, so joins the queue for now......
1970 Triumph Herald 1200: "Hetty" -- Driven back from Llangollen in Wales (twice.....)
1952 Morris Minor MM highlight with sidevalve engine still fitted, wants work, so joins the queue for now......
Re: Austin 1970 pickup from Guatemala
Are you saying that you can't fit the engine and box as one unit without removing the support towers?GBond wrote: And here's why, I forgot to remove the crossmember and that's why the engine support towers had to be removed.
Why is that? Should be at the same point early next week.
Re: Austin 1970 pickup from Guatemala
Thanks Mike, as a matter of fact I thought it was the original piece until I had to drill through it. There's a template and instructions on the Workshop Manual (p. AA.28) to install on earlier cars and my dad had it made several years ago when he started restoring the car. The original is visible on my "before" pictures on the first page.
Andy, we tried but couldn't mount the engine without removing the support towers. To get the gearbox mounts in the correct place we needed to raise the rear part of the engine and gearbox assembly, but then the bellhousing would hit the steering rack so the front part had to be lowered but then because the gearbox mounts weren't in their place yet the engine mounts were way forward of the towers so after much sweating and cursing we decided removing them would be the better idea.
No pictures today, but hopefully there'll be more progress tomorrow and during the weekend.
Gabriel
-
George Smathers
- Minor Fan
- Posts: 126
- Joined: Wed Jun 20, 2012 5:18 am
- Location: Spokane, WA USA
- MMOC Member: No
Re: Austin 1970 pickup from Guatemala
Great Progress!
Re: Austin 1970 pickup from Guatemala
Thanks George! From the looks of Beatrice it seems we will both be sporting brand new minors at about the same time. I haven't yet started my engine but I'm getting close (and I also need to do just half the interior).
This was the fuel pump.[frame] [/frame]It worked, but not very well some times so I decided to do a full rebuild. Culprit ended up being a bad connection but the points were very worn as well.
Good thing I did, there was a lot of rust inside.[frame] [/frame]
Masked and repainted the body.[frame] [/frame]Black spray paint, nothing fancy.
Zinc-tin plated everything that would stick to a magnet.[frame] [/frame]This is before wire brushing.
After.[frame] [/frame]
Removing the old parts, replacing with the new.[frame] [/frame]
Some Aluma Blast for the aluminium parts.[frame] [/frame]
Getting it all back together.[frame] [/frame]The kit came with a capacitor so now I've doubled the amount of electronic components in the pick-up. Hope I don't make it feel too "modern".
Hopefully I won't have to see this side again soon.[frame] [/frame]
Done![frame] [/frame]
Clutch release lever was badly worn so I was planning to buy a replacement. My dad decided he would fix it so he added some welding to the worn parts and then rounded the shafts again in the lathe.[frame] [/frame]
Not an expensive part, I know, but it was his idea.[frame] [/frame]
Still needs a bit more work but it's coming out good though.[frame] [/frame]
Next things to do are finishing the coil and dynamo connections to then assemble the front bodywork. Also, one of the wheels sprung a leak in one of the rivets so any ideas on how to fix it are appreciated. My dad says to remove the powdercoating and weld around the rivet but I think maybe just using some good sealant around the head of the rivet would work just as well. Let me know if you've had similar problems/solutions.
This was the fuel pump.[frame]
Good thing I did, there was a lot of rust inside.[frame]
Masked and repainted the body.[frame]
Zinc-tin plated everything that would stick to a magnet.[frame]
After.[frame]
Removing the old parts, replacing with the new.[frame]
Some Aluma Blast for the aluminium parts.[frame]
Getting it all back together.[frame]
Hopefully I won't have to see this side again soon.[frame]
Done![frame]
Clutch release lever was badly worn so I was planning to buy a replacement. My dad decided he would fix it so he added some welding to the worn parts and then rounded the shafts again in the lathe.[frame]
Not an expensive part, I know, but it was his idea.[frame]
Still needs a bit more work but it's coming out good though.[frame]
Next things to do are finishing the coil and dynamo connections to then assemble the front bodywork. Also, one of the wheels sprung a leak in one of the rivets so any ideas on how to fix it are appreciated. My dad says to remove the powdercoating and weld around the rivet but I think maybe just using some good sealant around the head of the rivet would work just as well. Let me know if you've had similar problems/solutions.
Gabriel