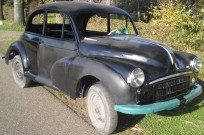
1969 4DR Saloon Restoration Project (a very slow one)
Forum rules
By using this site, you agree to our rules. Please see: Terms of Use
By using this site, you agree to our rules. Please see: Terms of Use
-
Daddybear1984
- Minor Fan
- Posts: 177
- Joined: Thu Aug 16, 2012 7:47 pm
- Location: Doncaster,UK
- MMOC Member: No
Re: 1969 4DR Saloon Restoration Project (a very slow one)
Thanks Lou, all will be fine just one of those minor blokey ops 
When you're in up over your head, the first thing to do is close your mouth.
-
Daddybear1984
- Minor Fan
- Posts: 177
- Joined: Thu Aug 16, 2012 7:47 pm
- Location: Doncaster,UK
- MMOC Member: No
Re: 1969 4DR Saloon Restoration Project (a very slow one)
well back tinkering and haven't had time to do too much, i have removed the N/S/F wing and found that the lowest two bolts that hold it on have been welded to a patch fortunately/unfortunately the wing was rotten and just about snapped off anyway.
i have been removing some of the other bits in the engine bay trying to get that stripped out and work back from there, horn,washer bottle,voltage regulator and solenoid and i am sure they're are some things i have missed.
i will post some pictures up when i have done something worth posting rather than some random pictures of things removed for reference of how they came off.
also i have released the nuts from the wiper motor but am unsure of how to release the drive wipe thingy-ma-bob,any information on this would be very much appreciated
Kind Regards
Scott
When you're in up over your head, the first thing to do is close your mouth.
-
DAVIDMCCULLOUGH
- Minor Legend
- Posts: 3010
- Joined: Sun Sep 09, 2007 10:42 pm
- Location: Whiteabbey, Co Antrim
- MMOC Member: Yes
Re: 1969 4DR Saloon Restoration Project (a very slow one)
On the pointed bit at the back there is a big nut, loosen this off, then remove the 4 small screws that hold the lid on. Mark the lid and plate so that you can refit in the same place as this alters your self parking. Under the lid you will find a copper contact held on with a circlip thing, once you remove this the rack part of the mechanism that goes into the car will lift out.
Too many Minors so little time.....
-
Daddybear1984
- Minor Fan
- Posts: 177
- Joined: Thu Aug 16, 2012 7:47 pm
- Location: Doncaster,UK
- MMOC Member: No
Re: 1969 4DR Saloon Restoration Project (a very slow one)
wonderful, thanks for the quick response i will get that sorted when i next go in the garage and great tip about the marking for the self parking.
kind regards
Scott
kind regards
Scott
When you're in up over your head, the first thing to do is close your mouth.
-
Daddybear1984
- Minor Fan
- Posts: 177
- Joined: Thu Aug 16, 2012 7:47 pm
- Location: Doncaster,UK
- MMOC Member: No
Re: 1969 4DR Saloon Restoration Project (a very slow one)
Well i have been busy today i spent about 4 hours cleaning and sorting the garage after my tip run and the garage is now as spacious as it gets which is good and then i set to Yoda, i have got the axle and springs off finally after fighting with the for a few days so i decided to take my new angle grinder and cutting disc to the spring as they are being replaced anyway so that is now done.
here's my list that i have completed today
Garage tidied
Axle and Springs off
Fuel pump removed
earth lead in engine bay removed
boot boards removed
fuel spout and fuel tank removed
boot lid and bonnet hung on the wall out of the way
jig piping laid in order of assembly
and then.....the bulb in my lead lamp blew and i have no more bulbs so had to stop there
oh and i followed your instructions and the wiper motor is off also now
here a few pics to go with the info above plus a few pics of my birthday presents[frame] [/frame][frame]
 [/frame][frame]
 [/frame][frame]
 [/frame]
the evilness that would not let go[frame] [/frame]
finally removed and hiding behind the bonnet[frame] [/frame][frame]
 [/frame][frame]
 [/frame][frame]
 [/frame][frame]
 [/frame][frame]
 [/frame][frame]
 [/frame]
that's all for now thanks for reading/looking
here's my list that i have completed today
Garage tidied
Axle and Springs off
Fuel pump removed
earth lead in engine bay removed
boot boards removed
fuel spout and fuel tank removed
boot lid and bonnet hung on the wall out of the way
jig piping laid in order of assembly
and then.....the bulb in my lead lamp blew and i have no more bulbs so had to stop there
oh and i followed your instructions and the wiper motor is off also now
here a few pics to go with the info above plus a few pics of my birthday presents[frame]
the evilness that would not let go[frame]
finally removed and hiding behind the bonnet[frame]
that's all for now thanks for reading/looking
When you're in up over your head, the first thing to do is close your mouth.
-
MarkyB
- Minor Maniac
- Posts: 7845
- Joined: Thu Jan 25, 2007 3:18 pm
- Location: South East London
- MMOC Member: No
Re: 1969 4DR Saloon Restoration Project (a very slow one)
Go easy with your new tool, destroying stuff has a way of coming back to bite you when the new bit is the wrong one, wrong side, worse than the old one or you cut through a bit that isn't supplied with the new one 
"Once you break something you will see how it was put together"
-
Daddybear1984
- Minor Fan
- Posts: 177
- Joined: Thu Aug 16, 2012 7:47 pm
- Location: Doncaster,UK
- MMOC Member: No
Re: 1969 4DR Saloon Restoration Project (a very slow one)
i cut the springs as i will need to replace them as they are sagged otherwise i would have carried on fighting with it but very good advice that IS taken
thanks for the warning on new parts also
Kind regards
Scott
thanks for the warning on new parts also
Kind regards
Scott
When you're in up over your head, the first thing to do is close your mouth.
-
hough
- Minor Friendly
- Posts: 17
- Joined: Sun Nov 18, 2012 11:26 am
- Location: Norwich Norfolk
- MMOC Member: No
Re: 1969 4DR Saloon Restoration Project (a very slow one)
A great way to store parts is old Jam jars dunk them in very hot water the labels come of pop the bits in side screw the lid to the garage roof timbers and then screw the jar into the lid after you have labelled the jar " wing bolts etc"
With regards to your seats smear them with Vasaline pop them into a bin bag - seal and pop them in the loft
With regards to your seats smear them with Vasaline pop them into a bin bag - seal and pop them in the loft
-
Daddybear1984
- Minor Fan
- Posts: 177
- Joined: Thu Aug 16, 2012 7:47 pm
- Location: Doncaster,UK
- MMOC Member: No
Re: 1969 4DR Saloon Restoration Project (a very slow one)
good idea, i have got loads of SMA milk tins from the kids and take away plastic tubs with lids which i have bits on my shelves you might be able to spot them on the top shelf though the jar idea will be very handy for some bits not to ention spare bolts/washers and the like
good stuff thanks, keep the advice coming i welcome it all, good or bad
Kind regards
Scott
good stuff thanks, keep the advice coming i welcome it all, good or bad
Kind regards
Scott
When you're in up over your head, the first thing to do is close your mouth.
-
Daddybear1984
- Minor Fan
- Posts: 177
- Joined: Thu Aug 16, 2012 7:47 pm
- Location: Doncaster,UK
- MMOC Member: No
Re: 1969 4DR Saloon Restoration Project (a very slow one)
Okay so was in the garage yesterday with the company of my dad and got quite a bit done, are much Tea drinking and tinkering we managed to do:
Front and rear screen out, both intact, the front rubber is pretty soft but rear one was hard and just shot
Heater out
switches and dial out
the fiendish few brass screws holding the gearbox surround out finally after many sessions trying
Dad could resist a little rubbing/cleaning of the engine bay to see what was beneath all the dirt
bonnet hinges and washer bezal dewbury thingymabobs
steering wheel removed
i am sure they're a few more bits that we managed to do but that is all for now.
here's a couple of pics[frame] [/frame]
glass is only there for now and will be cleaned, wrapped and put out of the way[frame] [/frame][frame]
 [/frame]
oh and my dad managed to pick me up a lead lamp of my own woohoo not to mention some more bulbs, good man![frame] [/frame]
me holding the heater which doesn't look in such bad shape, though i am guessing the inside will be a different story, not sure why it looks like i have a freakishly long thumb on this pic lol[frame] [/frame]
and this is what the center console/ dial area looks like, we attempted to remove this panel but could only manage to remove one of the six tiny bolts so will attempt another day of mask and tape it up.
ps got the spit about %50 built also which i am pleased with
thanks for looking/reading
Scott
Front and rear screen out, both intact, the front rubber is pretty soft but rear one was hard and just shot
Heater out
switches and dial out
the fiendish few brass screws holding the gearbox surround out finally after many sessions trying
Dad could resist a little rubbing/cleaning of the engine bay to see what was beneath all the dirt
bonnet hinges and washer bezal dewbury thingymabobs
steering wheel removed
i am sure they're a few more bits that we managed to do but that is all for now.
here's a couple of pics[frame]
glass is only there for now and will be cleaned, wrapped and put out of the way[frame]
oh and my dad managed to pick me up a lead lamp of my own woohoo not to mention some more bulbs, good man![frame]
me holding the heater which doesn't look in such bad shape, though i am guessing the inside will be a different story, not sure why it looks like i have a freakishly long thumb on this pic lol[frame]
and this is what the center console/ dial area looks like, we attempted to remove this panel but could only manage to remove one of the six tiny bolts so will attempt another day of mask and tape it up.
ps got the spit about %50 built also which i am pleased with
thanks for looking/reading
Scott
When you're in up over your head, the first thing to do is close your mouth.
Re: 1969 4DR Saloon Restoration Project (a very slow one)
Scott
I'd drip some Plus Gas ( releasing fluid ) on the small nuts, holding the fascia sides on and leave it to soak in for a day or so.
The studs aren't terribly robust and it's easy to break one or more trying to force things.Gently is the by word.
Bob
I'd drip some Plus Gas ( releasing fluid ) on the small nuts, holding the fascia sides on and leave it to soak in for a day or so.
The studs aren't terribly robust and it's easy to break one or more trying to force things.Gently is the by word.
Bob
-
Daddybear1984
- Minor Fan
- Posts: 177
- Joined: Thu Aug 16, 2012 7:47 pm
- Location: Doncaster,UK
- MMOC Member: No
Re: 1969 4DR Saloon Restoration Project (a very slow one)
the nuts look free from rust and i agree plus gas is a good idea although i have to say getting a spanner to fit them is a work of art, got a good fit on one but the others appear to be a different size, one that i don't have at the moment, might try a small adjustable, was using the rear view mirror in the recess of the dash to actually see them.
When you're in up over your head, the first thing to do is close your mouth.
-
DaisyMayFozz
- Minor Fan
- Posts: 492
- Joined: Tue Jun 02, 2009 7:44 pm
- Location: East Yorkshire
- MMOC Member: No
Re: 1969 4DR Saloon Restoration Project (a very slow one)
Get your head right up behind the dash through the big square hole where the heater used to be. If you can do it right you can 'sit ' with your back against the bulkhead and you can put your arms through the 2 round holes under the dash. A little 1/4 socket fits perfectly, but 7mm can be used, but it is a sloppy fit, and if they are really tight then you will probably round off the bolts. As others have said, those nuts have probably been on there since 1969 and the studs shear easily. You might find that the stud comes off/out instead of the nut if it is really stuck.[frame] [/frame]
-
Daddybear1984
- Minor Fan
- Posts: 177
- Joined: Thu Aug 16, 2012 7:47 pm
- Location: Doncaster,UK
- MMOC Member: No
Re: 1969 4DR Saloon Restoration Project (a very slow one)
great news with the sizes and the description of how to wear a morris minor lol, i will give it a whirl but i am a rather big chap but the sizing of the nuts is great, i tried a 7mm as you say it was sloppy, i was broken into and my socket set was taken and has yet to be replaced though i have some small socket loose in another so i am hoping a rummage in there will prove fruitful.
thanks for the info again
Scott
thanks for the info again
Scott
When you're in up over your head, the first thing to do is close your mouth.
-
Daddybear1984
- Minor Fan
- Posts: 177
- Joined: Thu Aug 16, 2012 7:47 pm
- Location: Doncaster,UK
- MMOC Member: No
Re: 1969 4DR Saloon Restoration Project (a very slow one)
I haven't got around to sorting the little face plate for the speedo+switches i have concentrating on trying to get the car on the spit to sort the welding on the underside, though the spit is proving to be a nuisance, I had the car at half way on the height poles and slowly raised the car to full height only to realise that there was more adjustment on the pole that i hadn't done (not my spit) so then and only then did i also realise that the boards for the battery box and back brace we not coping well, back down it goes for some repairs.
here are a few pics of my efforts on fathers day[frame] [/frame]
as you can see on the pole there is quite alot of room for adjustment[frame] [/frame]
not good [frame]
 [/frame]
not brilliant but not as bad as the front[frame] [/frame]
replacement battery box board[frame] [/frame]
this is the two replacement back boards that will be used together for strength[frame] [/frame]
all ready for lift attempt two...wish me luck[frame] [/frame]
last check with back brace (both boards together) in place and here we gooooo[frame] [/frame]
that's it! we're airborn now to turn the car over........ err no maybe not, the rear wheel arches are in the way i was going to leave these until the car was on it's side to make it easier to get to, i guess not now....
that's all i have to offer for now, i am beat after getting that far and believe me that little bit took me nearly 8 hours to achieve safely on my own.
thanks for looking/reading
here are a few pics of my efforts on fathers day[frame]
as you can see on the pole there is quite alot of room for adjustment[frame]
not good
not brilliant but not as bad as the front[frame]
replacement battery box board[frame]
this is the two replacement back boards that will be used together for strength[frame]
all ready for lift attempt two...wish me luck[frame]
last check with back brace (both boards together) in place and here we gooooo[frame]
that's it! we're airborn now to turn the car over........ err no maybe not, the rear wheel arches are in the way
that's all i have to offer for now, i am beat after getting that far and believe me that little bit took me nearly 8 hours to achieve safely on my own.
thanks for looking/reading
When you're in up over your head, the first thing to do is close your mouth.
-
Trickydicky
- Minor Legend
- Posts: 1565
- Joined: Fri Aug 05, 2011 9:53 pm
- Location: Leeds, West Yorkshire
- MMOC Member: No
Re: 1969 4DR Saloon Restoration Project (a very slow one)
Be careful scott, don`t want no accidents, it may be wise when the car is up and on its side on the spit to put the tyres underneath to help take some load off the spit to prevent it collapsing.
Richard
Opinions are like people,everyone can be different.
Opinions are like people,everyone can be different.
-
Daddybear1984
- Minor Fan
- Posts: 177
- Joined: Thu Aug 16, 2012 7:47 pm
- Location: Doncaster,UK
- MMOC Member: No
Re: 1969 4DR Saloon Restoration Project (a very slow one)
yeah will pack it up the best i can to be on the safe side, that's what takes so long the fact that i can only in one place at once so it's lift a bit, check everything, a bit more, tighten, lower jack and repack, loosen lift, check etc etc still nearly there now
When you're in up over your head, the first thing to do is close your mouth.
-
Daddybear1984
- Minor Fan
- Posts: 177
- Joined: Thu Aug 16, 2012 7:47 pm
- Location: Doncaster,UK
- MMOC Member: No
Re: 1969 4DR Saloon Restoration Project (a very slow one)
well no pictures yet as progress has slowed (if that's possible) to pretty much a stand still, funds are just about non-existent and Yoda seems to be fighting me at every hurdle, i have removed the N/S/R arch which is completely dead so a replacement is needed there, i haven't been able to do the other side yet, the kick plate refuses to be unbolted though one or two have snapped causing me to punch the underside of the car, which seems pretty solid lol. i attempted to remove the N/S/F door which all bar one bolt will move the last one seems different to the rest and i cannot for the life of me get it to move so it will be left until i can get some to make some releasing fluid, the doors need to come off before the car will roll over and clear the support bars underneath will keep going at it when i have time and post some pictures up when there is something worth showing
thanks for reading
Scott
thanks for reading
Scott
When you're in up over your head, the first thing to do is close your mouth.
-
Daddybear1984
- Minor Fan
- Posts: 177
- Joined: Thu Aug 16, 2012 7:47 pm
- Location: Doncaster,UK
- MMOC Member: No
Re: 1969 4DR Saloon Restoration Project (a very slow one)
Hello all again, i have been in the garage doing some more and manage to get both back wings off, sill finishers off and kickplates also the rear bumper hangers and that gave me just enough clearance to roll Yoda over below are a few pics of the underside and a few closer pics on some bits needing attention and i am sure they'll be lots more hidden[frame] [/frame][frame]
 [/frame][frame]
 [/frame][frame]
 [/frame][frame]
 [/frame][frame]
 [/frame][frame]
 [/frame][frame]
 [/frame][frame]
 [/frame]
as you can see the springs were cut, i have no idea how to get these off i have trying hammering the pin out but just doesn't seem to move, anyone any ideas?[frame] [/frame]
i have 4 different ways of supporting the car just incase[frame] [/frame]
need to buy some stuff now before i can continue...hopefully won't belong before i can do some more
thanks for looking/reading
as you can see the springs were cut, i have no idea how to get these off i have trying hammering the pin out but just doesn't seem to move, anyone any ideas?[frame]
i have 4 different ways of supporting the car just incase[frame]
need to buy some stuff now before i can continue...hopefully won't belong before i can do some more
thanks for looking/reading
When you're in up over your head, the first thing to do is close your mouth.
-
TvdWerf

- Minor Addict
- Posts: 553
- Joined: Wed Jul 28, 2010 9:39 am
- Location: Netherlands, Drenthe
- MMOC Member: No
Re: 1969 4DR Saloon Restoration Project (a very slow one)
I should not cut the springs, but the bolt on both sides.
After that, drill this bolt to make him shorter, and tak the spring out.
Or when available, take a Torch, and cut the bolt in the length.
make the bolt head hot till he is red, and then a little oxygen flow in the length from the bolt.
When it is the first time you are cutting with auto-gene and oxygen, test it on a part of metal before the use on the morris.
With the right head, a hole from 8 mm wide, and 10 cm deep is not a problem.
MM '51 LHD sidevalve