I agree, no reason to fail on a split gear lever gaiter.
Just continue to work your way through the electrics, make sure everything is working fine. Use the resources here if not; it's much cheaper than the garage!
Get the engine started and we can sort out those carbs and I can tell you a very easy way to set your tracking!
I am convinced you can completely finish this by yourself!
Pickup restoration part three
Forum rules
By using this site, you agree to our rules. Please see: Terms of Use
By using this site, you agree to our rules. Please see: Terms of Use
Re: Pickup restoration part three
1956 Morris Minor Series II
1959 MGA 1600 Roadster
1966 Jaguar Mk2 3.8 MOD
1959 MGA 1600 Roadster
1966 Jaguar Mk2 3.8 MOD
-
davidmiles
- Minor Legend
- Posts: 2731
- Joined: Mon Mar 23, 2009 4:54 pm
- Location: Sussex
- MMOC Member: No
Re: Pickup restoration part three
Thanks, Id like to get as much done before the 24th of October when it goes in to the local garage. The cables between the spark plugs and the distributer cap go in a particular order, not sure how to work that out. Looks like a wilting octopus at the moment. The sparkplug gaps need to be set too
[frame] [/frame]
[frame]
smile, you never know, you might be winning.[IMG]http://i67.tinypic.com/2ro3j37.jpg[/IMG]
-
MarkyB
- Minor Maniac
- Posts: 7845
- Joined: Thu Jan 25, 2007 3:18 pm
- Location: South East London
- MMOC Member: No
Re: Pickup restoration part three
Maybe if they hate classic cars and are having a very bad day, I'd challenge that one and never go back there!if they're feeling picky, the mot man wont like the gearstick gaiter with the split in.
"Once you break something you will see how it was put together"
-
aupickup
- Minor Maniac
- Posts: 6004
- Joined: Tue Jul 20, 2004 11:41 pm
- Location: lanark
- MMOC Member: No
Re: Pickup restoration part three
the firing order is stamped on the manifold, 1342
-
Matt Tomkins
- Minor Addict
- Posts: 798
- Joined: Sun Jan 24, 2010 11:01 pm
- Location: Aston Clinton, Aylesbury, Bucks or Oxford during term time
- MMOC Member: No
Re: Pickup restoration part three
thatr's a midget one -- that's whgat i've got fitted to mine after the other one came of in my hand... gov :pdavidmiles wrote:Malasian ply, that sounds like a more cost effective option, thanks Paul. The gear stick gaiter is the next bit fitted. But as you can see I have a spurious gear knob fitted, looks like a Metro or Marina one, Moss had none in stock when I checked, so I'll try bull or ESM for one[frame][/frame]
http://www.flickr.com/photos/46862234@N ... 671969048/
http://www.facebook.com/matttomkins
Misty, Morris Minor 2-door, 1970,
fully restored with the help of various of the young members to whom i am forever grateful. http://www.mmoc.org.uk/viewtopic.php?f=28&t=43571
Also Mavis, 1960 Factory Tourer, and a '69 Traveller project: http://www.mmoc.org.uk/viewtopic.php?f=28&t=53487
Join the young owners at: https://www.facebook.com/?ref=logo#!/gr ... [sig]11392[/sig]
-
davidmiles
- Minor Legend
- Posts: 2731
- Joined: Mon Mar 23, 2009 4:54 pm
- Location: Sussex
- MMOC Member: No
Re: Pickup restoration part three
the leads in the firing order, thanks Dennis.[frame] [/frame]
smile, you never know, you might be winning.[IMG]http://i67.tinypic.com/2ro3j37.jpg[/IMG]
-
davidmiles
- Minor Legend
- Posts: 2731
- Joined: Mon Mar 23, 2009 4:54 pm
- Location: Sussex
- MMOC Member: No
Re: Pickup restoration part three
the next bit in was the ply cargo floor, Malasian ply, Pauls advice, just needs screwing down after its been waterproofed.[frame] [/frame]
smile, you never know, you might be winning.[IMG]http://i67.tinypic.com/2ro3j37.jpg[/IMG]
-
chrisryder
- Minor Legend
- Posts: 2217
- Joined: Mon Nov 15, 2010 11:44 pm
- Location: West Midlands UK
- MMOC Member: No
Re: Pickup restoration part three
they may be in the right order, but is the rotor arm pointing to the lead which goes to plug number 1 when number 1 piston is at the top of its stroke after the inlet valve on number 1 has closed?
you may have taken that into account, but i dont want you setting fire to your airfilter!
the new floor looks great. really makes it look much more complete!
you may have taken that into account, but i dont want you setting fire to your airfilter!
the new floor looks great. really makes it look much more complete!

-
davidmiles
- Minor Legend
- Posts: 2731
- Joined: Mon Mar 23, 2009 4:54 pm
- Location: Sussex
- MMOC Member: No
Re: Pickup restoration part three
when the floor is in you really get a picture of the amazing size of the payload area for such a modest sized vehicle.[frame] [/frame]
smile, you never know, you might be winning.[IMG]http://i67.tinypic.com/2ro3j37.jpg[/IMG]
-
davidmiles
- Minor Legend
- Posts: 2731
- Joined: Mon Mar 23, 2009 4:54 pm
- Location: Sussex
- MMOC Member: No
Re: Pickup restoration part three
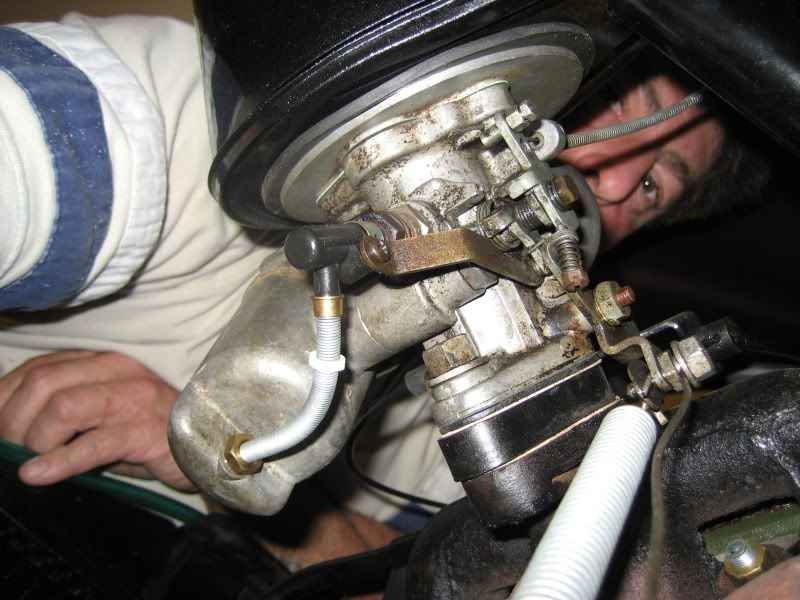
one area thats causing me consternation is the connections of the Carb, I think I'm missing a spring or two.[frame] [/frame]
Last edited by davidmiles on Tue Oct 18, 2011 5:49 pm, edited 1 time in total.
smile, you never know, you might be winning.[IMG]http://i67.tinypic.com/2ro3j37.jpg[/IMG]
-
davidmiles
- Minor Legend
- Posts: 2731
- Joined: Mon Mar 23, 2009 4:54 pm
- Location: Sussex
- MMOC Member: No
Re: Pickup restoration part three
there has to be a spring to add return tension to the accelerator pedal, its shown on the exploded view in the manual, but with no idea how to connect it, or where it attaches.[frame] [/frame]
smile, you never know, you might be winning.[IMG]http://i67.tinypic.com/2ro3j37.jpg[/IMG]
-
davidmiles
- Minor Legend
- Posts: 2731
- Joined: Mon Mar 23, 2009 4:54 pm
- Location: Sussex
- MMOC Member: No
Re: Pickup restoration part three
The rotor arm points at number four spark plug/piston, so I'll need to swap those around again, Thanks Chris, its easy for people to assume you know more than you do, believe me, this is all news to me.[frame] [/frame]
smile, you never know, you might be winning.[IMG]http://i67.tinypic.com/2ro3j37.jpg[/IMG]
-
ptitterington

- Minor Fan
- Posts: 391
- Joined: Thu May 12, 2005 9:59 pm
- Location: Jersey Channel Islands
- MMOC Member: No
Re: Pickup restoration part three
Not sure if these help

The bottom of the spring attaches to a little bar with a hole in on the exhaust clamp
Peter
The bottom of the spring attaches to a little bar with a hole in on the exhaust clamp
Peter
Traveller rebuilt in 2007 by Charles Ware's Morris Minor Centre
Pickup Fully restored 2011 by Rich Legg


http://WWW.minor1000.com
http://www.morrisowners.co.uk/

Pickup Fully restored 2011 by Rich Legg
http://WWW.minor1000.com
http://www.morrisowners.co.uk/
-
aupickup
- Minor Maniac
- Posts: 6004
- Joined: Tue Jul 20, 2004 11:41 pm
- Location: lanark
- MMOC Member: No
Re: Pickup restoration part three
with number one piston on the compression stroke the roter arm should point to number one cylinder, then teh leads are 1342
it may be possible the firing order is 180 degrees out if this is not teh case, but conect leads accordingly and the engine will still run
it may be possible the firing order is 180 degrees out if this is not teh case, but conect leads accordingly and the engine will still run
-
davidmiles
- Minor Legend
- Posts: 2731
- Joined: Mon Mar 23, 2009 4:54 pm
- Location: Sussex
- MMOC Member: No
Re: Pickup restoration part three
the rotor arm is pointing to the four o'clock position, so ive connected piston 1 up to that and followed around 3,4,2 around the distributor cap in a clockwise rotation. Unfortunatly I was holding the cap back to front and had to undo it all and start again.[frame] [/frame]
smile, you never know, you might be winning.[IMG]http://i67.tinypic.com/2ro3j37.jpg[/IMG]
-
davidmiles
- Minor Legend
- Posts: 2731
- Joined: Mon Mar 23, 2009 4:54 pm
- Location: Sussex
- MMOC Member: No
Re: Pickup restoration part three
Once I had the cap turned around and plugs put back in I realised I don't know if piston one is Top. Oh Dear, my rotor arm may not be right afterall. Ive turned the engine over since the rebuild, many times by hand, just to get the oil flowing. Since I had the head skimmed, and after I bolted it all down Ive no idea where piston one is on its stroke. The garage probably have a gauge for that. I'll be sure to mention it to them.[frame] [/frame]
smile, you never know, you might be winning.[IMG]http://i67.tinypic.com/2ro3j37.jpg[/IMG]
-
davidmiles
- Minor Legend
- Posts: 2731
- Joined: Mon Mar 23, 2009 4:54 pm
- Location: Sussex
- MMOC Member: No
Re: Pickup restoration part three
after casting around for old pictures of the carb and the accelerator cable return spring, I came across an image that showed me I had not wired up the earth point to the fuel pump correctly, so I quickly remedied that.[frame] [/frame]
smile, you never know, you might be winning.[IMG]http://i67.tinypic.com/2ro3j37.jpg[/IMG]
-
davidmiles
- Minor Legend
- Posts: 2731
- Joined: Mon Mar 23, 2009 4:54 pm
- Location: Sussex
- MMOC Member: No
Re: Pickup restoration part three
I like these old images, they provide a wealth of detail.[frame] [/frame]
smile, you never know, you might be winning.[IMG]http://i67.tinypic.com/2ro3j37.jpg[/IMG]
-
chrisryder
- Minor Legend
- Posts: 2217
- Joined: Mon Nov 15, 2010 11:44 pm
- Location: West Midlands UK
- MMOC Member: No
Re: Pickup restoration part three
remove number one spark plug and use a long screwdriver as a dip stick. turn the engine over on the handle and you can discern the point that the screwdriver stops rising and starts to fall.
Re: Pickup restoration part three
Both your pictures show the cap wired 1243! The rotor arm rotates anti clockwise.
1956 Morris Minor Series II
1959 MGA 1600 Roadster
1966 Jaguar Mk2 3.8 MOD
1959 MGA 1600 Roadster
1966 Jaguar Mk2 3.8 MOD