Pickup restoration part three
Forum rules
By using this site, you agree to our rules. Please see: Terms of Use
By using this site, you agree to our rules. Please see: Terms of Use
-
ASL642
- Minor Maniac
- Posts: 5200
- Joined: Sat Oct 20, 2007 3:14 pm
- Location: Worcestershire
- MMOC Member: Yes
Re: Pickup restoration part three
I think they originally would have been body colour 
Lou Rocke
MMOC 43512
-
davidmiles
- Minor Legend
- Posts: 2731
- Joined: Mon Mar 23, 2009 4:54 pm
- Location: Sussex
- MMOC Member: No
Re: Pickup restoration part three
yes you're right Lou, it is down to personal choice, I think if they look wrong picked out in a colour that departs from the BMC guide, you can always repaint them. The front lamps are a mystery, mind you there are parts still to be acquired, like the rim assembly. At the moment the lamps don't seem to match with the headlamp bowls.[frame] [/frame]
smile, you never know, you might be winning.[IMG]http://i67.tinypic.com/2ro3j37.jpg[/IMG]
-
ian.mcdougall
- Minor Legend
- Posts: 3287
- Joined: Tue May 20, 2008 9:24 pm
- Location: Co.Mayo Ireland
- MMOC Member: Yes
Re: Pickup restoration part three
I can not see the backing support ring that would slide onto the adjuster screws and is held in with a spring. Oops are they the plastic pots or metal pots as i think they are different mountings ,I am talking about the metal pots
-
ASL642
- Minor Maniac
- Posts: 5200
- Joined: Sat Oct 20, 2007 3:14 pm
- Location: Worcestershire
- MMOC Member: Yes
Re: Pickup restoration part three
Once David has the rims it'll all go together properly.
Lou Rocke
MMOC 43512
-
chrisryder
- Minor Legend
- Posts: 2217
- Joined: Mon Nov 15, 2010 11:44 pm
- Location: West Midlands UK
- MMOC Member: No
Re: Pickup restoration part three
yep, metal buckets need an 'inner bowl'. plastic ones don't require that, but plastic ones normally come with the inner retaining ring (which i can't see in the picture) so i'm guessing you've got metal buckets, and are missing the inner bowl and inner retaining rim.

-
davidmiles
- Minor Legend
- Posts: 2731
- Joined: Mon Mar 23, 2009 4:54 pm
- Location: Sussex
- MMOC Member: No
Re: Pickup restoration part three
looking at the original catalogue, and forgive me if I'm out of date, but it looks like you need different components if you have sealed beam units against the non sealed type, I have the more modern Halogen headlamps, just to make things difficult. With the metal buckets I think I need the plate(7) LMP 155/156. I don't yet understand how the springs retain the unit or why the buckets have brass coloured tubes that go through the wing rim? If anyone can shed light, I understand I'll have to refit the buckets in front of the plates.[frame] [/frame]
smile, you never know, you might be winning.[IMG]http://i67.tinypic.com/2ro3j37.jpg[/IMG]
-
davidmiles
- Minor Legend
- Posts: 2731
- Joined: Mon Mar 23, 2009 4:54 pm
- Location: Sussex
- MMOC Member: No
Re: Pickup restoration part three
inside the passenger side headlamp nacelle, I have realised that the captive nuts would better suit bolts than the screws Ive used.[frame] [/frame]
smile, you never know, you might be winning.[IMG]http://i67.tinypic.com/2ro3j37.jpg[/IMG]
-
DAVIDMCCULLOUGH
- Minor Legend
- Posts: 3010
- Joined: Sun Sep 09, 2007 10:42 pm
- Location: Whiteabbey, Co Antrim
- MMOC Member: Yes
Re: Pickup restoration part three
The headlight buckets with the 3 brass screws are usually for the older bulb type headlights, generally the newer ones for sealed beam have 2 adjusters that fit in place with a plastic bit and the galvanised holder at the back held in place with the spring, ESM part http://morrisminorspares.co.uk/shop/pro ... b746f4ec73
you also use http://morrisminorspares.co.uk/shop/pro ... b746f4ec73
this attaches with the spring to the back of the bowl, healight fits in place and then is held in with the chrome ring.[frame] [/frame]
you also use http://morrisminorspares.co.uk/shop/pro ... b746f4ec73
this attaches with the spring to the back of the bowl, healight fits in place and then is held in with the chrome ring.[frame]
Too many Minors so little time.....
-
aupickup
- Minor Maniac
- Posts: 6004
- Joined: Tue Jul 20, 2004 11:41 pm
- Location: lanark
- MMOC Member: No
Re: Pickup restoration part three
use bolts for the captive nuts as it will be a nightmare to undo them with nuts on the back at a later date
you will need the inner silver bowl and the spring attatches to that and the clip in teh metal bucket, then the sealed units witch are the same as the halogens , no difference in fitting, then the chrome outer ring for the sealed beams and the outer finishing ring that just pops on
adjustment for the main beam is the 2 adjuster bolts that go through the rubber gaskets
-
davidmiles
- Minor Legend
- Posts: 2731
- Joined: Mon Mar 23, 2009 4:54 pm
- Location: Sussex
- MMOC Member: No
Re: Pickup restoration part three
aha, thanks Guys, so Ive got to kit out as if it's a sealed beam unit, right. Had a break today, took advantage of the teachers strike and took my son Harry to Bovington Tank museum to see the fully operational and running second world war German Tiger tank, I had a conversation with one of the restoration staff and he made me realise the depth of the achievment in bringing the exhibit up to scratch. What you can reach with good organisation,technical insight, the will to win, oh, and a major lottery grant thrown in.
[frame] [/frame]
[frame]
smile, you never know, you might be winning.[IMG]http://i67.tinypic.com/2ro3j37.jpg[/IMG]
-
davidmiles
- Minor Legend
- Posts: 2731
- Joined: Mon Mar 23, 2009 4:54 pm
- Location: Sussex
- MMOC Member: No
Re: Pickup restoration part three
I'm hoping those componnets will arrive by post today, in the mean time I'm fitting the bonnet catch.[frame] [/frame]
smile, you never know, you might be winning.[IMG]http://i67.tinypic.com/2ro3j37.jpg[/IMG]
-
davidmiles
- Minor Legend
- Posts: 2731
- Joined: Mon Mar 23, 2009 4:54 pm
- Location: Sussex
- MMOC Member: No
Re: Pickup restoration part three
once i'd assembled all the pieces that I have in my possession, the catch went on easily, it's making the adjustments thats the time consuming bit.[frame] [/frame]
smile, you never know, you might be winning.[IMG]http://i67.tinypic.com/2ro3j37.jpg[/IMG]
-
davidmiles
- Minor Legend
- Posts: 2731
- Joined: Mon Mar 23, 2009 4:54 pm
- Location: Sussex
- MMOC Member: No
Re: Pickup restoration part three
still waiting on the safety catch, not that you can't fit and adjust without it...[frame] [/frame]
smile, you never know, you might be winning.[IMG]http://i67.tinypic.com/2ro3j37.jpg[/IMG]
-
davidmiles
- Minor Legend
- Posts: 2731
- Joined: Mon Mar 23, 2009 4:54 pm
- Location: Sussex
- MMOC Member: No
Re: Pickup restoration part three
this is with the bonnet closed, still a gap to be closed up, may have to loosen the bonnet hinges and tap the bonnet forward a couple of mm.[frame] [/frame]
smile, you never know, you might be winning.[IMG]http://i67.tinypic.com/2ro3j37.jpg[/IMG]
Re: Pickup restoration part three
David
Make sure the bonnet catch gets plenty of grease,so the " pin "part on the bonnet doesn't get stuck.
My trick, when positioning the catch, is to use a blob of blu-tack.Flatten a generous amount into a pancake/ pizza shape to fill the hole.Lower the bonnet pin into the hole..but don't drop/ close it...so it marks the blu-tack.Lift the bonnet, move the catch in the direction required.Re- make your pizza blob and repeat until the pin hits the hole in the catch " dead centre ".
Tightened the bolts and grease up the catch.
Bonnet position, I can't quite tell from the picture but is it sitting high ? On my pal's Morris, we had to shave a bit off the new reproduction rubber bump stops on the side ( Inner wing ) water channels.The bonnet wouldn't sit down correctly.
Life is never easy or dull when you have reproduction parts to contend with !!
Not much " slack " in the hinge fixings so it may be a case of elongating the hole forward, with a small round file, if really necessary.Out with the touch up paint.Anyway slacken off the nuts both sides first and apply some technical adjustment....i.e. a damn good tug.Actually just leaning back, with a firm hold on the front edge of the bonnet, is probably less damaging.
Keep at it.. you're winning !!
Bob
Last edited by mogbob on Tue Jul 05, 2011 4:13 pm, edited 1 time in total.
-
davidmiles
- Minor Legend
- Posts: 2731
- Joined: Mon Mar 23, 2009 4:54 pm
- Location: Sussex
- MMOC Member: No
Re: Pickup restoration part three
Thanks Bob some top tips there your own private methods shared, top bloke. I'll give those a ideas a go, some parts for the headlights and the number plate light arrived this morning, ESM, never let me down.[frame] [/frame]
smile, you never know, you might be winning.[IMG]http://i67.tinypic.com/2ro3j37.jpg[/IMG]
Re: Pickup restoration part three
David
You are welcome.Sometimes, and this was a case in point, the lesson is learned from bitter, bitter experience.
My 1965 sportscar, full nut & bolt restoration, is hinged at the front and the bonnet release is at the back ,on the bulkhead wall.When it gets stuck there is" no cheating allowed" to release it.The "sticking a long screwdriver through the front grille
to release it " trick doesn't work.
After it got jammed a second time, fitting the bonnet !!! The air was somewhat blue... but heh, I was getting quicker at dismantling the front of the car, to get at it again.I wasted a few happy ( ? ) hours I can tell you.
If I remember Henry Ford's words correctly....he said "failure is the opportunity to begin again, more intelligently".
So I sat down, thought it through, and had a blu-tack moment.
My pal I'm helping ( with his Moggie ) at the moment uses ESM for most of his bits.His experience is the same, first class service.
Get on with those headlights before the rain comes or are they part of the "wet weather programme" in the garages when it does ?
Bob
-
sgray
- Minor Fan
- Posts: 274
- Joined: Mon Aug 31, 2009 8:59 pm
- Location: Buckinghamshire
- MMOC Member: No
Re: Pickup restoration part three
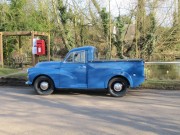
That front shot looks good. I'm about to take my front panel apart to respray it and it might be worth tidying up the bumper at the same time. Is that a new bumper blade that you bought or did you respray the original?
1970 Minor 1000 Pickup - Blue
Oxfordshire/Buckinghamshire borders
Oxon & Berks MMOC branch member and webmaster - http://www.bucksinfo.net/mogbox
Oxfordshire/Buckinghamshire borders
Oxon & Berks MMOC branch member and webmaster - http://www.bucksinfo.net/mogbox
-
davidmiles
- Minor Legend
- Posts: 2731
- Joined: Mon Mar 23, 2009 4:54 pm
- Location: Sussex
- MMOC Member: No
Re: Pickup restoration part three
it's a respray, go back a few pages an see the state it was in, I bet you blade isn't half as bad. They're so solid a component they can be in any condition and you can take them back to bare steel and start again.
Ive got a slight problem with my buckets, I don't think I've purchased the correct one's for the insert. only two of the sprung screws match up. I may need to come up with an alternative solution so the headlight can be adjusted.
[frame] [/frame]
Ive got a slight problem with my buckets, I don't think I've purchased the correct one's for the insert. only two of the sprung screws match up. I may need to come up with an alternative solution so the headlight can be adjusted.
[frame]
smile, you never know, you might be winning.[IMG]http://i67.tinypic.com/2ro3j37.jpg[/IMG]
-
davidmiles
- Minor Legend
- Posts: 2731
- Joined: Mon Mar 23, 2009 4:54 pm
- Location: Sussex
- MMOC Member: No
Re: Pickup restoration part three
Here's the nearside one, again only two of the three sprung screws match up, I can't figure out what the dome ended rubber parts are for? And, with this light Ive still to cut down the rubber gasket that fits between the bucket and the wing. its far too wide needing about 20mm cut off its outer circumferance. This has been completed on the other side.
[frame] [/frame]
[frame]
smile, you never know, you might be winning.[IMG]http://i67.tinypic.com/2ro3j37.jpg[/IMG]