1960 Traveller Full Restoration

Let us all know what you are up to with your current restoration project. Get that Minor on the road!
Forum rules
By using this site, you agree to our rules. Please see: Terms of Use
wozzer
Minor Friendly
Posts: 10
Joined: Sun Sep 26, 2010 9:05 pm
MMOC Member: No

1960 Traveller Full Restoration

Post by wozzer »

Hi there,

I have recently purchased a 1960 Grey Morris Traveller with the intention of a full restoration over the next couple of years. Once (if) it's finished, I am planning on handing ot over to me eldest daughter who is helping me with the cleaning down in the garage.

I managed to build a Robin Hood Lotus 7 type kit car from scratch a few years ago, so I am hoping I have enough technical knowledge to give it a good go.

I found the car just outside Burton on Trent in a very sorry state and paid a couple of hundred pounds for it, and an extra £30 for him to deliver it on his trailer.

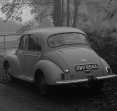
When it arrived at my house one of the rear wings had fallen off and the headlight was hanging out. But apart from that and a seized rear brake, we managed to get it started and reversed it into my garage. That was in June this year, and straight after I managed to brake my hand and wasnt able to work on it until August.[frame]Image[/frame]
wozzer
Minor Friendly
Posts: 10
Joined: Sun Sep 26, 2010 9:05 pm
MMOC Member: No

Re: 1960 Traveller Full Restoration

Post by wozzer »

Here are a few more photos..............[frame]Image[/frame][frame]Image[/frame][frame]Image[/frame][frame]Image[/frame][frame]Image[/frame][frame]Image[/frame]
As you can clearly see it has the wrong front seats, panels and steering wheel, although the original three spoke steering wheel was on the back seat.

The dashboard has been drilled and lots of after market clocks and dials have been added over the years, so will need some work to sort that out.

I decided that the wood all needed replacing and started dismantling it a couple of weeks ago.[frame]Image[/frame]
These last photos were taken this evening, I am now thinking that there is going to be considerable welding needed and am wondering wether I am capable or should I employ a professional welder![frame]Image[/frame][frame]Image[/frame][frame]Image[/frame][frame]Image[/frame][frame]Image[/frame][frame]Image[/frame][frame]Image[/frame][frame]Image[/frame][frame]Image[/frame][frame]Image[/frame]

The next job is to take off the sill covers on either side and see what they are like underneath!

Then I will remove the engine and gearbox in readiness for the welding, so I can tip it over on it's side.

Any comments, critisism or advice would be welcomed.

Woz
User avatar
Dryad
Minor Addict
Posts: 639
Joined: Tue Jan 11, 2005 7:37 pm
Location: South Norfolk
MMOC Member: No

Re: 1960 Traveller Full Restoration

Post by Dryad »

Nice project! If you want inspiration have a look at Taupe's traveller restoration on this forum, it's at http://www.mmoc.org.uk/viewtopic.php?f=28&t=25298 Fantastic for those of us who are taking on a Traveller restoration!
Image
Jonah681
Minor Fan
Posts: 286
Joined: Mon Aug 03, 2009 4:33 pm
Location: Geordieland
MMOC Member: No

Re: 1960 Traveller Full Restoration

Post by Jonah681 »

Great to see another unroadworthy car being rescued. Best of luck with the resto....Keep us all posted with updates.
chickenjohn
Minor Legend
Posts: 4064
Joined: Tue Dec 07, 2004 8:50 am
Location: Margate, East Kent
MMOC Member: No

Re: 1960 Traveller Full Restoration

Post by chickenjohn »

Looks like a great project. All standard, expected welding repairs, exactly the same as I did to my traveller to get him back on the road.

Wozzer, the best thing you can do now is to go on a night school course on vehicle body restoration. They will teach you all the skills you need to restore a car properly. The course I've been on in Kent is excellent value.

Phone round your local colleges that have a motor vehicle section and ask!
Cheers John - all comments IMHO
- Come to this years Kent branches Hop rally! http://www.kenthop.co.uk
(check out the East Kent branch website http://www.ekmm.co.uk )
ImageImage
wozzer
Minor Friendly
Posts: 10
Joined: Sun Sep 26, 2010 9:05 pm
MMOC Member: No

Re: 1960 Traveller Full Restoration

Post by wozzer »

Hi,

As I progress, the more I feel less confident in the welding side of things and am thinking of asking an expert to do all the welding.

Is there anyone who has any thoughts or knows someone near Rugby?
Jonah681
Minor Fan
Posts: 286
Joined: Mon Aug 03, 2009 4:33 pm
Location: Geordieland
MMOC Member: No

Re: 1960 Traveller Full Restoration

Post by Jonah681 »

Try contacting Bill Stewardson, 77, Parkfield Road Newbold of the Rugby MMOC. He may have a few recommendations.

Branch meet Meeting Day/Time: 3rd Tuesday, 8.00 pm.
Location: St. Andrew's Rugby Club, Ashlawn Road, Rugby.

Depending on budget, have a word with Jonathon Heap of JLH - he's just down the road from you in Southam. Builds some fantastic Minors.
User avatar
d_harris
Minor Legend
Posts: 4388
Joined: Thu Apr 15, 2004 3:52 pm
Location: Sunny Brighton
MMOC Member: No

Re: 1960 Traveller Full Restoration

Post by d_harris »

Hi Wozz.

Although all that welding looks scary, theres nothing there that really looks too bad to me. Get yourself on a vehicle restoration course and save yourself a packet!

irmscher
Minor Legend
Posts: 3773
Joined: Wed Jul 14, 2010 10:53 am
Location: South Manchester
MMOC Member: Yes

Re: 1960 Traveller Full Restoration

Post by irmscher »

:oops: i paid £700 for one worse than yours . i think it looks a good project :D
wozzer
Minor Friendly
Posts: 10
Joined: Sun Sep 26, 2010 9:05 pm
MMOC Member: No

Re: 1960 Traveller Full Restoration

Post by wozzer »

OK, Engine and gearbox now out, along with all the ancileries in the engine bay. All old wiring removed. In fact there aint much left!!

Just to clear off the dash with all the clocks etc and will take out side for a good old jet wash over a grid.

No choice with welding now as I recieved a mig welder for Christmas......

Will take some more photos when it is outside in daylight.

Then the fun begins.................trying to put it back together?
Ian46
Minor Fan
Posts: 399
Joined: Wed Apr 15, 2009 11:51 pm
Location: Usually on the naughty step
MMOC Member: Yes

Re: 1960 Traveller Full Restoration

Post by Ian46 »

Hi Wozzer, as others have said the Traveller looks a good project.
However, beware. With a project car it is very easy and quick to take to pieces and then find the task of putting it back together takes forever.

You are now entering the danger zone where many a project car has entered and many projects do not return. Which is why there are always so many unfinished projects for sale.

I took a welding course at my local college some years ago and it was a great investment. Whilst others on the course were making axle stands (which I thought a little enthusiast) I practiced on old Minor repair panels I had kicking around at the time. After all that is what I was going to work with and you can practice welding into corners etc.

Take lots of photos of your car now, you can never have enough, bag up parts, don't throw anything away and label everything clearly. It will be months before reassembly and you will have forgotten what goes where.

With the wood off the back of the car the structure will be come quite flexible and I would suggest that before you cut out any rust making the shell weaker you make sure the car is 'square' and 'true', either by accurate measuring or by taking the car to your local crash repairers and putting it on a jig. Then weld on temporary cross bracing members longitudinally, diagonally and across the car to 'hold' the it in that position. Only then can you hack off a cill etc.

If you follow the procedure, then the doors will fit, the wood will be easier to fit, the rear doors will shut etc., etc.

In fact leave the doors in place for as long as possible so front wings/panels can be aligned before permanent welding.

A secret tip is always start work from the outside of the car and work into the sub structure. If you weld the cill structure just slightly out of position the outer panels touching these will be further out of position and thats what you ultimately see. The cill structure for example in under the carpet and you can 'hide' any little imperfections there which you can't on the outside.

Good luck and keep us posted.

Regards Ian
Busy collecting parts for my '52 MM Convertible and 1949 Saloon restorations. :o
wozzer
Minor Friendly
Posts: 10
Joined: Sun Sep 26, 2010 9:05 pm
MMOC Member: No

Re: 1960 Traveller Full Restoration

Post by wozzer »

HI All,

Been stripping it all down and now nothing left...........as Ian suggests.

Done lots of practising with my welding techniques and am quietly confident to start to fix some 'simple' panels.

I thought I would start with the rear boot section and one of the inner wings (L/H). I have cut away the old inner wing, but am slightly confused?

As you can see in the photo, I have left part of the wing attached to the rear member going over the axle. Please excuse my ignorance, but does this all need to be cut away, or just cleaned up and the new wing welded on top of it and not to worry about the extra couple of mm width?

Woz[frame]Image[/frame]
taupe
Minor Legend
Posts: 1189
Joined: Sun Oct 26, 2008 3:20 pm
Location: Bucks
MMOC Member: No

Re: 1960 Traveller Full Restoration

Post by taupe »

Hi

Great project!

Ideally you would cut that all away otherwise you will end up with a rust sandwich!

You can also paint within the box section which will reduce rusting later :D

Before you do though put some supports along the rear chassis leg so that it all stays in alignment.

Taupe
wozzer
Minor Friendly
Posts: 10
Joined: Sun Sep 26, 2010 9:05 pm
MMOC Member: No

Re: 1960 Traveller Full Restoration

Post by wozzer »

Hi Taupe,

What paint would you use inside the sections?

Woz
taupe
Minor Legend
Posts: 1189
Joined: Sun Oct 26, 2008 3:20 pm
Location: Bucks
MMOC Member: No

Re: 1960 Traveller Full Restoration

Post by taupe »

Hi

Anything that will seal the surface and neutralise the rust a bit eg zinc rich primer, red oxide or smooth hammerite.

You will need to leave it to dry off a bit before completing your welding as otherwise it will burn!

When you have finished all the box sections welding you can inject waxoyle or similar to keep the rust away :D
wozzer
Minor Friendly
Posts: 10
Joined: Sun Sep 26, 2010 9:05 pm
MMOC Member: No

Re: 1960 Traveller Full Restoration

Post by wozzer »

Hi All,

Thought I would push it out of the garage for a quick clean up of all the rust on the floor!!!

Just a few photos of what it is looking like at the moment.

Looks a bit lobsided at the back as the leaf spring has been unbolted on the left side.[frame]Image[/frame][frame]Image[/frame][frame]Image[/frame][frame]Image[/frame][frame]Image[/frame][frame]Image[/frame]

I will be starting on the left rear first, to see how the new bits weld up.
brian
Minor Friendly
Posts: 83
Joined: Sat Mar 20, 2010 10:25 pm
Location: Saltash,Cornwall
MMOC Member: No

Re: 1960 Traveller Full Restoration

Post by brian »

The thought of restoring that would scare me to death, Best of luck,cheers,Brian

wozzer
Minor Friendly
Posts: 10
Joined: Sun Sep 26, 2010 9:05 pm
MMOC Member: No

Re: 1960 Traveller Full Restoration

Post by wozzer »

It does !!!!
1mustard
Minor Fan
Posts: 125
Joined: Wed May 26, 2010 6:45 pm
MMOC Member: No

Re: 1960 Traveller Full Restoration

Post by 1mustard »

hi wozzer,
if you are going to buy/fit new rear arches make sure they are in exactly the right place, because if the flanges that screw into the wood are out, this will mean lots of cutting and rewelding etc, also make sure the height of the boot floor is bang on if you have the timber side frames and the rear boot floor wood you could temporarily fit these, only with a few screws to make sure you get these bang on, if they are out it could be a real nuisance.
wozzer
Minor Friendly
Posts: 10
Joined: Sun Sep 26, 2010 9:05 pm
MMOC Member: No

Re: 1960 Traveller Full Restoration

Post by wozzer »

HI

I havn't even thought about the timber yet! All the metalwork will be 'best guess'.

As the replacement rear arches seem to come in three bits - the first is the inner, then there seems to be the flange that fastens to the wood, then the outside arch. I will only weld the inner arch in and leave the flange piece until I am ready with the wood. This 'should' then able me to play around with width etc.

What do you think?

Woz
Post Reply