Aologies for duplicating a similar post but can anyone advice me on how to repair a front wing.
Basically the front wing on KAS is rotted in the usual place - at the bottom where it meets the door. I was told what you do is cut out the old rusted piece and weld in a new piece, grind down, use filler to even it out, sand and finish. I eventually got around to taking the wing of earlier, so I have two questions. Firstly what gauge or thickness of steel do i need to cut and weld back in ? Secondly I noticed that the rot is not just confined to the front of the wing, but has partially pentrated to the back of the wing too directly opposite the visible outer side. So, can this be repaired in the same way as the former or is it new wing time ? I just didnt' have the camera with me when I took the wing off so I don't have any pictures to illustrate the question just yet, but you probably know what I mean.
Any suggestions ?????
Wing Repair,
Forum rules
By using this site, you agree to our rules. Please see: Terms of Use
By using this site, you agree to our rules. Please see: Terms of Use
-
iandromiskin
- Minor Fan
- Posts: 475
- Joined: Fri Jun 30, 2006 8:51 am
- Location: Dromiskin, Co. Louth, Ireland
- MMOC Member: No
Wing Repair,
Gertie, 1962 Saloon, Milly, 1969 Traveller (ex APL 971H) and now KAS 1958 4 Door Saloon.
[img]http://i156.photobucket.com/albums/t28/iandromiskin/DSC_0051-1.jpg[/img][img]http://i156.photobucket.com/albums/t28/iandromiskin/Picture112.jpg[/img][img]http://i156.photobucket.com/albums/t28/iandromiskin/Picture366.jpg[/img]
http://www.youtube.com/watch?v=WnDuQIOtYcc
http://www.youtube.com/watch?v=ZuhsoEd1GhQ
Re: Wing Repair,
Of course you need to cut out and renew any rotted metal, inside or out. Use same thickness as original, so measure what you have.
-
chickenjohn
- Minor Legend
- Posts: 4064
- Joined: Tue Dec 07, 2004 8:50 am
- Location: Margate, East Kent
- MMOC Member: No
Re: Wing Repair,
I would use ~1mm steel or close to that, 0.8 or 0.9mm will do as it is not a structural repair. Ideally you will need a folder to make up the sections, as there is a curve in the rear piece that is not visible when the wing is on the car. This curve can be replicated by lots of tiny folds, 3mm apart to get the right shape. Then to minimise distortion, I have made up a few repair sections for the visible side of the wing. It is a flat rectangular piece with a swage at the front (to enable spot welding of the repair to original wing) and a fold at the rear of the wing. make the distance between fold at the rear and start of the joddle at the front bigger than the rust you will cut out.
This fold will be tapped down flush with a hammer and dolly to sandwich the curved piece, butt welded where it joins the wing at the top and bottom, then ground flush at the front. I spot welded the swaged section (can use a joddler, hole punch the original wing and plug weld if you don't have a spot welder) then lead loaded and skimmed with filler before painting. Where there are overlaps, i spray with zinc weld thru and seam seal before painting. Once you have made the two repait sections for the rear of the wing, then scribe around these on the wing and cut the wing accurately to suit the repair sections.
Sorry, but I don't think i have any photo's (yet) as all these repairs to the rear of wings were done at college. Will try and get a few photo's done over the next few days and posted as I am in the middle of repairing a front wing at the moment. I realise my above description might not make much sense without a photo or two!! apologies.
I have also made repairs to the headlamp ring and the spotwelded strengthener below the indicator/side light unit on a few wings.
It is possible though to make a lasting permanent repair to Minor wings using a minimum of filler. I would not attempt to repair the wing with the wing still on the car. Take it off to give you access to the rear of the rust.
Cheers John - all comments IMHO
- Come to this years Kent branches Hop rally! http://www.kenthop.co.uk
(check out the East Kent branch website http://www.ekmm.co.uk )


- Come to this years Kent branches Hop rally! http://www.kenthop.co.uk
(check out the East Kent branch website http://www.ekmm.co.uk )
Re: Wing Repair,
Hi
Another option if the front of the wing is original and in reasonable condition is to use the rear end of a 'cheap' pattern wing.
Bolt the wing back on in alignment, cut vertically at the edge of the rusted out part and joddle the vertical joint then cut out what you need from the repair wing and bolt on/ seam weld the join.
If you do the joddle on the outside - once its seam welded on the inside you can sand or grind the joddle seam off and leave an 'invisible' repair.
The advantage with this method is that you start with a wing that fits at the front and dont have to spend hours trying to get it realigned. You do however need a reasonable level of welding skill to achieve a tidy result.
Taupe
-
iandromiskin
- Minor Fan
- Posts: 475
- Joined: Fri Jun 30, 2006 8:51 am
- Location: Dromiskin, Co. Louth, Ireland
- MMOC Member: No
Re: Wing Repair,
I managed to take a few pictures earlier.
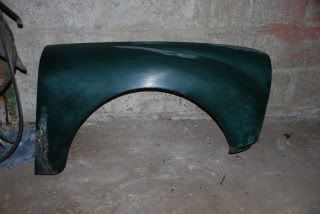 Picture of the drivers side wing showing the rust.
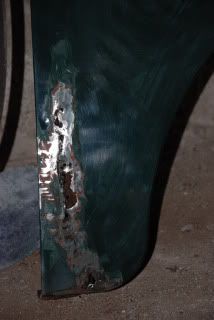 General view of the rust in the usual place. It doesn't extend all the way to the door edge but does extend to the bottom of the wing.
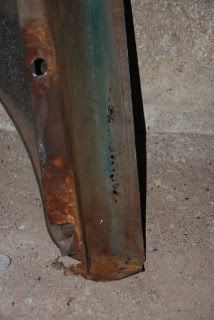 The rust has partially penetrated to the inside of the wing too.
Has anyone one tried to use a later 1098 wing instead of repairing this one for example, and just welding in a piece at the bottom of the larger indicator/side light to make the earlier and smaller light fit ? I was wondering if this would be an easier fix ???
Picture of the drivers side wing showing the rust. General view of the rust in the usual place. It doesn't extend all the way to the door edge but does extend to the bottom of the wing. The rust has partially penetrated to the inside of the wing too.Has anyone one tried to use a later 1098 wing instead of repairing this one for example, and just welding in a piece at the bottom of the larger indicator/side light to make the earlier and smaller light fit ? I was wondering if this would be an easier fix ???
Gertie, 1962 Saloon, Milly, 1969 Traveller (ex APL 971H) and now KAS 1958 4 Door Saloon.
[img]http://i156.photobucket.com/albums/t28/iandromiskin/DSC_0051-1.jpg[/img][img]http://i156.photobucket.com/albums/t28/iandromiskin/Picture112.jpg[/img][img]http://i156.photobucket.com/albums/t28/iandromiskin/Picture366.jpg[/img]
http://www.youtube.com/watch?v=WnDuQIOtYcc
http://www.youtube.com/watch?v=ZuhsoEd1GhQ
[img]http://i156.photobucket.com/albums/t28/iandromiskin/DSC_0051-1.jpg[/img][img]http://i156.photobucket.com/albums/t28/iandromiskin/Picture112.jpg[/img][img]http://i156.photobucket.com/albums/t28/iandromiskin/Picture366.jpg[/img]
http://www.youtube.com/watch?v=WnDuQIOtYcc
http://www.youtube.com/watch?v=ZuhsoEd1GhQ
-
Alec
- Minor Legend
- Posts: 2148
- Joined: Thu Apr 15, 2004 7:29 am
- Location: Oswestry, Shropshire
- MMOC Member: No
Re: Wing Repair,
Hello all,
as we all know this spot is due to the rust trap created by the wing and the inner member. For a longer lasting repair, (I hope) I filled that 'V' shaped hollow with seam sealer, after painting, to eliminate that hollow. Obviously regular washing of the inside of the wing also helps.
Alec
as we all know this spot is due to the rust trap created by the wing and the inner member. For a longer lasting repair, (I hope) I filled that 'V' shaped hollow with seam sealer, after painting, to eliminate that hollow. Obviously regular washing of the inside of the wing also helps.
Alec
Re: Wing Repair,
Hi Ian,
That looks quite fixable. Mine were rusty a lot further up which made it tricky to repair the complex curve of the inner part, it looks like you'll manage with just a simple curve on the inner and a flat piece on the outer. John's description sounds spot on to me, though I'll admit that I wasn't that thorough but I'm not expecting to win any prizes.
That looks quite fixable. Mine were rusty a lot further up which made it tricky to repair the complex curve of the inner part, it looks like you'll manage with just a simple curve on the inner and a flat piece on the outer. John's description sounds spot on to me, though I'll admit that I wasn't that thorough but I'm not expecting to win any prizes.