Pickup restoration part three
Forum rules
By using this site, you agree to our rules. Please see: Terms of Use
By using this site, you agree to our rules. Please see: Terms of Use
-
davidmiles
- Minor Legend
- Posts: 2731
- Joined: Mon Mar 23, 2009 4:54 pm
- Location: Sussex
- MMOC Member: No
Re: Pickup restoration part three
I'm a bit confused right now, page 88 of my Haynes diy restoration manual image VP1 shows the pipe going up and across under the floor to exit on the drivers side in front of the rear wheel.[frame] [/frame]
smile, you never know, you might be winning.[IMG]http://i67.tinypic.com/2ro3j37.jpg[/IMG]
-
davidmiles
- Minor Legend
- Posts: 2731
- Joined: Mon Mar 23, 2009 4:54 pm
- Location: Sussex
- MMOC Member: No
Re: Pickup restoration part three
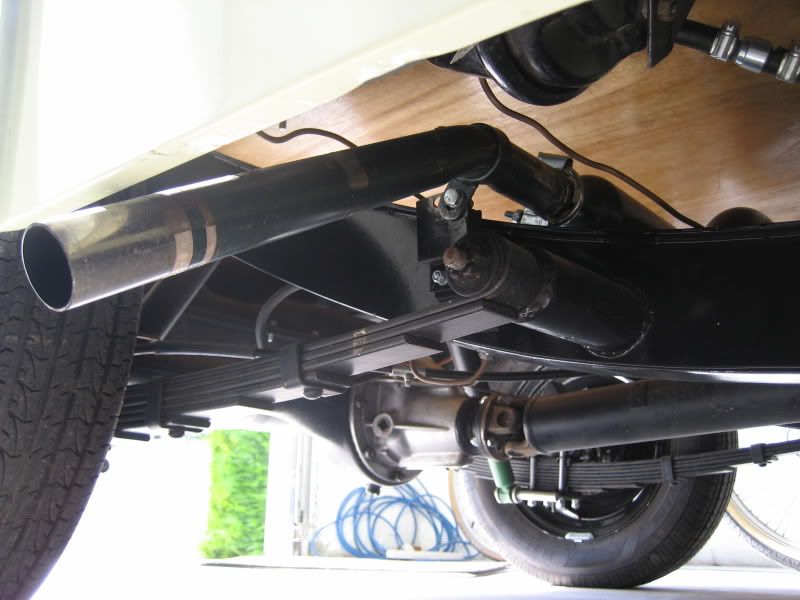
Is there any advantage in a longer exhaust, more compression maybe? if not I may as well cut it short here and exit in front of the passenger side rear wheel. But it does sit comfortably at this angle.
[frame] [/frame]
[frame]
smile, you never know, you might be winning.[IMG]http://i67.tinypic.com/2ro3j37.jpg[/IMG]
-
chrisryder
- Minor Legend
- Posts: 2217
- Joined: Mon Nov 15, 2010 11:44 pm
- Location: West Midlands UK
- MMOC Member: No
Re: Pickup restoration part three
It goes like you have it mocked up in your picture.davidmiles wrote:I'm a bit confused right now, page 88 of my Haynes diy restoration manual image VP1 shows the pipe going up and across under the floor to exit on the drivers side in front of the rear wheel.[frame]
I'm not sure of the advantages, i presume the longer length may help with back pressure.
i believe the orignal reasoning behind them going over to the drivers side is that there was a regulation stating that commercial vehicles exhaust pipes couldn't exit toward the pavement.

-
davidmiles
- Minor Legend
- Posts: 2731
- Joined: Mon Mar 23, 2009 4:54 pm
- Location: Sussex
- MMOC Member: No
Re: Pickup restoration part three
Chris, that makes perfect sense, I guess it's another difference between the pickups & vans and the saloons and Travellers.
The pipe just slots in nice and neat in this position.[frame] [/frame]
The pipe just slots in nice and neat in this position.[frame]
smile, you never know, you might be winning.[IMG]http://i67.tinypic.com/2ro3j37.jpg[/IMG]
-
davidmiles
- Minor Legend
- Posts: 2731
- Joined: Mon Mar 23, 2009 4:54 pm
- Location: Sussex
- MMOC Member: No
Re: Pickup restoration part three
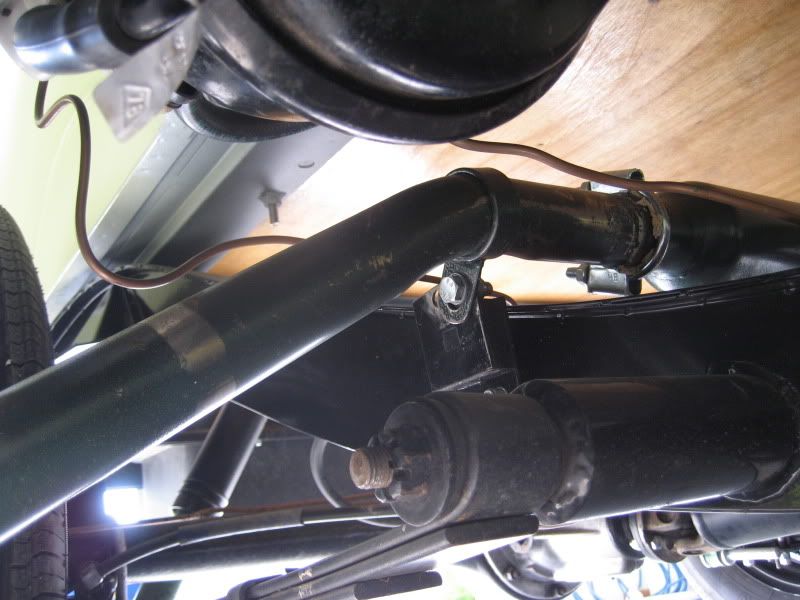
one last thing to decide before I paste and clamp it all in, is there a reason ESM sent me a second mount bracket, does it support the tip of the pipe?[frame] [/frame]
smile, you never know, you might be winning.[IMG]http://i67.tinypic.com/2ro3j37.jpg[/IMG]
-
chrisryder
- Minor Legend
- Posts: 2217
- Joined: Mon Nov 15, 2010 11:44 pm
- Location: West Midlands UK
- MMOC Member: No
Re: Pickup restoration part three
yes, you do need 2, but i'm not sure whereabouts it bolts onto on that side. i would imagine you would already have holes somewhere!
Re: Pickup restoration part three
Sorry, I thought you had a pick up exhaust system - What you have is just a standard system that will fit any Minor......davidmiles wrote:I'm a bit confused right now, page 88 of my Haynes diy restoration manual image VP1 shows the pipe going up and across under the floor to exit on the drivers side in front of the rear wheel.[frame]
[sig]8426[/sig]
Compare the Minors - Simples !! http://mog.myfreeforum.org/index.php
Compare the Minors - Simples !! http://mog.myfreeforum.org/index.php
-
chrisryder
- Minor Legend
- Posts: 2217
- Joined: Mon Nov 15, 2010 11:44 pm
- Location: West Midlands UK
- MMOC Member: No
Re: Pickup restoration part three
Normal minors have their exhaust come out the back, this one pictured IS a van/pick up one, where it crosses over the chassis to come out infront of the rear wheel on the drivers side.PSL184 wrote:Sorry, I thought you had a pick up exhaust system - What you have is just a standard system that will fit any Minor......
-
Pikey
- Minor Fan
- Posts: 229
- Joined: Tue May 22, 2007 1:07 pm
- Location: Nelson, Treharris, Mid Glamorgan
- MMOC Member: No
Re: Pickup restoration part three
Sorry but thats definately a Pickup system, the system is similar to a saloon/trav etc up to the silencer, but thats where the similarity ends, the exhaust pipe then turns though 90 degs and goes over the chassis to the drivers side as per davids photo.
David, where you have pictured your second clamp is roughly in the right place but you should have a small angled bracket which is welded onto the chassis member and then the clamp youve pictured bolts to the angle bracket. You should also have one exactly the same to the rear of the silencer underneath the passender floor. The angle brackets normally break off.
If you need it I'll photograph mine for you, but I wasnt able to get the right clamps at the time, so my rubber clamps are slightly different, but you'll get the idea.
S
Last edited by Pikey on Wed Aug 17, 2011 5:10 pm, edited 1 time in total.
-
ptitterington

- Minor Fan
- Posts: 391
- Joined: Thu May 12, 2005 9:59 pm
- Location: Jersey Channel Islands
- MMOC Member: No
Re: Pickup restoration part three
Not sure if this helps,
Previously I fitted a stainless one I had from the spares pile and just cut it off under the bed, worked ok but in time may make stuff sooty!
Previously I fitted a stainless one I had from the spares pile and just cut it off under the bed, worked ok but in time may make stuff sooty!
Last edited by ptitterington on Thu Aug 18, 2011 8:02 pm, edited 2 times in total.
Traveller rebuilt in 2007 by Charles Ware's Morris Minor Centre
Pickup Fully restored 2011 by Rich Legg

http://WWW.minor1000.com
http://www.morrisowners.co.uk/

Pickup Fully restored 2011 by Rich Legg
http://WWW.minor1000.com
http://www.morrisowners.co.uk/
-
jaekl
- Minor Addict
- Posts: 658
- Joined: Thu Jun 19, 2008 7:40 pm
- Location: Pennsylvania, USA
- MMOC Member: No
Re: Pickup restoration part three
On LHD models only the front section was used but was rotated so that the angled exit was directed down and out. I don't think the original arrangement had the joggle in the pipe to clear the stub of the crossmember. The absense of the pipe across the frame allowed me to fill that void between the frame and bed with a custom built box. Access is through the front half of the wooded floor which is held down with two quarter turn fasteners sourced from the boot of ADO16 cars.
-
davidmiles
- Minor Legend
- Posts: 2731
- Joined: Mon Mar 23, 2009 4:54 pm
- Location: Sussex
- MMOC Member: No
Re: Pickup restoration part three
the clamps and paste are in, just enough clearance through the back of the engine bay. Just needs a narrow bolt for the middle clamp.
Now I need to fabricate a bracket mount for the end of the exhaust pipe where it exits on the drivers side.The mount will be spot/ plug welded directly to the chassis with two bolt holes drilled in it for the bracket to bolt to.[frame] [/frame]
Now I need to fabricate a bracket mount for the end of the exhaust pipe where it exits on the drivers side.The mount will be spot/ plug welded directly to the chassis with two bolt holes drilled in it for the bracket to bolt to.[frame]
smile, you never know, you might be winning.[IMG]http://i67.tinypic.com/2ro3j37.jpg[/IMG]
-
chrisryder
- Minor Legend
- Posts: 2217
- Joined: Mon Nov 15, 2010 11:44 pm
- Location: West Midlands UK
- MMOC Member: No
Re: Pickup restoration part three
is there meant to be a pinch bolt that goes through that mount, to grip the pipe to stop it chattering?
I'm not an expert on these LCV bits, but i'd imagine they'd benefit from a bolt, even if the mounts didnt come with any. Or is it already a tight fit?
I'm not an expert on these LCV bits, but i'd imagine they'd benefit from a bolt, even if the mounts didnt come with any. Or is it already a tight fit?
-
davidmiles
- Minor Legend
- Posts: 2731
- Joined: Mon Mar 23, 2009 4:54 pm
- Location: Sussex
- MMOC Member: No
Re: Pickup restoration part three
DRYAD kindly mailed me this well needed slide switch, what a decent fella. Being an original Morris minor part it should screw in there no problems. He's even left the wires on it as a guide.[frame] [/frame]
smile, you never know, you might be winning.[IMG]http://i67.tinypic.com/2ro3j37.jpg[/IMG]
-
davidmiles
- Minor Legend
- Posts: 2731
- Joined: Mon Mar 23, 2009 4:54 pm
- Location: Sussex
- MMOC Member: No
Re: Pickup restoration part three
yes Chris you're right, as I said it needs a narrow bolt fitted as the one Ive cut down to the right length is too wide and catches the exhaust pipe, it is a tight fit, but I do want to pinch bolt it up to avoid it coming loose with vibration.[frame] [/frame]
smile, you never know, you might be winning.[IMG]http://i67.tinypic.com/2ro3j37.jpg[/IMG]
-
davidmiles
- Minor Legend
- Posts: 2731
- Joined: Mon Mar 23, 2009 4:54 pm
- Location: Sussex
- MMOC Member: No
Re: Pickup restoration part three
using a cardboard template to get the size and angle of the exhaust mount bracket[frame] [/frame]
smile, you never know, you might be winning.[IMG]http://i67.tinypic.com/2ro3j37.jpg[/IMG]
Re: Pickup restoration part three
Hi David
Good little bit of fabrication there.Well done.
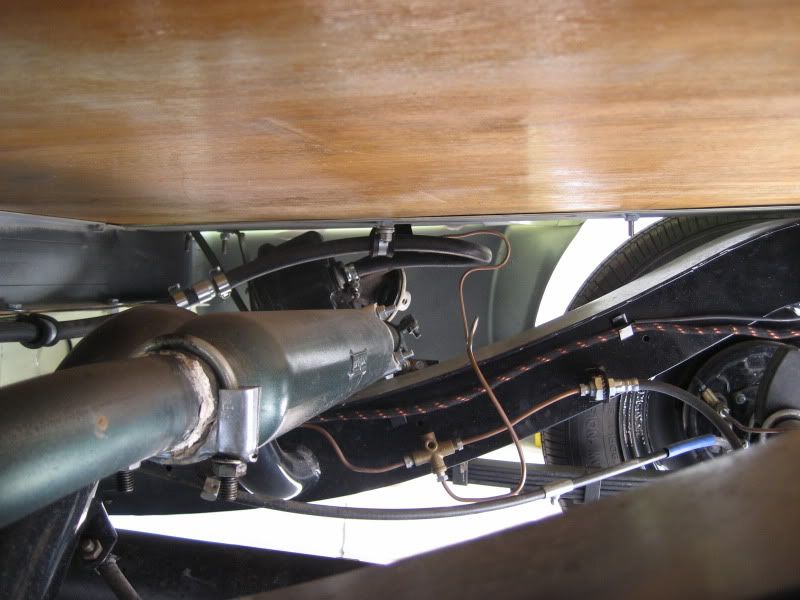
Can you put my mind at rest please.One of the earlier shots appears ( ? ) to show your Servo hose bending around horizontally and the fixed brake line ( from the three way union ) rising and then circum-navigating around the Servo hose.
Are the clamps, holding the Servo hose, placed sufficiently close to each other, to stop contact with the brake line ?
The hose is quite heavy and could flop/ flex around, when bouncing over speed humps, etc making contact with the brake line, inducing wear.Give it some time, several thousand speed bumps later and you might have a hole in the rubber ( brakes going heavy with loss of Servo ) or worse still, a worn /weak patch on the fixed brake line. A stamp on the brakes one day and Ooooopps ....NO BRAKES !!
It's difficult to tell from a photo and without being able to flex the Servo pipe manually ,to assess the potential risk.
You've got a fantastic vehicle there and I'd like you to keep it in that condition and your family unharmed as well, so they can enjoy it.
Regards Bob
Good little bit of fabrication there.Well done.
Can you put my mind at rest please.One of the earlier shots appears ( ? ) to show your Servo hose bending around horizontally and the fixed brake line ( from the three way union ) rising and then circum-navigating around the Servo hose.
Are the clamps, holding the Servo hose, placed sufficiently close to each other, to stop contact with the brake line ?
The hose is quite heavy and could flop/ flex around, when bouncing over speed humps, etc making contact with the brake line, inducing wear.Give it some time, several thousand speed bumps later and you might have a hole in the rubber ( brakes going heavy with loss of Servo ) or worse still, a worn /weak patch on the fixed brake line. A stamp on the brakes one day and Ooooopps ....NO BRAKES !!
It's difficult to tell from a photo and without being able to flex the Servo pipe manually ,to assess the potential risk.
You've got a fantastic vehicle there and I'd like you to keep it in that condition and your family unharmed as well, so they can enjoy it.
Regards Bob
-
davidmiles
- Minor Legend
- Posts: 2731
- Joined: Mon Mar 23, 2009 4:54 pm
- Location: Sussex
- MMOC Member: No
Re: Pickup restoration part three
Hi Bob, are you sure you mean my truck as Ptitterington put a load of images up on my thread of his pickup. if you do mean mine Ive no idea what you mean and I'm quite concearned with your observation, and I want to correct it, could you paste it here with arrows?
smile, you never know, you might be winning.[IMG]http://i67.tinypic.com/2ro3j37.jpg[/IMG]
-
ptitterington
- Minor Fan
- Posts: 391
- Joined: Thu May 12, 2005 9:59 pm
- Location: Jersey Channel Islands
- MMOC Member: No
Re: Pickup restoration part three
Confusion!
Those were the pictures of the exhaust on my pickup but did show the 3 way union near the servo hanging without a bolt through it.
David, you are welcome to come over and bolt it up for me!!
Its on my to do list!
Peter
Those were the pictures of the exhaust on my pickup but did show the 3 way union near the servo hanging without a bolt through it.
David, you are welcome to come over and bolt it up for me!!
Its on my to do list!
Peter
Traveller rebuilt in 2007 by Charles Ware's Morris Minor Centre
Pickup Fully restored 2011 by Rich Legg
http://WWW.minor1000.com
http://www.morrisowners.co.uk/
Pickup Fully restored 2011 by Rich Legg
http://WWW.minor1000.com
http://www.morrisowners.co.uk/
Re: Pickup restoration part three
Hi David / Peter
Apologies for the confusion guys.My excuse is that life is more than a bit hectic at the moment, I zoomed through the piccies
and zapped off a post without checking.I need a few nights decent sleep and maybe my brain will catch up and function.
Recapping then...not yours David.How do I post the picture , from the previous post, and add arrows ? A real " idiots " guide for me please and you will have found my level of computer expertise ( or lack of it !! ).
Thanks.
Bob