The worst bit (the floor above the crossmember) isn't obvious without pulling the carpets up, and I don't think they normally do that on the test. Where it's now holed through to the outside is right above the arm on the end of the torsion bar, so they'd have had to get their testing tool (pointy hammer) into that small gap to poke at the undersealed rust.
Alex Holden - http://www.alexholden.net/
If it doesn't work, you're not hitting it with a big enough hammer.
I think the main difficulty with this resto is going to be gettingthe car back off the huge pile of rusty flages, filler and newspaper - after tapping around the floor and chassis for half an hour...
2nd problem will be getting rid of said huge pile!
Get the shell supported on several stands to keep things straight then get in there with the air needle gun - the big bundle of 'magic spaghetti' that soon shows where the good steel is !
[img]http://www.spagweb.com/v8mini/images/spag_avatar1.gif[/img] Ian (Spag)
www.spagweb.com - www.v8mini.co.uk - "The Roughest V8Mini Deathtrap In The World"
Whats really interesting there is the way the repair patches have gone so badly.
Whats the reason for this ? poor quality steel or just plain laziness not treating them after they were welded in?
Whe you do those Alex will you remove the old patch welds as well? As one would assume it will go upto or at the welds sometime in the future?
Orkney wrote:Whats really interesting there is the way the repair patches have gone so badly.
Whats the reason for this ? poor quality steel or just plain laziness not treating them after they were welded in?
It's because the patches have been welded over the rusted-through original floor, leaving a sandwich that salty road spray was able to soak into through capillary action and stay there. In several places they've done the same on the underside, giving three layers to soak up water and rust from the inside out. The ends of the crossmembers are the same (see earlier pictures) so they will be merrily rotting away right now - I noticed when I got her back from Liverpool that there was rusty water dripping out of the patches.
When you do those Alex will you remove the old patch welds as well? As one would assume it will go upto or at the welds sometime in the future?
When I do it properly I'll get rid of all the old bodges and probably replace the whole crossmember. But for the time being I'm just going to chop out the worst of it and then do some slightly neater bodging of my own so as to get the car back on the road until next winter.
Alex Holden - http://www.alexholden.net/
If it doesn't work, you're not hitting it with a big enough hammer.
I must say I emailed saying I was interested in this when first offered.
I said I wanted something to drive around in for a while and vowed to sell / give total proceeds to the person who was offering it in first place or give away again when my Minor was back on the road.
I'm now glad you got in before me as I wouldn't have been happy driving that even as a short term run around
On the downside, I was poking around at the loose underseal and discovered a rather nasty rust hole in the nearside chassis leg near the eyebolt that really should have been picked up on the last MOT!
Alex Holden - http://www.alexholden.net/
If it doesn't work, you're not hitting it with a big enough hammer.
Cross member ends is next on my list of jobs to tackle, then its the nearside chassis leg, but only a small section needs doing so ill hopefully be able to lop that bit out and graft in a new piece. Then after that is a mega cleanathon over the whole underside of the car......and then dare i say it thats the welding over!!!
Ultimate rust cure for your moggy....paint it brown, at least that way you dont notice the rust as much!!
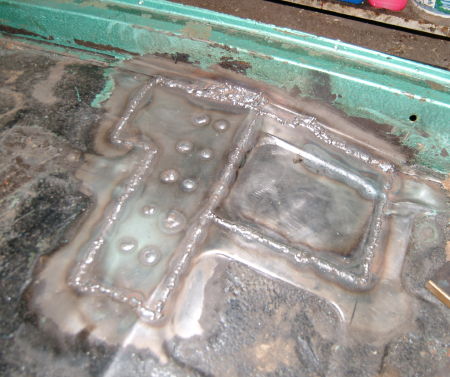
Hey Alex, the repairs (not bodges) are looking good.
Nice cuts all the way to decent metal and solid 'battleship' welding. As long as there's good penetration through both bits, the don't worry how ugly it is.
And as John says a tickle with Mr Grinder soon cleans things up, then all gets hidden under a little smear of sealer anyway.
Keep it up !!!
[img]http://www.spagweb.com/v8mini/images/spag_avatar1.gif[/img] Ian (Spag)
www.spagweb.com - www.v8mini.co.uk - "The Roughest V8Mini Deathtrap In The World"
BTW, ALex, your blog page on the repairs loads fine in Camino but has difficulty in Safari. I am on OSX 10.2 though so Safari doesnt allways work these days.
I cleaned up the welds tonight with one of those silicone carbide angle grinder discs with the rubber backing pad. I'm not sure I'm doing the seam-sealing step right because it always seems to end up a right mess. Maybe the brushable stuff would be easier to apply neatly than the stuff that comes in a gun.
Alex Holden - http://www.alexholden.net/
If it doesn't work, you're not hitting it with a big enough hammer.
Nice work Alex
I use the brushable seam sealer and put masking tape either side of the weld leaving about a one inch gap, this leaves a nice neat finish when the tape is removed
Dave
Looking good alex, Ill be tackling those bits of floor myself tomorrow. Pics to follow...............
Its Apple operating systems and browser versions! Basically, my laptop is 5 1/2 years old and has the old Operating System, I'm too tight to spend £100 on the newest OS when I can spend it on Minor parts.
Yes, Alex, brushable seam sealer is better. I used 3M stuff they have at college and it spreads really nicely and sets fast. Also U pol polyurethane is good too out of a tube.
Can I ask is seam sealer used only for the under side welds? should I be using it, I have been welding in a new boot floor and the lower section of the back end and I am unsure weather to use this stuff on the parts of the body that will be seen, can it be painted over ok?
regards
Nigel
Meet Nobby Minor my daily driver, needing a little TLC now and then.
[img]http://i152.photobucket.com/albums/s192/nslocomotives/nobby/IMG00319-1.jpg[/img]
http://s152.photobucket.com/albums/s192/nslocomotives/
If at first you don't succeed, destroy all evidence of trying :-)