That's the very clip!
They had the benefit that all the parts they are working with being made in the same factory at the same time too!
Pick up Restoration (Part 2)
Forum rules
By using this site, you agree to our rules. Please see: Terms of Use
By using this site, you agree to our rules. Please see: Terms of Use
-
MarkyB
- Minor Maniac
- Posts: 7845
- Joined: Thu Jan 25, 2007 3:18 pm
- Location: South East London
- MMOC Member: No
Re: Pick up Restoration (Part 2)
"Once you break something you will see how it was put together"
-
davidmiles
- Minor Legend
- Posts: 2731
- Joined: Mon Mar 23, 2009 4:54 pm
- Location: Sussex
- MMOC Member: No
Re: Pick up Restoration (Part 2)
One corner of my loft will now forever be linked with sir Alec Issigonis car design guru of the fourties and fifties. Actually on the plus side storing stuff up here out of the way, and covered (unlike in ther photo) to prevent them getting dusty over winter, will keep them out of the way and lessen the chance of Damage. Harry my ten year old son had already started to incorporate the drivers seat into his computer gaming console setup. I mean, whoever won Grand turismo, F1 or Need for Speed from the driving seat of a (original spec) Morris 1000.[frame] [/frame]
smile, you never know, you might be winning.[IMG]http://i67.tinypic.com/2ro3j37.jpg[/IMG]
-
davidmiles
- Minor Legend
- Posts: 2731
- Joined: Mon Mar 23, 2009 4:54 pm
- Location: Sussex
- MMOC Member: No
Re: Pick up Restoration (Part 2)
The original bits in the photo are battered and scruffy. But I do want to re fit them on the vehicle, they're far from perfect, but then again so is the truck. There are nos items out there in perfect condition that could replace these, but somehow it only seems right to replace items that are missing with new bits. Before I start my general re spray,these bits are going into a nice new, clean shoebox and they're joining the spare rims, seats and windscreen in the loft.[frame] [/frame]
smile, you never know, you might be winning.[IMG]http://i67.tinypic.com/2ro3j37.jpg[/IMG]
-
davidmiles
- Minor Legend
- Posts: 2731
- Joined: Mon Mar 23, 2009 4:54 pm
- Location: Sussex
- MMOC Member: No
Re: Pick up Restoration (Part 2)
After some tapping and then banging with a block of timber and a mallet, lessons learnt from a eastern european car factory, (thanks Marky) I managed to refit the radiator panel in behind the fitted front panel. I measured a length of timber to fit in between the inner wings and tamped this down toward the front panel teasing apart the front inner wings. It worked rather well. The top bolt was passed through up by a rod passed through the lower bolt hole to line them up.[frame] [/frame]
smile, you never know, you might be winning.[IMG]http://i67.tinypic.com/2ro3j37.jpg[/IMG]
-
davidmiles
- Minor Legend
- Posts: 2731
- Joined: Mon Mar 23, 2009 4:54 pm
- Location: Sussex
- MMOC Member: No
Re: Pick up Restoration (Part 2)
nearly there, just a slight catching at the ends of the bonnet where the new panel joint needs a little bit of gentle filing to smooth it. Looking at the front there, the radiator panel jutts down a way, could this mean I have a custom or at least non-standard radiator panel?
[frame] [/frame]
[frame]
smile, you never know, you might be winning.[IMG]http://i67.tinypic.com/2ro3j37.jpg[/IMG]
-
mmjosh
- Minor Legend
- Posts: 1066
- Joined: Tue Apr 14, 2009 8:51 am
- Location: Atherstone,Warwickshire
- MMOC Member: No
Re: Pick up Restoration (Part 2)
yes looking at it as it sesms loads out i would just chop it to the shape of the bottom grille panel
-
chickenjohn
- Minor Legend
- Posts: 4064
- Joined: Tue Dec 07, 2004 8:50 am
- Location: Margate, East Kent
- MMOC Member: No
Re: Pick up Restoration (Part 2)
Remove the front panel and bolt it to the Cowl (radiator ) panel, then offer up the cowl and front panels as a unit. Bolt one side to the inner wing, then with a gentle push out of the front part of the inner wings you can bolt the other side of the cowl panel to the inner wing. Inner wings will then be correctly spaced and the bonnet should fit.davidmiles wrote:After some tapping and then banging with a block of timber and a mallet, lessons learnt from a eastern european car factory, (thanks Marky) I managed to refit the radiator panel in behind the fitted front panel. I measured a length of timber to fit in between the inner wings and tamped this down toward the front panel teasing apart the front inner wings. It worked rather well. The top bolt was passed through up by a rod passed through the lower bolt hole to line them up.[frame]
No need at all to hit anything with a mallet and a block of wood!
It is hard to make out the detail in that picture, but is the Cowl panel low because you have the top bolt hole bolted through the lower of the two inner wing mounting holes?? It looks like there is a big gap between the bottom of the bonnet and the cowl panel. BTW, you should be doing the trial fitting with the three chrome pieces as well -including the chrome trim that bolts the front panel to the Cowl. It in not enough just to put nuts and bolts through the holes and hope for the best! That advice was from Jonothan who is sadly no longer allowed on this board.
Cheers John - all comments IMHO
- Come to this years Kent branches Hop rally! http://www.kenthop.co.uk
(check out the East Kent branch website http://www.ekmm.co.uk )


- Come to this years Kent branches Hop rally! http://www.kenthop.co.uk
(check out the East Kent branch website http://www.ekmm.co.uk )
-
davidmiles
- Minor Legend
- Posts: 2731
- Joined: Mon Mar 23, 2009 4:54 pm
- Location: Sussex
- MMOC Member: No
Re: Pick up Restoration (Part 2)
thanks for the advice Chickenjohn, the bolt holes line up in the correct order, Ive not bolted up the lower holes yet as I'm still making adjustments. Once I get the bonnet to fit nice and smoothly tommorrow I'm getting tyres fitted and the wheels on and I'm wheeling her out for some general view pictures. Then I can sand her down one last time, and get the garage cleaned, dusted & ready for the paint spraying.[frame] [/frame]
smile, you never know, you might be winning.[IMG]http://i67.tinypic.com/2ro3j37.jpg[/IMG]
-
davidmiles
- Minor Legend
- Posts: 2731
- Joined: Mon Mar 23, 2009 4:54 pm
- Location: Sussex
- MMOC Member: No
Re: Pick up Restoration (Part 2)
Josh I think you're right, I will profile the bottom of the panel with a cutting disc once its all settled in position. I hate to use the proverb "there's more than one way to skin a cat" cos I like my cat, but it really fits here, Ive got body parts made in several different factories and countries, she's a bit of a bassets allsorts. So I'm doing the best I can under my particular circumstances, but thanks all of you for any comments.
smile, you never know, you might be winning.[IMG]http://i67.tinypic.com/2ro3j37.jpg[/IMG]
-
chickenjohn
- Minor Legend
- Posts: 4064
- Joined: Tue Dec 07, 2004 8:50 am
- Location: Margate, East Kent
- MMOC Member: No
Re: Pick up Restoration (Part 2)
Yes, it does look like the cowl panel you have is of poor quality and is too long!
I would still strongly advise bolting on the hockey sticks and the chrome trim that holds the front panel to the radiatior before you start cutting any panels!
I would still strongly advise bolting on the hockey sticks and the chrome trim that holds the front panel to the radiatior before you start cutting any panels!
Cheers John - all comments IMHO
- Come to this years Kent branches Hop rally! http://www.kenthop.co.uk
(check out the East Kent branch website http://www.ekmm.co.uk )
- Come to this years Kent branches Hop rally! http://www.kenthop.co.uk
(check out the East Kent branch website http://www.ekmm.co.uk )
-
davidmiles
- Minor Legend
- Posts: 2731
- Joined: Mon Mar 23, 2009 4:54 pm
- Location: Sussex
- MMOC Member: No
Re: Pick up Restoration (Part 2)
with some final adjustments the bonnet sits properly and opens and closes smoothly, I can turn my attention to the...[frame] [/frame]
smile, you never know, you might be winning.[IMG]http://i67.tinypic.com/2ro3j37.jpg[/IMG]
-
davidmiles
- Minor Legend
- Posts: 2731
- Joined: Mon Mar 23, 2009 4:54 pm
- Location: Sussex
- MMOC Member: No
Re: Pick up Restoration (Part 2)
the tyres, ive borrowed this 155/65/14 from my local tyre centre to see if it looks proportionate to the wheel arch. Difficult to tell with the car on stands.
[frame] [/frame]
[frame]
smile, you never know, you might be winning.[IMG]http://i67.tinypic.com/2ro3j37.jpg[/IMG]
Re: Pick up Restoration (Part 2)
David
You could always jack up the wheel that side to get a better impression/ assessment.
( Just enough to lift the wheel not the whole car off the axle stands )
Bob
You could always jack up the wheel that side to get a better impression/ assessment.
( Just enough to lift the wheel not the whole car off the axle stands )
Bob
-
davidmiles
- Minor Legend
- Posts: 2731
- Joined: Mon Mar 23, 2009 4:54 pm
- Location: Sussex
- MMOC Member: No
Re: Pick up Restoration (Part 2)
Thanks Bob, I'll try that. Also up for consideration once again is my original pickup relic grill, looks mighty corroded doesn't it, In need of quite a lot of work, but as usual I don't want to give up on it.
[frame] [/frame]
[frame]
smile, you never know, you might be winning.[IMG]http://i67.tinypic.com/2ro3j37.jpg[/IMG]
-
davidmiles
- Minor Legend
- Posts: 2731
- Joined: Mon Mar 23, 2009 4:54 pm
- Location: Sussex
- MMOC Member: No
Re: Pick up Restoration (Part 2)
the rain is just pouring down today, picked up my specially mixed Smoke Grey ICI ref 3301 (got that ref from the well organised paint list, thanks Louise) I found a nice little shop in Hove East Sussex that specialize in Auto Paint, as per the shop title, they mixed me up 2 litres of my smoke grey and I also got some cellulose thinner, a can of cellulose grey primer, some paint filters. The Clarke HVLP spray gun and hose are from Machine Mart, top marks to them, they advised me the compressor I was intending to buy couldn't even provide enough wind to spray a pushbike frame, so I'm going to hire one. £60+vat for 5 days.[frame] [/frame]
smile, you never know, you might be winning.[IMG]http://i67.tinypic.com/2ro3j37.jpg[/IMG]
-
chickenjohn
- Minor Legend
- Posts: 4064
- Joined: Tue Dec 07, 2004 8:50 am
- Location: Margate, East Kent
- MMOC Member: No
Re: Pick up Restoration (Part 2)
Wait till a warm dry day before you spray cellulose.
Cheers John - all comments IMHO
- Come to this years Kent branches Hop rally! http://www.kenthop.co.uk
(check out the East Kent branch website http://www.ekmm.co.uk )
- Come to this years Kent branches Hop rally! http://www.kenthop.co.uk
(check out the East Kent branch website http://www.ekmm.co.uk )
-
MarkyB
- Minor Maniac
- Posts: 7845
- Joined: Thu Jan 25, 2007 3:18 pm
- Location: South East London
- MMOC Member: No
Re: Pick up Restoration (Part 2)
What cellulose thinners did you get?
My understanding is you can get grades from gun wash to high gloss or finishing thinners.
Someone who really knows about this stuff will be along shortly.
My understanding is you can get grades from gun wash to high gloss or finishing thinners.
Someone who really knows about this stuff will be along shortly.
"Once you break something you will see how it was put together"
-
davidmiles
- Minor Legend
- Posts: 2731
- Joined: Mon Mar 23, 2009 4:54 pm
- Location: Sussex
- MMOC Member: No
Re: Pick up Restoration (Part 2)
I got the one that was recommended to me in the shop, its universal fast thinners, 35-209 by pro sprey finishing. any recommendations? I typed in OMI CRON 35-209 into my search engine and it came up with Autopaints Brighton website, it says this product can be used for most solvent based products and can be used for 2 pack. Now that worries me, I'm not doing 2 pack cos of the health issues, so is this the wrong thinner for me to use with cellulose paints?
smile, you never know, you might be winning.[IMG]http://i67.tinypic.com/2ro3j37.jpg[/IMG]
-
ptitterington

- Minor Fan
- Posts: 391
- Joined: Thu May 12, 2005 9:59 pm
- Location: Jersey Channel Islands
- MMOC Member: No
Re: Pick up Restoration (Part 2)
I would say 2l is not going to go very far. When I sprayed the 2 door I used 5l and afterwards wished I had put a lot more paint on. I am sure I read here folk putting 12 coats on.
I am sure a good painter will be along to advise, all the hard work is in the preparation. priming sanding, filling sanding prining, sanding filling and even when you think it is perfect the tiniest blemish, pit will show up after you top coat it with the colour.
Lots of cost involved with wet and dry papers, tack cloths, thinners different fillers its a long list.
It is worth doing yourself, just to appreciate how good the pros are that can a proper job.
Traveller rebuilt in 2007 by Charles Ware's Morris Minor Centre
Pickup Fully restored 2011 by Rich Legg

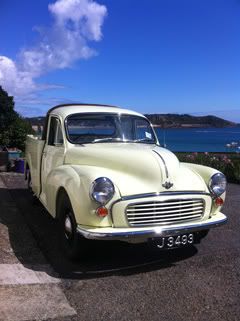
http://WWW.minor1000.com
http://www.morrisowners.co.uk/

Pickup Fully restored 2011 by Rich Legg
http://WWW.minor1000.com
http://www.morrisowners.co.uk/
-
davidmiles
- Minor Legend
- Posts: 2731
- Joined: Mon Mar 23, 2009 4:54 pm
- Location: Sussex
- MMOC Member: No
Re: Pick up Restoration (Part 2)
but am I using the right thinner?
smile, you never know, you might be winning.[IMG]http://i67.tinypic.com/2ro3j37.jpg[/IMG]