Traveller restoration

Let us all know what you are up to with your current restoration project. Get that Minor on the road!
Forum rules
By using this site, you agree to our rules. Please see: Terms of Use
pegasus
Minor Fan
Posts: 101
Joined: Fri Oct 03, 2008 6:04 pm
Location: wednesbury
MMOC Member: No

Post by pegasus »

Today the cab got its top coat<br>Image<br><br>Image<br><br>Image<br><br>Image<br><br>Image<br><br>Image<br>
Then it rained :evil: but at least the paint was hard enough to withstand it
I will put some more pictures on soon.
pegasus
Minor Fan
Posts: 101
Joined: Fri Oct 03, 2008 6:04 pm
Location: wednesbury
MMOC Member: No

Re: Traveller restoration

Post by pegasus »

I have notice that there is a new section for posts like this so if the site mods could move this post to there i would appreciate it.
Thanks
Its been a while since i did any work on my traveller as its been too wet and cold over the winter to work on the front garden, and then my daily driver died and i had to get a new car. But now the weather is getting better i am starting work again.
I treated and started to varnish the wood at the beginning of the winter but it got too cold to finish but its all done now. Its had 4 coats of cuprinol 5 star wood preserver and 5 coats of Le Tonkinois Varnish ( i like my wood to be shiny ) so here are some new pictures, i hope you like them.
mark
[frame]Image[/frame][frame]Image[/frame][frame]Image[/frame][frame]Image[/frame][frame]Image[/frame][frame]Image[/frame]
http://www.mig-welding.co.uk/forum/showthread.php?t=12994[url][/url]
pegasus
Minor Fan
Posts: 101
Joined: Fri Oct 03, 2008 6:04 pm
Location: wednesbury
MMOC Member: No

Re: Traveller restoration

Post by pegasus »

[frame]Image[/frame][frame]Image[/frame][frame]Image[/frame][frame]Image[/frame][frame]Image[/frame][frame]Image[/frame][frame]Image[/frame]
http://www.mig-welding.co.uk/forum/showthread.php?t=12994[url][/url]
bmcecosse
Minor Maniac
Posts: 46561
Joined: Wed Feb 16, 2005 11:24 pm
Location: ML9
MMOC Member: No

Re: Traveller restoration

Post by bmcecosse »

Excellent! Very shineeeeeeeeeey.
ImageImage
Image
RobMoore
Minor Addict
Posts: 511
Joined: Tue Mar 30, 2010 1:06 pm
Location: Peterlee Co Durham
MMOC Member: No

Re: Traveller restoration

Post by RobMoore »

Looking very bright clean and shiney. Impressive job you have done there.
Moggieless :(

Another great Moggy orientated Forum.
http://mog.myfreeforum.org/index.php
pegasus
Minor Fan
Posts: 101
Joined: Fri Oct 03, 2008 6:04 pm
Location: wednesbury
MMOC Member: No

Re: Traveller restoration

Post by pegasus »

Thank you, i have painted the new rear wings and side panels today so there should be more photos soon. next job is to trial fit the new 2nd hand drivers front wing. The old one looked in good condition but disintegrated when i removed it, i also found a bent inner wing which explains why the wing didnt fit very well. Thats straight now and i have a good condition original wing to try on it.
Will put new photos on as i get them.
All the best
Mark
http://www.mig-welding.co.uk/forum/showthread.php?t=12994[url][/url]
mmjosh
Minor Legend
Posts: 1066
Joined: Tue Apr 14, 2009 8:51 am
Location: Atherstone,Warwickshire
MMOC Member: No

Re: Traveller restoration

Post by mmjosh »

love the colour

AntB
Minor Fan
Posts: 133
Joined: Sat Feb 20, 2010 6:47 pm
MMOC Member: No

Re: Traveller restoration

Post by AntB »

amazing display of skill and craftsmanship. 10/10 !!!
Mike Shipman
Minor Fan
Posts: 475
Joined: Wed Feb 13, 2002 12:00 am
Location: New Forest, Hampshire.
MMOC Member: Yes

Re: Traveller restoration

Post by Mike Shipman »

Looks really great - wish I was able to do likewise!
Mike Shipman,
Seaton, Torpoint, Cornwall.
pegasus
Minor Fan
Posts: 101
Joined: Fri Oct 03, 2008 6:04 pm
Location: wednesbury
MMOC Member: No

Re: Traveller restoration

Post by pegasus »

Thanks for the encouragement guys.
I have now taken some photos of the newly painted panels, and while i was trying the fit of the front wing today i couldnt resist trying the one side on to see how it looked. I am waiting for some dum dum sealer to turn up then i can start fitting the sides on permanently.
Here are the rear doors with the varnishing finished, they had the same treatment as the sides.
[frame]Image[/frame]
Rear panel that fits behind the bumper[frame]Image[/frame]
Alloy side panels painted[frame]Image[/frame][frame]Image[/frame]
Near side rear wing[frame]Image[/frame]
Off side rear wing[frame]Image[/frame]
And the last 2 are of the side fitted just to see what it looked like.[frame]Image[/frame][frame]Image[/frame]
Thanks for looking
Mark
http://www.mig-welding.co.uk/forum/showthread.php?t=12994[url][/url]
polo2k
Minor Addict
Posts: 921
Joined: Fri Mar 28, 2003 9:40 pm
Location: Swindon-Shire
MMOC Member: No

Re: Traveller restoration

Post by polo2k »

Looking beautiful!
- Ash
  • [MONA] - 1963 4 door saloon
    [IGOR] - 1970 trav (In Surgery)
    [GOLFIE] - 2001 Golf GT TDi 200 (my daily "fix")
- The only way your guarenteed to fail, is never to try! -
Image Image Image
Click on the middle pic for progress!
pegasus
Minor Fan
Posts: 101
Joined: Fri Oct 03, 2008 6:04 pm
Location: wednesbury
MMOC Member: No

Re: Traveller restoration

Post by pegasus »

Not done anything for a few days as i had a small op on my foot and i am supposed to be resting it, but today has been nice weather and i can`t sit still while the car is in bits. I got the wooden sides on saturday and i had my op on Monday, today i secured everything down, fitted the roof supports and rear wings. The rear doors are just held in place with masking tape so i can make shure the frame is square.
Hope you enjoy the pictures.
Wooden sides fitted
[frame]Image[/frame]
o/side
[frame]Image[/frame][frame]Image[/frame]
rear doors held in place to square up the frame
[frame]Image[/frame]
n/side rear wing fitted and roof supports
[frame]Image[/frame][frame]Image[/frame]
n/side wing fitted[frame]Image[/frame]
Thats all i have for now, got to do a cam seal on my discovery tomorrow then i`ll start prepping the front wings.
Mark
http://www.mig-welding.co.uk/forum/showthread.php?t=12994[url][/url]
pegasus
Minor Fan
Posts: 101
Joined: Fri Oct 03, 2008 6:04 pm
Location: wednesbury
MMOC Member: No

Re: Traveller restoration

Post by pegasus »

Car turned around and a few more bits fitted,
n/side front wing painted, ready to be fitted
[frame]Image[/frame]
o/side front wing painted, (this was an original panel)[frame]Image[/frame]
Front panel (with holes that wernt supposed to be there)
[frame]Image[/frame]
Front panel undercoated
[frame]Image[/frame]
slam panel and inner front panel
[frame]Image[/frame]
front panel painted (notice in the background an original BL grille surround)
[frame]Image[/frame]
Front panel assembled
[frame]Image[/frame]
n/side door and front wing fitted
[frame]Image[/frame]
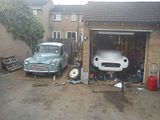
Both front wings fitted
[frame]Image[/frame]
Finally the front wings and front panel fitted
[frame]Image[/frame]
My Daughter has said he looks better now he has his smile back but will look even better when he has got his eyes.
Next job is to do the rear roof section.
http://www.mig-welding.co.uk/forum/showthread.php?t=12994[url][/url]
pegasus
Minor Fan
Posts: 101
Joined: Fri Oct 03, 2008 6:04 pm
Location: wednesbury
MMOC Member: No

Re: Traveller restoration

Post by pegasus »

Been getting on with the car so here are a few more pictures.[frame]Image[/frame]rear door panels fitted and rear roof section.[frame]Image[/frame]front lights and bumper fitted[frame]Image[/frame][frame]Image[/frame] parts to make new interior pillar cover[frame]Image[/frame] old cover and new one taking shape[frame]Image[/frame] new cover almost finished[frame]Image[/frame] old and new cover. I have since made all the other interior trim and should have photos soon. I have made them from oak and they look really nice now they are finished. i am currently fitting the side windows and felt runners.
More photos soon
Mark
http://www.mig-welding.co.uk/forum/showthread.php?t=12994[url][/url]
the-green-monkey
Minor Friendly
Posts: 87
Joined: Tue Jul 28, 2009 11:29 pm
Location: Consett, Co.Durham
MMOC Member: No

Re: Traveller restoration

Post by the-green-monkey »

Looks absolutely gorgeous, cant wait to get mine to this stage ;)
R.I.P Barry Morris, you may have been my first Moggy but you won't be my last.

SGTBILKO
Minor Fan
Posts: 236
Joined: Sat Sep 04, 2010 6:40 pm
Location: Somewhere in France
MMOC Member: No

Re: Traveller restoration

Post by SGTBILKO »

Great work and an inspiration to all![frame]Image[/frame]
williamraff
Minor Friendly
Posts: 82
Joined: Sun Jun 21, 2009 4:56 pm
Location: Otley (Leeds)
MMOC Member: No

Re: Traveller restoration

Post by williamraff »

Excellent quality and very well documented, a lot of hard work there and it shows - well done !
Will :) .
MarkyB
Minor Maniac
Posts: 7845
Joined: Thu Jan 25, 2007 3:18 pm
Location: South East London
MMOC Member: No

Re: Traveller restoration

Post by MarkyB »

Oak should last very well, isn't that what half timbered houses use?

"Once you break something you will see how it was put together"
pegasus
Minor Fan
Posts: 101
Joined: Fri Oct 03, 2008 6:04 pm
Location: wednesbury
MMOC Member: No

Re: Traveller restoration

Post by pegasus »

Thanks for the encouraging comments. I dont know about the half timbered houses but the oak looks nice in the car. I have some mahogany too, wonder what that will look like :wink: .
Back to the work, i had a load of parts turn up the other day so i can carry on (weather permitting). Sliding windows are in on the drivers side and one is in on the passenger side. So i will have some more photos very soon.
Mark
http://www.mig-welding.co.uk/forum/showthread.php?t=12994[url][/url]
oldromrider
Minor Friendly
Posts: 18
Joined: Tue Jan 06, 2009 12:35 pm
Location: Washington
MMOC Member: No

Re: Traveller restoration

Post by oldromrider »

I'm really pleased to have come across your restoration site. The photos really help not only as a guide to fitting but to encourage the likes of me to keep going. Must be a huge lift once you begin laying on paint.
Nice job, keep the photos coming.
Post Reply